

This article was created in line with Trends Oraa’s research and content standards.
Your garage is a disaster — and honestly? You’re not alone. Most people open that door and immediately close it again.
But here’s the thing: a few smart garage organization ideas can turn that chaotic dumping ground into the most functional room in your entire house. And the best part? You don’t need to spend a fortune or hire anyone to do it.
In this post, I’m sharing 10 genius garage organization ideas — complete with expert tips, honest breakdowns, and real reasons why each one actually works. By the time you hit the end of this list, you’re going to feel genuinely excited about tackling your garage. Let’s get into it.
You might also love our viral guide on apartment organization ideas — packed with budget-friendly storage solutions that work in any space.
Why Most Garages Stay a Mess (And How to Finally Fix It)
The problem isn’t that you’re lazy or disorganized. The problem is that most garages are set up to fail from the start. There’s no system, no dedicated zones, and no real storage that takes advantage of vertical space.
Once you see the ideas below, you’ll realize how much untapped potential is hiding in those walls, ceilings, and corners. Keep reading — because idea #4 is the one that changed everything for me.
The Garage Organization Budget Breakdown: What to Expect
Before we dive into the ideas, let me give you a real-world budget picture. One of the biggest mistakes people make is assuming garage organization has to cost thousands of dollars. It doesn’t.
Budget Tier: Under $100
This is the “just get started” zone. For less than a hundred dollars, you can:
- Install basic wall hooks and a pegboard panel
- Pick up a few stackable plastic bins with labels
- Add a simple freestanding shelving unit
- Grab a set of bungee cords and a wall-mount bike hook
This tier works great if your garage is relatively small or you’re renting and can’t make permanent changes.
Mid-Range Tier: $100–$500
This is where most homeowners land and where you’ll see the biggest transformation. In this range, you can invest in:
- A full pegboard wall system with interchangeable hooks
- Heavy-duty metal shelving units that hold up to 1,000 lbs
- A wall-mounted fold-down workbench
- Overhead ceiling storage racks for seasonal bins
- A rolling tool chest with locking drawers
Premium Tier: $500–$2,000+
If you’re ready to go all in, this tier is where your garage becomes something people actually brag about. Think modular cabinet systems, custom-built workbenches, slat wall panels with accessories, and epoxy-coated floors that make the whole space feel like a showroom.
My honest recommendation? Start in the mid-range. Focus on one wall at a time. You’ll get 80% of the results for 30% of the cost, and you can always upgrade later. A phased approach also means you’re less likely to feel overwhelmed and quit halfway through.
Now, avoid this mistake: jumping straight into buying organizers before you’ve decluttered. If you organize chaos, you just have organized chaos. Spend one weekend pulling everything out, donating what you don’t need, and grouping what’s left by category. Then shop for storage solutions.
Idea 1: Install a Full Pegboard Wall System
Imagine walking into your garage and seeing every single tool hanging neatly on a floor-to-ceiling pegboard wall, each one in its exact place, outlined in marker so you always know where it goes back. That’s what a well-executed pegboard wall actually looks like — and it’s completely achievable on a weekend.
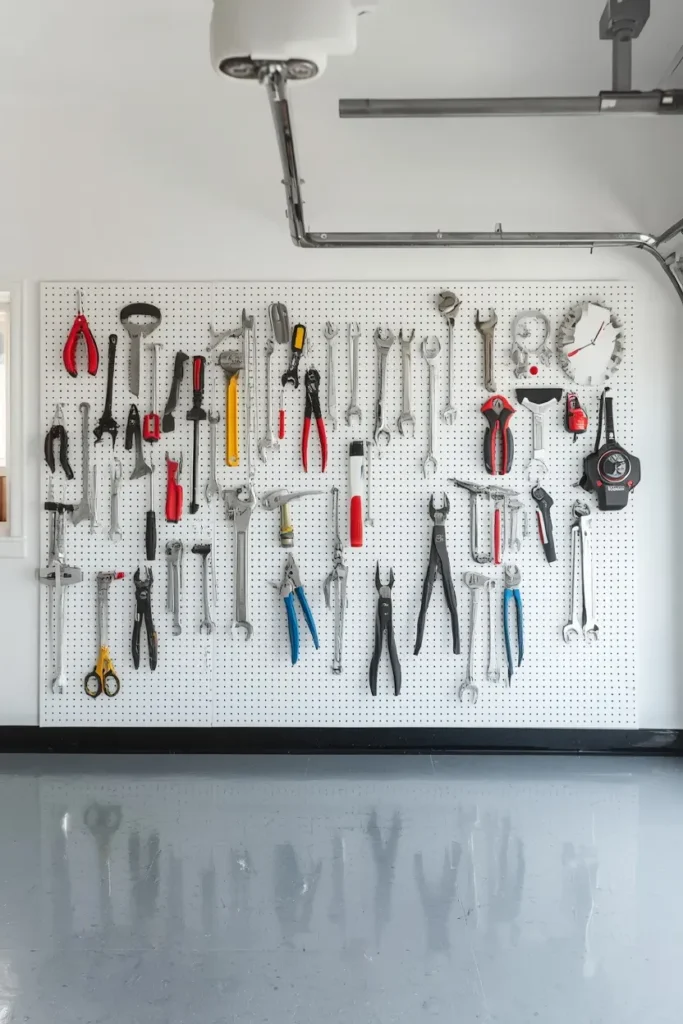
A pegboard system turns any blank wall into a fully customizable storage hub. The hooks, shelves, and bins that attach to it can be rearranged endlessly as your needs change, which means this investment grows with you instead of becoming obsolete.
Expert Tip: Don’t mount pegboard directly to the wall — space it out at least half an inch using wood furring strips behind it. This creates the clearance hooks need to actually slide in and out, which most beginners overlook and then wonder why their hooks keep falling.
Why it works: Pegboard keeps your most-used tools visible and within arm’s reach. No more digging through drawers or bins. Visual organization is faster, and when everything has a dedicated hook, putting things back actually becomes a habit instead of a chore. This single upgrade tends to cut the time people spend searching for tools by more than half.
Idea 2: Use Overhead Ceiling Racks for Seasonal Storage
Here’s where it gets interesting — most people forget to look up. The ceiling of a standard two-car garage contains hundreds of square feet of completely unused space, and a ceiling storage rack system turns all of that into prime real estate for bins, holiday decorations, camping gear, and anything else that only comes out a few times a year.
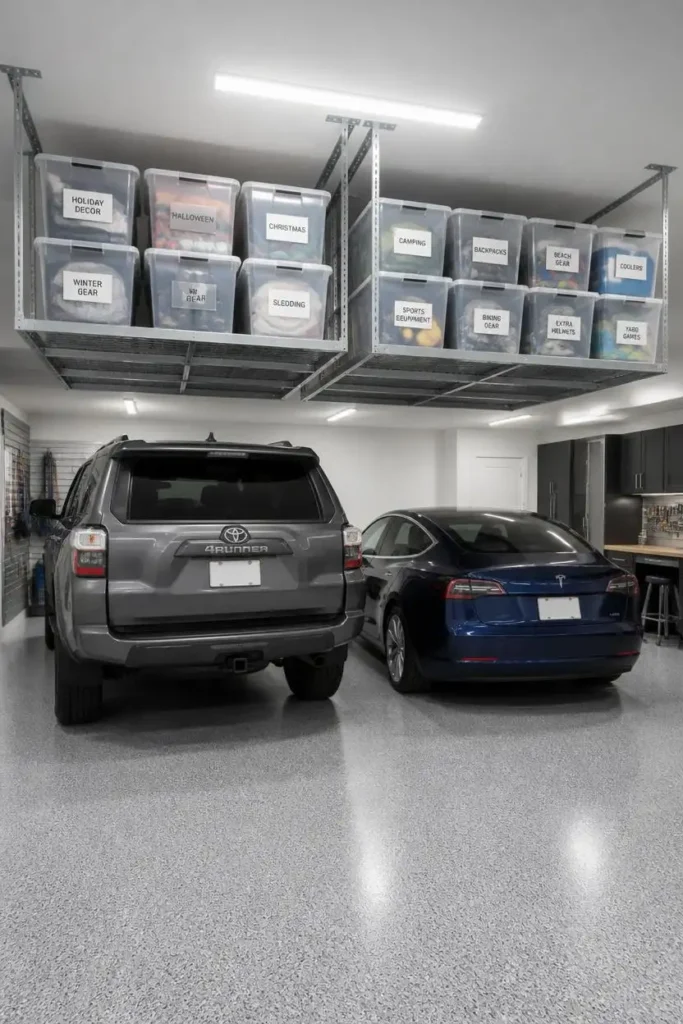
These racks typically hang from the ceiling joists using adjustable straps and can hold anywhere from 250 to 600 pounds depending on the model. You slide your labeled plastic bins up there and don’t think about them again until you need them.
Expert Tip: Measure the height of your car’s roof before buying. You’ll want at least 12 inches of clearance between the top of your vehicle and the bottom of the rack. Nothing is more annoying than realizing your truck doesn’t clear the storage you just installed.
Why it works: Getting seasonal items off the floor and walls frees up the ground-level and eye-level storage for things you actually use every day. It’s the ultimate “out of sight, out of mind” solution for bulky items, and once those bins are up there and labeled, it genuinely feels like they don’t even exist until you need them.
Which of these first two ideas excites you most — the pegboard wall or the ceiling racks? Drop it in the comments — I’d love to know which direction you’re going!
Idea 3: Create Dedicated Zones for Different Activities
Most people don’t know this, but the single most impactful thing you can do in a garage has nothing to do with buying storage products. It’s about zoning. When you assign a specific area for each category of activity — tools, sports gear, gardening, automotive supplies, workshop — everything else clicks into place naturally.
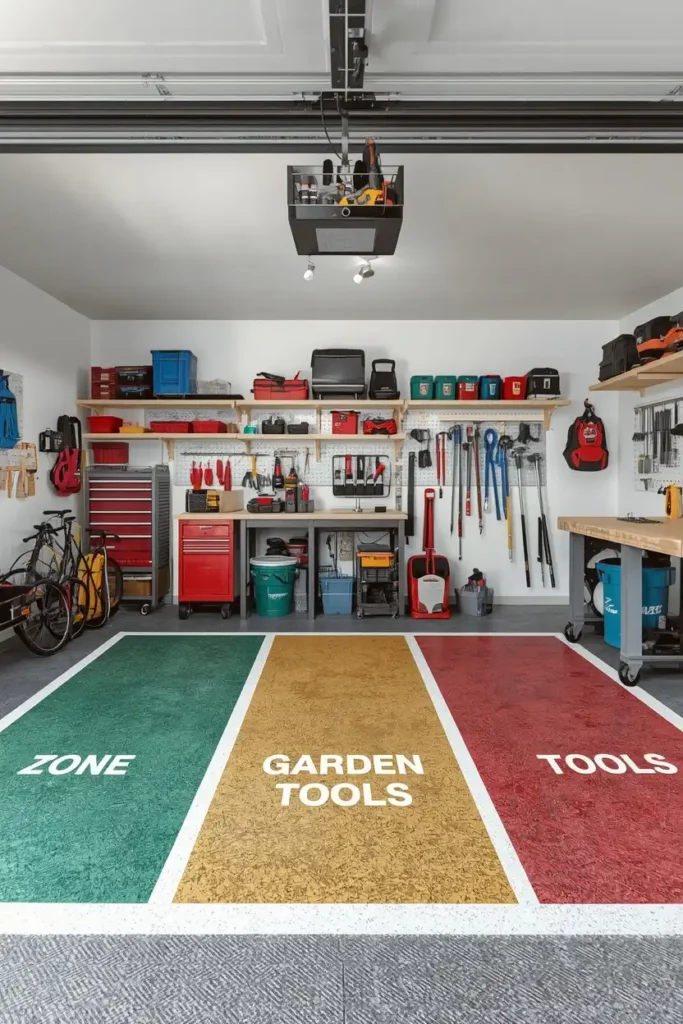
Think of it like organizing a kitchen. You wouldn’t keep your baking supplies next to your cleaning products. The same logic applies here. A dedicated sports zone near the door, a workshop zone along the back wall, and a gardening zone closest to the backyard will make your garage feel intuitive to use from the very first day.
Expert Tip: Use painter’s tape or even floor paint to mark out zones before you commit to any shelving or storage. Live with those zones for a week and see if the workflow actually makes sense for how your family uses the space. Then buy storage around what you mapped out — not the other way around.
Why it works: Zones eliminate the mental effort of deciding where something goes. When your kids know the soccer balls live in the sports zone by the door, they’re far more likely to put them back there. Zoning creates self-reinforcing habits, and that’s what makes a garage stay organized for years instead of months.
Idea 4: Add a Wall-Mounted Folding Workbench
This is the idea that changed everything for me, and I want you to really think about this one. A wall-mounted fold-down workbench gives you a full work surface when you need it and folds completely flat against the wall when you don’t. In a garage where floor space is precious, this is essentially a magic trick.
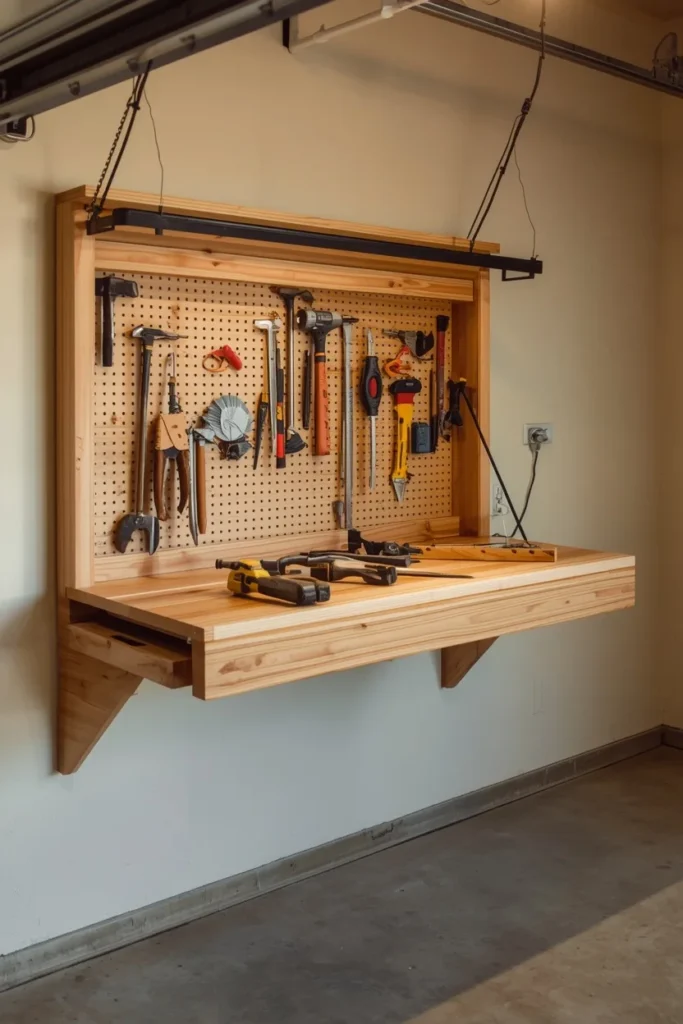
These benches are typically made from solid wood or laminate and mount on a heavy-duty piano hinge with fold-down legs for support. When folded up, they take up about four inches of wall depth — barely noticeable. When folded down, you have a solid, flat surface for projects, repairs, and assembly.
Expert Tip: Mount yours at 34 to 36 inches high — the standard standing work height for most adults. And place it near an outlet so you can plug in tools without dragging extension cords across the garage. Add a strip of pegboard above it and you’ve got a self-contained mini-workshop on a single wall.
Why it works: The biggest reason garages get cluttered is that people use horizontal surfaces as dumping grounds. A fold-down workbench is only there when you need it, which eliminates the temptation to pile things on it between projects. It’s purpose-built for working, and that single-purpose design actually keeps it cleaner by default.
But here’s the important part: don’t skip anchoring this bench into actual wall studs. A workbench that pulls away from the wall mid-project is both frustrating and dangerous. Use a stud finder, locate two solid studs, and use lag bolts — not drywall anchors — for the mount.
If you love smart storage solutions, you’ll also want to check out these genius IKEA hacks for keeping your whole home organized.
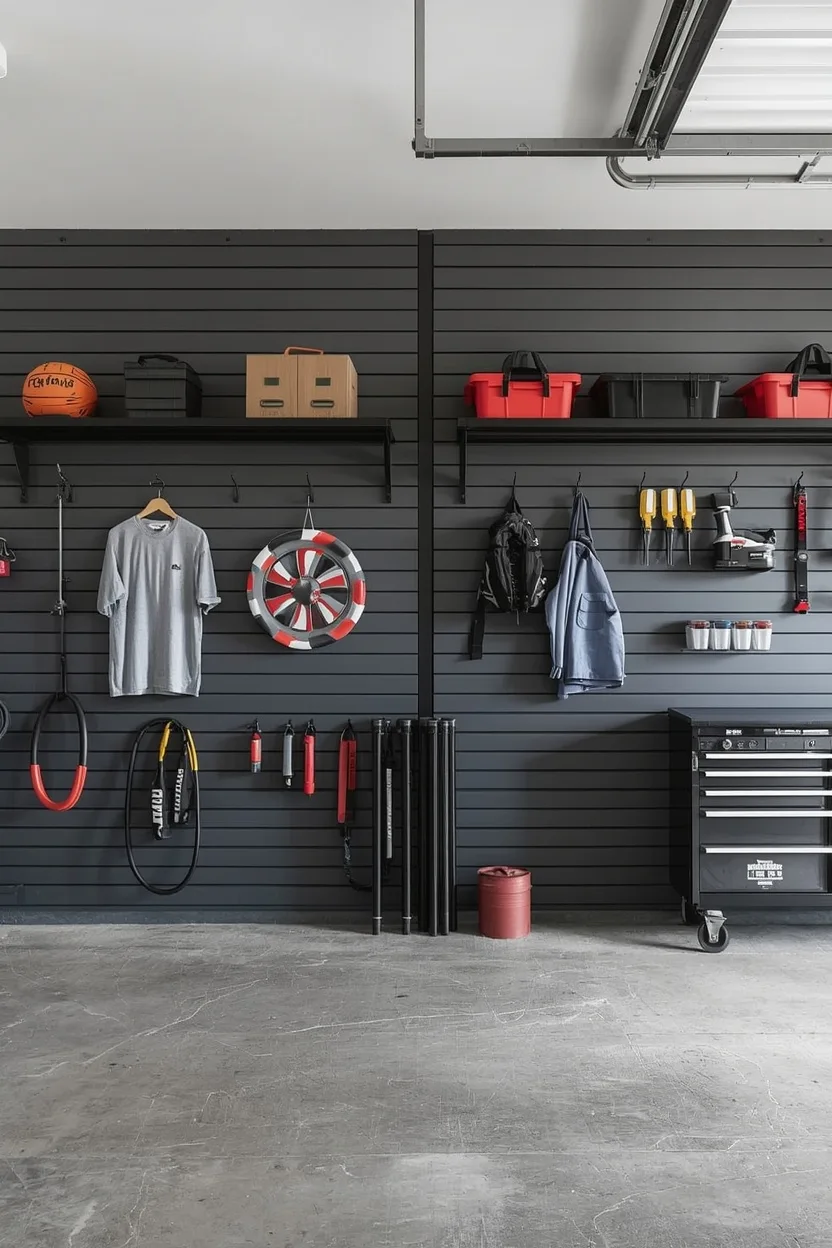
Idea 5: Install Slat Wall Panels for Flexible Storage
Slat wall panels are pegboard’s more polished, higher-capacity cousin, and if you’ve ever walked into a garage showroom or a well-organized workshop, slat wall is almost certainly what made you stop and say “wow.”

These panels consist of horizontal grooves into which you slide compatible hooks, shelves, bins, and holders. Unlike pegboard, slat wall panels are made from PVC or MDF and can support much heavier loads per hook. They also look significantly more finished and professional — if that matters to you.
Expert Tip: Stick to one brand’s ecosystem of accessories when starting out. Different manufacturers use slightly different groove dimensions, and mixing them leads to hooks that slip or don’t sit flush. Once you find a system you love, stick with it and expand over time.
Why it works: The flexibility of slat wall is its biggest selling point. You can rearrange accessories in seconds without any tools — just slide and click. That means your storage adapts to seasonal needs, new hobbies, and changing gear without you ever having to drill new holes or buy new hardware. It’s a genuinely future-proof investment.
Idea 6: Use Clear Stackable Bins with Printed Labels
This one sounds almost too simple — but the difference between labeled, clear bins and unmarked opaque totes is genuinely enormous. When you can see what’s inside a bin and read its label from across the garage, you actually use your storage system. When you can’t, everything gradually migrates back to the floor.
Uniform stackable bins also let you use vertical space on shelves far more efficiently. A set of matching 30-gallon bins stacked three high takes up the same floor footprint as one, and each one is completely accessible with a label system.
Expert Tip: Print your labels — don’t handwrite them. Printed labels are more legible, more durable, and when every bin has the same clean label style, the whole system looks intentional and organized instead of thrown together. A $30 label maker will pay for itself the first week.
Why it works: Visual transparency removes the friction of accessing storage. When you can see exactly where something is without opening every bin, you save time and you’re more likely to put things back in the right place. It’s a small psychological trick that has an outsized impact on whether the system actually holds up long-term.
Most people don’t know this — there are actually standard bin sizes that major shelf manufacturers design their shelves around. If you buy bins first, there’s a real chance they won’t stack cleanly or fit your shelves properly. Buy your shelving units first, then measure the shelf depth and height before buying bins to fit.
Idea 7: Mount a Bike Storage System on the Wall or Ceiling
Bikes are one of the single biggest space-wasters in a garage. Left on the floor, a pair of bikes can eat up eight to ten square feet of prime real estate. Moved to the wall or ceiling, they take up essentially zero floor space and your whole garage immediately feels twice as big.
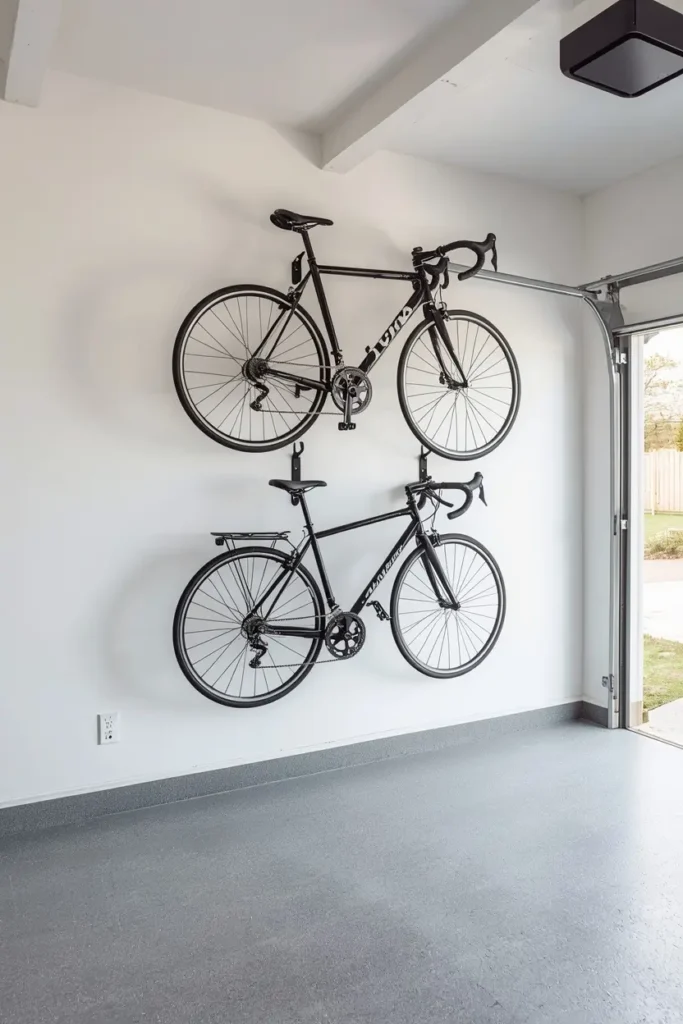
There are a few approaches here. Horizontal wall mounts hold bikes parallel to the wall and work well if you have the wall length. Vertical hooks hold bikes by one wheel and are more space-efficient but require you to lift the bike higher. Ceiling pulley systems hoist bikes all the way up to ceiling height, which is the most space-efficient option but requires a bit more physical effort to use.
Expert Tip: If you have kids’ bikes, avoid pulley systems — they’re hard for kids to operate independently. Opt for low horizontal hooks at kid height so they can access their own bikes without asking for help. It saves you a trip to the garage every single weekend morning.
Why it works: Bikes are a classic “blocking” item — they sit in the middle of the garage and force you to maneuver around them every time you’re trying to get to anything else. Once they’re off the floor, the spatial psychology of the whole garage shifts dramatically and movement through the space becomes effortless.
How many bikes are currently taking up floor space in your garage? One? Four? More than you want to admit? Tell me in the comments — and let me know which storage style you’re going with!
Idea 8: Add Heavy-Duty Metal Shelving Along the Back Wall
The back wall of most garages is its most underused asset. A row of heavy-duty metal shelving units — the kind with adjustable shelves rated for 800 to 1,000 pounds — turns that back wall into your garage’s primary storage spine and instantly gives every category of item a permanent, logical home.
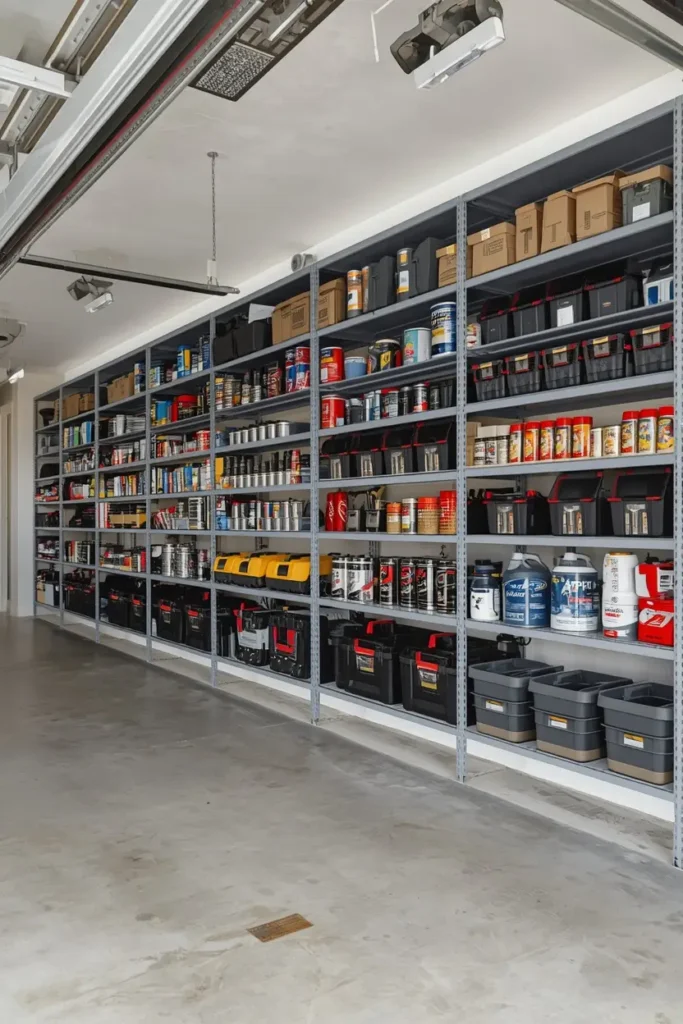
These units typically come in 72-inch height configurations that run nearly floor to ceiling, and because the shelves are adjustable, you can customize the spacing to fit everything from tall paint cans to short tool bins without wasting a single inch of vertical space.
Expert Tip: Bolt the units together side by side and anchor the last one to the wall. A row of connected shelving units is far more stable than individual free-standing ones, and in a garage where things get bumped and jostled regularly, that stability matters. Use earthquake safety straps as your anchoring hardware — they’re cheap and strong.
Why it works: Back-wall shelving creates a clear visual boundary for your storage zone, which psychologically separates the “working” part of your garage from the “storage” part. Once that separation exists, people stop sliding extra stuff into the working zone because the storage zone has clear capacity and clear organization. It’s one of those changes that makes everything else easier.
Idea 9: Set Up a Dedicated Garden and Lawn Tool Station
Garden tools are arguably the most awkwardly shaped, hardest-to-store items in a typical garage — and they usually end up leaning chaotically in a corner, falling over constantly, and creating a minor hazard every time you walk past them. A dedicated tool station solves all of that cleanly and elegantly.
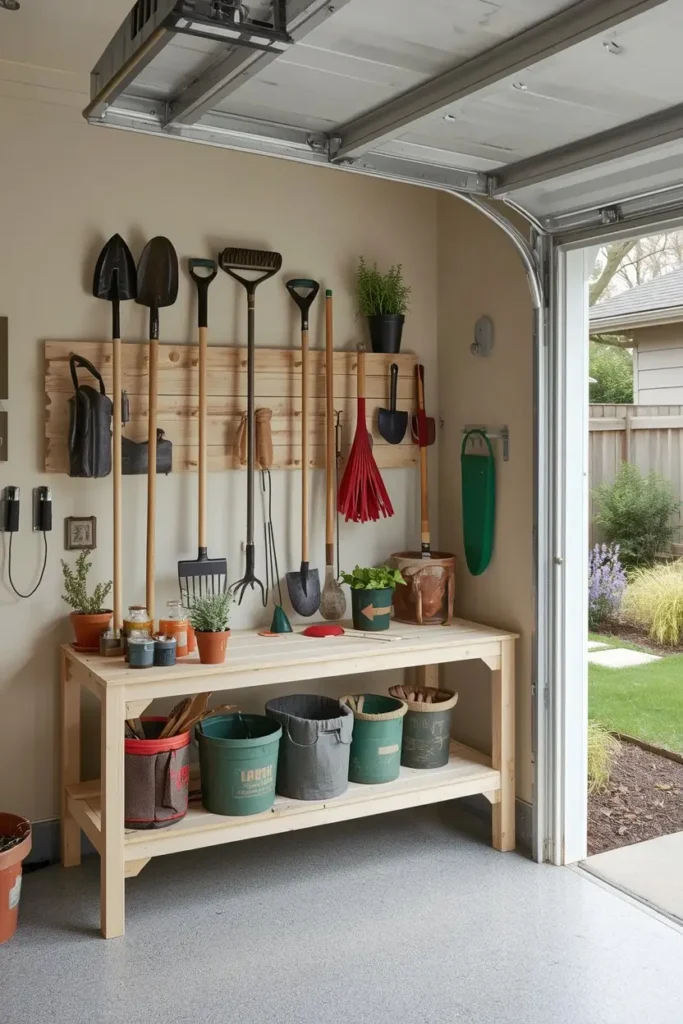
The classic approach is a wall-mounted tool organizer with individual slots for each long-handled tool — rakes, shovels, hoes, brooms — combined with a lower shelf or bin for smaller items like trowels, gloves, and plant ties. More polished versions incorporate a cabinet below for bagged fertilizer and soil amendments.
Expert Tip: Position your garden station closest to the door that leads to your yard — not the door that leads to the house. That one placement decision eliminates mud being tracked through the garage on the way in, and it creates a natural flow where tools get grabbed on the way out and hung back up on the way in.
Why it works: Long garden tools are a nightmare when they share space with other categories of items. They’re too tall for bins, too odd-shaped for shelves, and they inevitably fall into whatever is next to them. A dedicated station isolates them completely, which means the tools are organized and everything else nearby stays organized too.
Idea 10: Create a Command Center with a Bulletin Board and Charging Station
Here’s the idea most garage organization lists don’t include — and it might be the most genuinely life-changing one of the bunch. A small garage command center, tucked near the entry door to the house, pulls together a bulletin board for schedules and reminders, hooks for keys and bags, a small shelf for outgoing mail or packages, and a charging strip for devices.

It sounds small. But think about how much time is lost every day looking for keys, charging phones in different rooms, and trying to remember what needs to go out the door with you. Consolidating all of that into one spot near the exit you use every single day is remarkably effective.
Expert Tip: Mount this at eye level and keep it tight — maybe 24 inches wide and 36 inches tall maximum. The goal is a focused, dedicated spot, not another surface that gradually accumulates clutter. A small corkboard, three to four key hooks, and a single power strip is all you need to start.
Why it works: A command center works because it leverages existing behavior patterns. You already walk through this doorway every day. Adding a useful station to that exact spot means you’ll actually interact with it consistently. The small organizational behaviors it supports — hanging keys immediately, charging devices in one place, seeing the week’s schedule — add up to real time savings and a lot less daily stress.
Final Thoughts: Your Garage Transformation Starts Today
There’s something genuinely satisfying about a garage that works. Not just a garage that holds stuff — but one that makes your daily life smoother, your weekends more productive, and your home feel more pulled together overall.
Start with one idea. Just one. Whether it’s throwing up a pegboard wall this weekend or simply grabbing a label maker and a set of matching bins — any movement forward is the right move.
The garage you’ve always wanted is closer than you think, and honestly? It’s one of the most underrated home projects you can take on.
Ready to keep the organization momentum going? Check out our full guide on shed storage ideas for even more creative ways to maximize your outdoor storage space.
And if you found this post helpful, save it to your Pinterest boards so you can come back to it when you’re ready to tackle each idea. Your future organized self will thank you.