10 Patriotic Painted Rocks Ideas That Will Make Your Neighbors Stop and Stare
This article was created in line with Trends Oraa’s research and content standards.
You picked up a plain rock and thought, “I could make something beautiful with this.” But you’re not sure where to start — and you definitely don’t want it to look like a kid’s craft project.
Good news: you’re about to discover 10 patriotic painted rock ideas that are stunning, surprisingly beginner-friendly, and perfect for 4th of July, Memorial Day, or any day you want to add a little red, white, and blue to your porch.
And the best part? You only need a few dollars in supplies to pull off something that looks like it belongs in a boutique shop window.
You might also love our viral guide on 10 Easy Dollar Store 4th of July Decorations — perfect to pair with these painted rocks!
Let’s dive in. Trust me, by Idea #5 you’ll already be reaching for your paintbrush.
What You’ll Need Before You Start
Before we get into the actual ideas, let’s make sure you have the right setup. Nothing kills a craft session faster than realizing mid-project that you’re missing a key supply.
Here’s your quick starter list:
- Smooth river rocks or craft rocks (flat ones work best for detailed designs)
- Acrylic paint in red, white, and navy blue (plus black and gold for details)
- Mod Podge or clear sealant to weatherproof your finished rocks
- Fine-tip paint pens for lettering and details
- A sea sponge or old kitchen sponge for texture effects
- Small round brushes, flat brushes, and a liner brush
- Pencil or chalk for sketching your design before painting
Most of these can be found at your local dollar store or craft shop for under $15 total. We’ll talk more about budgeting in the deep dive section below — so keep scrolling.
10 Patriotic Painted Rock Ideas
1. Classic American Flag Rock
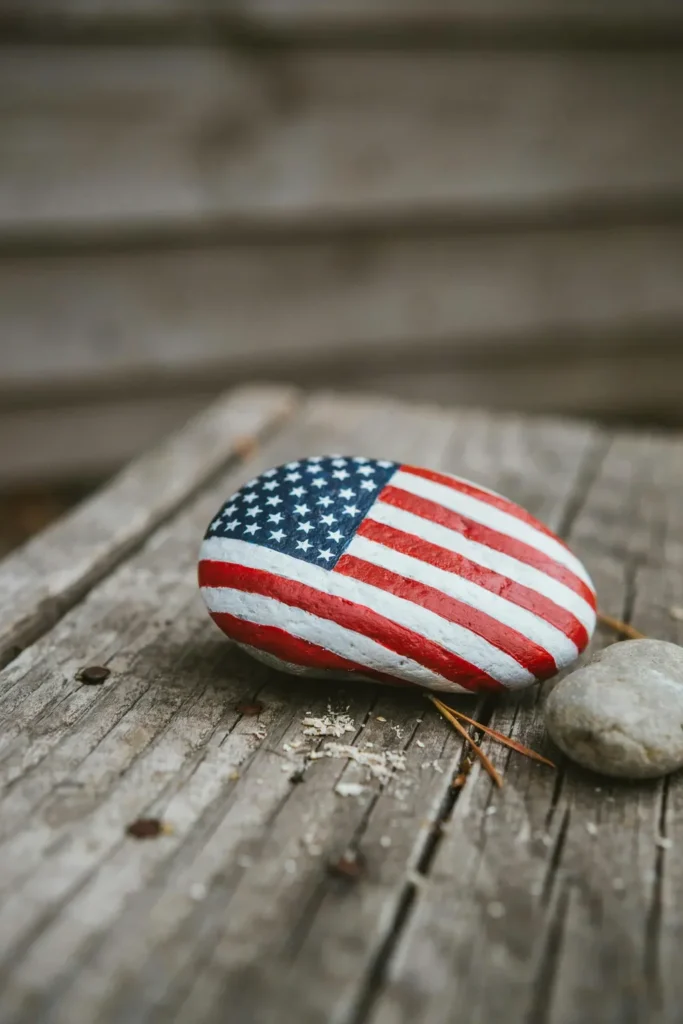
What you’re seeing: A smooth, medium-sized oval rock painted to look like a miniature American flag. The stripes are crisp alternating red and white bands, with a navy blue canton in the upper left corner filled with tiny white stars. The edges have a thin white border that makes the whole design pop.
This one is the cornerstone of any patriotic rock collection — and it’s more doable than it looks.
How to get this look: Start with two coats of white paint as your base. Once dry, use painter’s tape to section off your stripe areas. Paint every other stripe red, remove the tape carefully, and you’ll have perfectly clean lines. For the blue canton, use a square of masking tape as a guide, then dot on stars with the eraser end of a pencil dipped in white paint.
Expert Tip: Always let each layer dry completely before adding the next. Rushing this step is the number one reason flag rocks look blurry or muddy. Give each layer at least 20–30 minutes before moving on.
Why it works: The flag design is instantly recognizable and deeply emotional for most Americans. Placed near a front door or in a garden bed, it sends a clear, warm message of pride without being over-the-top. The color contrast of red, white, and navy is high-impact and visually satisfying.
Which of these styles is your favorite so far — bold and graphic like the flag, or something more intricate? Tell me in the comments below!
2. Gold Star Military Tribute Rock
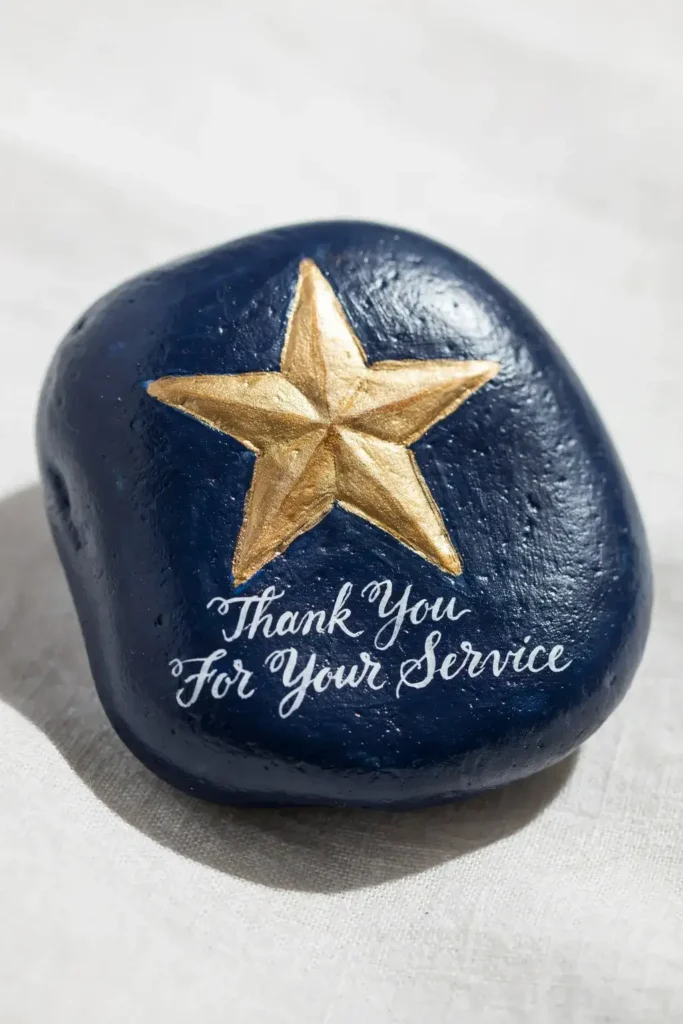
What you’re seeing: A deep navy blue rock with a single, large gold star painted in the center. Below the star, in elegant white lettering, are the words “Thank You For Your Service.” The rock is sealed with a glossy finish that makes the gold shimmer in outdoor light.
This design carries real emotional weight, and it’s incredibly meaningful when given as a gift to a veteran or military family.
How to get this look: Paint the rock navy blue and let it dry fully. Use a star stencil (you can cut one from cardstock) or carefully freehand a five-pointed star in gold metallic paint. Once dry, use a fine-tip white paint pen to add your lettering. Go slowly with the pen — the key is light, consistent pressure.
Expert Tip: Metallic gold paint tends to look dull on the first coat. Always do two thin layers of gold rather than one thick one. This gives you that rich, luminous finish that looks truly professional.
Why it works: Simple designs with a single focal point photograph beautifully — which means they perform amazingly on Pinterest and Instagram. Emotionally loaded visuals like a gold star on navy blue tap into deep patriotic feelings. This rock will never look dated.
But here’s the important part — this rock also makes one of the most touching handmade gifts you can give to someone who has served. If you know a veteran, consider making this for them. It costs almost nothing and means everything.
3. Firework Burst Rock
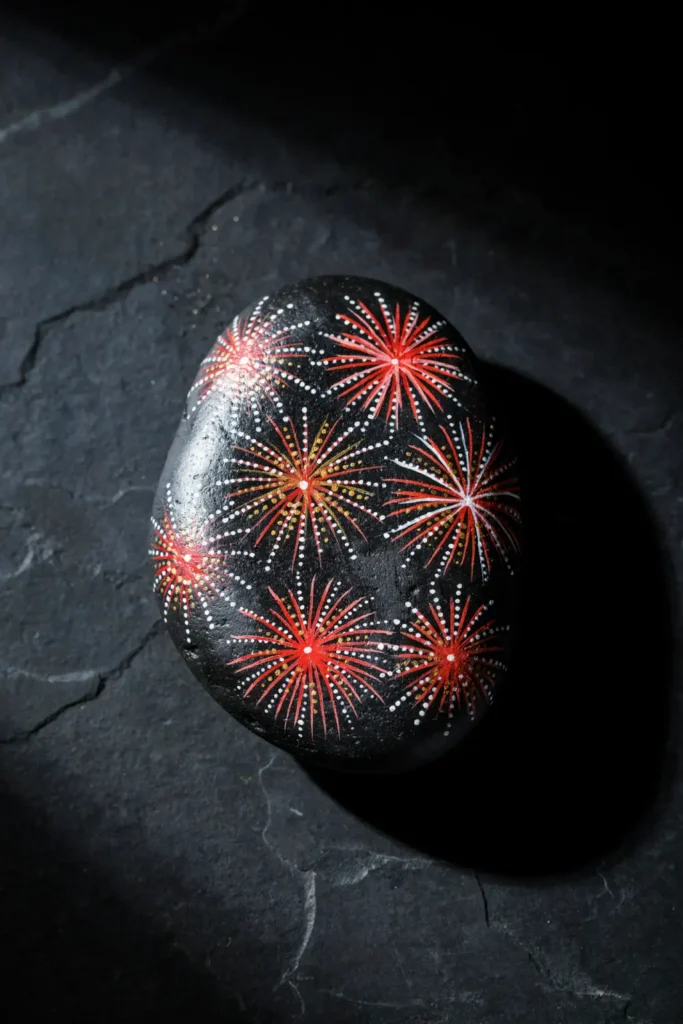
What you’re seeing: A black-painted rock covered in explosive, multi-burst firework designs in red, white, and gold. Each firework is made of radiating dotted lines — thin streaks of paint that fan out from a central point like real fireworks exploding in the night sky. Several “bursts” overlap for a layered, dynamic effect.
This is one of the most fun and forgiving designs on the list because the irregular, free-form style makes it nearly impossible to mess up.
How to get this look: Paint the rock black first (your “night sky”). Then load a liner brush with bright red, white, or gold paint and drag thin lines outward from a center point. The lines don’t have to be perfect — in fact, slightly wobbly lines look more realistic. Add tiny dots at the ends of each line to mimic the “burst” at the tip of a firework.
Expert Tip: Use a toothpick dipped in paint for the tiniest detail dots. You’ll get much more control than with a brush for this step.
Why it works: The black background creates dramatic contrast that makes the red, white, and gold pop brilliantly. These rocks look gorgeous in groups of three or five, arranged in a cluster near a front step or garden border. They also photograph stunningly against green grass.
4. Sunflower & Stars Garden Rock
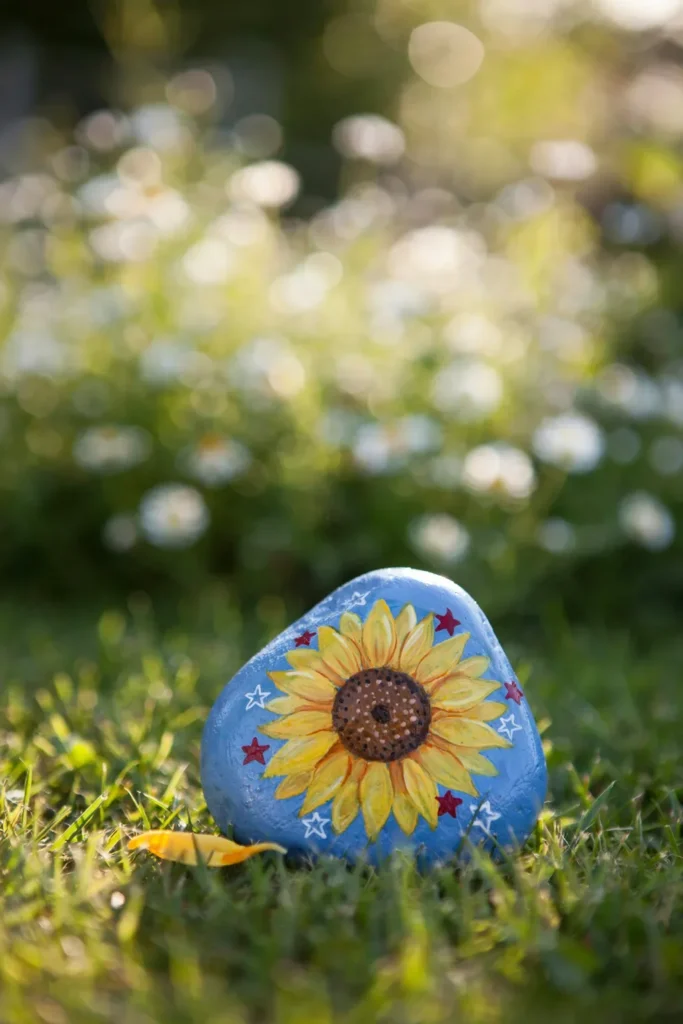
What you’re seeing: A cheerful painted rock featuring a bright yellow sunflower with a deep brown center, surrounded by red and white stars. The background is painted sky blue, giving the whole piece a summer-garden feel. It’s patriotic but soft — the kind of design that works as decor even after the holiday is over.
How to get this look: Paint the background sky blue. Add your sunflower in yellow — a circle center with petal-shaped strokes radiating outward. Once dry, fill the center brown. Scatter five-pointed stars in red and white around the sunflower using a star stamp or careful freehand.
Expert Tip: Add a thin white outline around the stars to make them stand out against the blue background. A white pen works perfectly for this outline step.
Why it works: Not everyone wants purely flag-themed decor, and this design bridges the gap beautifully. It says “patriotic” while also feeling like everyday garden art. This is the rock your neighbors will ask about. If you love garden crafts, check out our guide on Vintage Garden Decor Ideas for more inspiration!
Most people don’t know this — sunflower designs are among the top-performing painted rock images on Pinterest because they appeal to both craft lovers and garden enthusiasts at once.
5. Bald Eagle Statement Rock
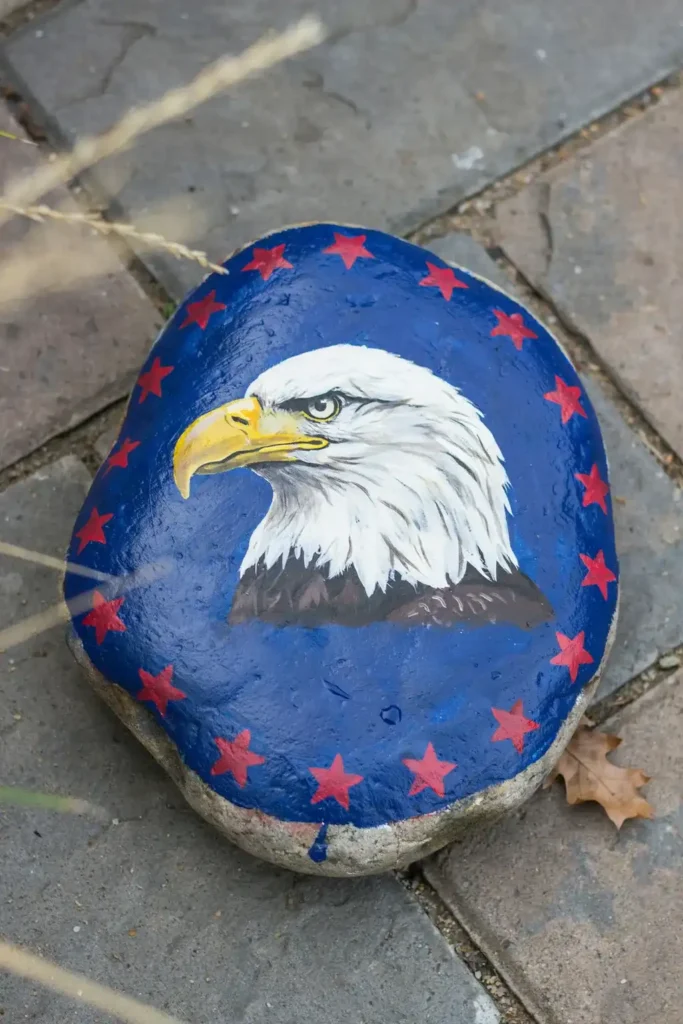
What you’re seeing: A large, flat rock painted with a bold bald eagle head in profile. The eagle features a stark white head, intense yellow beak, and piercing eye, set against a royal blue background. Small red stars are dotted around the edges of the rock.
This is a more advanced design, but I promise — the step-by-step approach makes it manageable even for beginners.
How to get this look: Start with a royal blue background. Lightly sketch the eagle’s head in pencil. Paint the head shape in white, then add brown and gray feather texture using a dry brush technique (minimal paint on the bristles, light dragging strokes). The beak is yellow-orange. The eye is a small black circle with a tiny white highlight dot. Add the red stars around the border with a pencil-eraser stamp.
Expert Tip: The dry brush technique is your best friend for eagle feathers. Load your brush with paint, wipe most of it off on a paper towel, then lightly stroke over the white area to build feather texture gradually.
Why it works: Eagles are the ultimate symbol of American patriotism. A well-executed eagle rock becomes a genuine conversation piece. It looks intentional and artistic — not like a mass-produced garden ornament.
Here’s where it gets interesting — large statement rocks like this one work beautifully as focal points in a garden display, flanked by smaller flag and star rocks on either side.
Deep Dive: Your Complete Supply Buying Guide & Budget Breakdown
Before we continue with the remaining five ideas, let’s talk money — because one of the best things about painted rocks is how incredibly affordable this hobby is.
Budget Tier 1: Dollar Store Starter ($5–$10 total)
If you’re brand new to painted rocks, you can literally start with dollar store supplies:
- Dollar store acrylic paint sets (usually 6–8 colors for $1–$2)
- A cheap brush set ($1–$2)
- River rocks from your backyard or a local park (free!)
- Dollar store Mod Podge alternative for sealing ($1–$2)
Total spend: roughly $5–$8
This won’t give you professional results, but it will let you practice and figure out which designs you enjoy before investing more.
Budget Tier 2: Craft Store Quality ($15–$25 total)
This is the sweet spot for most hobbyists:
- DecoArt Americana or Folk Art acrylics — about $1.50–$2 per bottle, and you only need 6–8 colors
- A basic brush set from Michaels or Joann — $5–$8 for a 10-piece set
- Smooth craft rocks from Amazon — a bag of 20–30 rocks runs $8–$12
- Mod Podge Outdoor formula — $6–$8, lasts for dozens of rocks
Total spend: roughly $20–$30
At this tier, your results will look genuinely beautiful and hold up outdoors.
Budget Tier 3: Premium Setup ($40–$60 one-time investment)
If you’re planning to sell at craft fairs, give as gifts regularly, or just want the absolute best results:
- Liquitex Basics or Golden Heavy Body acrylics — richer pigments, smoother coverage
- Molotow or Posca paint pens for lettering and fine details (game-changer)
- Glossy and matte spray sealer for different finish effects
- A lightbox or lamp for tracing star patterns and lettering
Total spend: $40–$60 one-time, then minimal refills
Pros & Cons of Painted Rocks as a Hobby
Pros:
- Extremely low startup cost
- Relaxing and meditative — great stress relief
- Finished pieces make meaningful gifts
- Rocks are free or nearly free in most areas
- Designs photograph beautifully for social media
- No drying time between sessions if you seal as you go
Cons:
- Smooth, flat rocks can be hard to find in some areas
- Outdoor rocks need to be resealed every season or two
- Fine detail work has a learning curve
- Acrylic paint can dry on brushes fast in hot weather
- Colors may look different once sealed (test on a scrap rock first)
Overall? The pros massively outweigh the cons. This is one of those crafts that gives back far more than you put in.
Now, avoid this mistake — don’t skip the sealant step thinking your rocks will be fine indoors. Even for indoor display, a clear coat of Mod Podge protects the paint from chipping and keeps your colors vibrant for years.
6. Rustic Whitewash Flag Rock
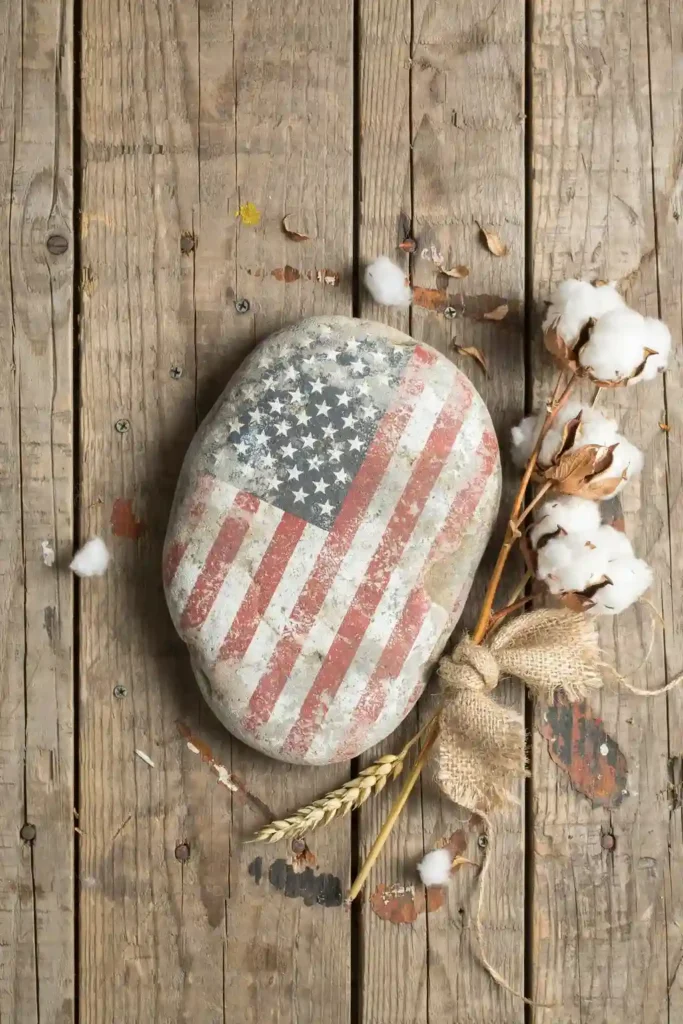
What you’re seeing: A large, flat rock with a distressed, whitewashed American flag painted across its entire surface. The design has a vintage, weathered quality — almost like a flag that’s been in the sun for decades. The red, white, and blue have a deliberately faded, chalky look that feels more like farmhouse decor than a craft project.
How to get this look: Paint your base colors as normal (red stripes, white stripes, navy canton). Once dry, mix a tiny amount of white paint into a lot of water to create a thin wash. Brush this diluted white paint loosely over the entire rock and wipe off with a cloth before it dries completely. The wash settles into the texture of the rock, giving that instant aged, rustic feel.
Expert Tip: Do the whitewash step in sections rather than all at once. Apply to a small area, wipe back, then move to the next section. This gives you more control over how much “aging” you achieve.
Why it works: The farmhouse and rustic decor aesthetic is consistently one of the top-performing niches on Pinterest. This design bridges patriotic and farmhouse styles perfectly — which means it appeals to a much wider audience and gets repinned far more often than a standard flag rock.
7. Red, White & Blue Mandala Rock
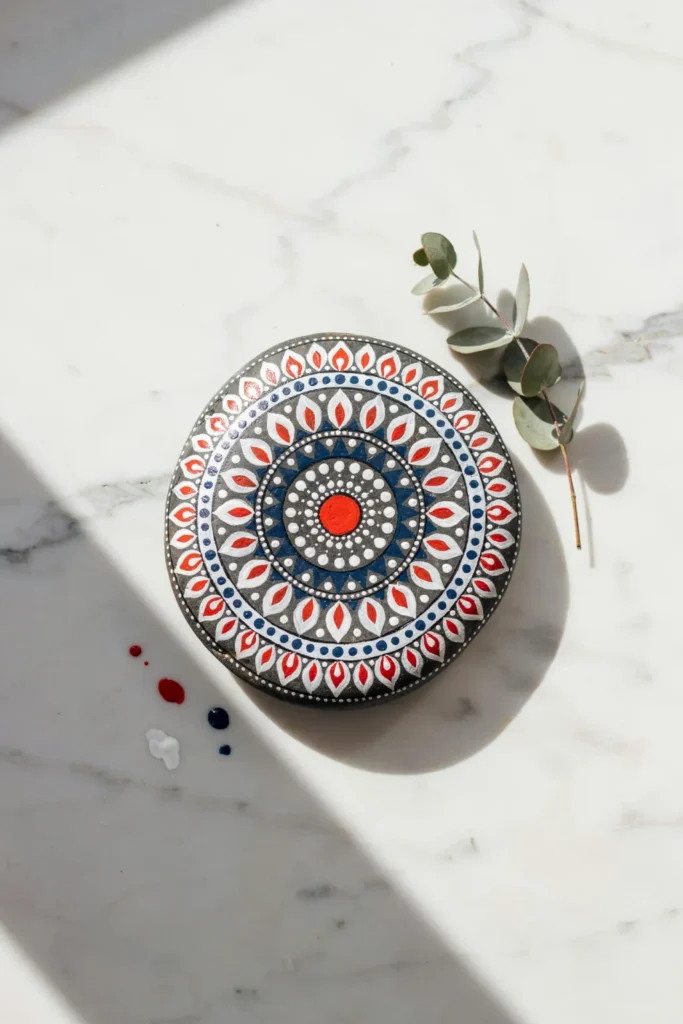
What you’re seeing: A round, smooth rock covered in an intricate mandala design using only red, white, and navy blue. Concentric circles radiate from the center, filled with dots, petal shapes, and geometric patterns — all in patriotic colors. It looks like jewelry you’d find at an art fair.
How to get this look: You don’t need to be a mandala artist to pull this off. Start with a center dot in white. Working outward in concentric circles, add rings of dots using the tip of a toothpick dipped in paint. Alternate red and white dots, then add a ring of navy. Keep building outward, adding different-sized dots and small petal shapes as you go.
Expert Tip: Use dotting tools if you have them, but toothpicks and pencil erasers work just as well. The key is consistency — try to keep your dots the same size within each ring for a polished look.
Why it works: Mandala rocks are the most-shared painted rock style on Pinterest year-round. Making them in patriotic colors gives you a design that’s both trendy and holiday-appropriate — which dramatically extends the seasons when this image will get saves and clicks.
Are you more drawn to the bold graphic styles (flag, eagle) or the detailed decorative ones (mandala, fireworks)? Drop a comment — I’m curious which team you’re on!
8. “Home of the Brave” Lettering Rock
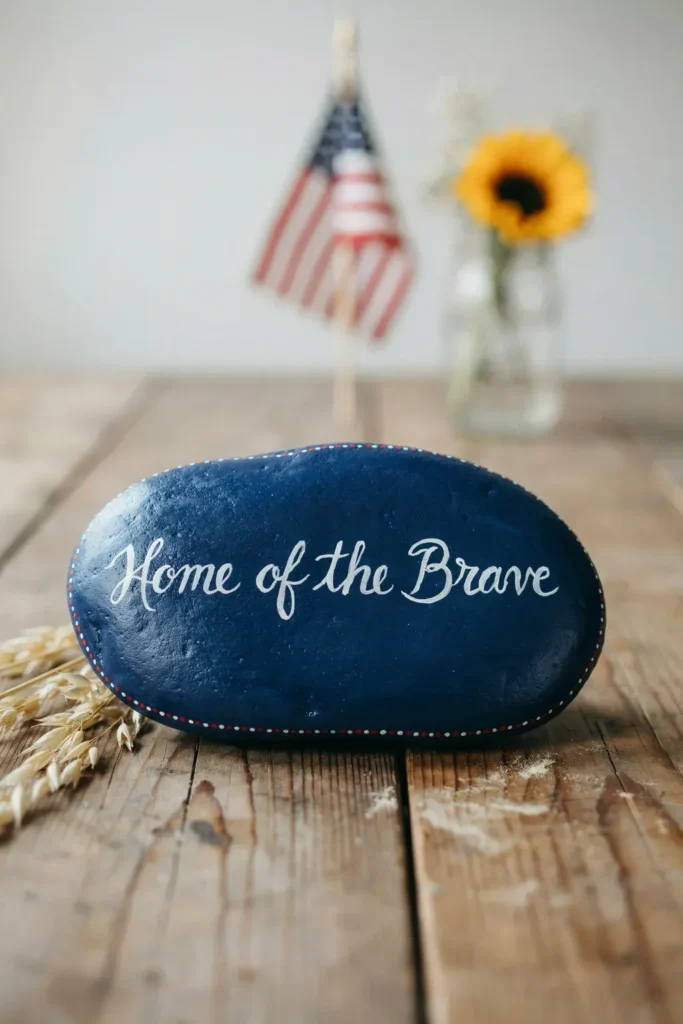
What you’re seeing: A large, flat oval rock with the phrase “Home of the Brave” painted in flowing white lettering against a navy blue background. A small red and white striped border frames the edge of the rock. Simple, powerful, and deeply moving.
How to get this look: Paint the rock navy. Use chalk to lightly sketch your lettering first — chalk wipes off easily if you make mistakes. Once you’re happy with the layout, trace over the chalk with a fine-tip white paint pen. Add a border of alternating red and white dots around the edge.
Expert Tip: If your handwriting isn’t your strongest suit, print out your phrase at the right scale, then tape it to the rock and trace over the letters with a ballpoint pen. The pressure leaves a faint indentation you can follow with your paint pen.
Why it works: Typography-based painted rocks resonate emotionally in a way that pure imagery doesn’t always achieve. Phrases like “Home of the Brave,” “Land of the Free,” or “One Nation” tap directly into feelings of belonging and pride. These rocks also work beautifully as year-round decor — not just at 4th of July.
9. Watercolor-Effect Tie-Dye Patriotic Rock
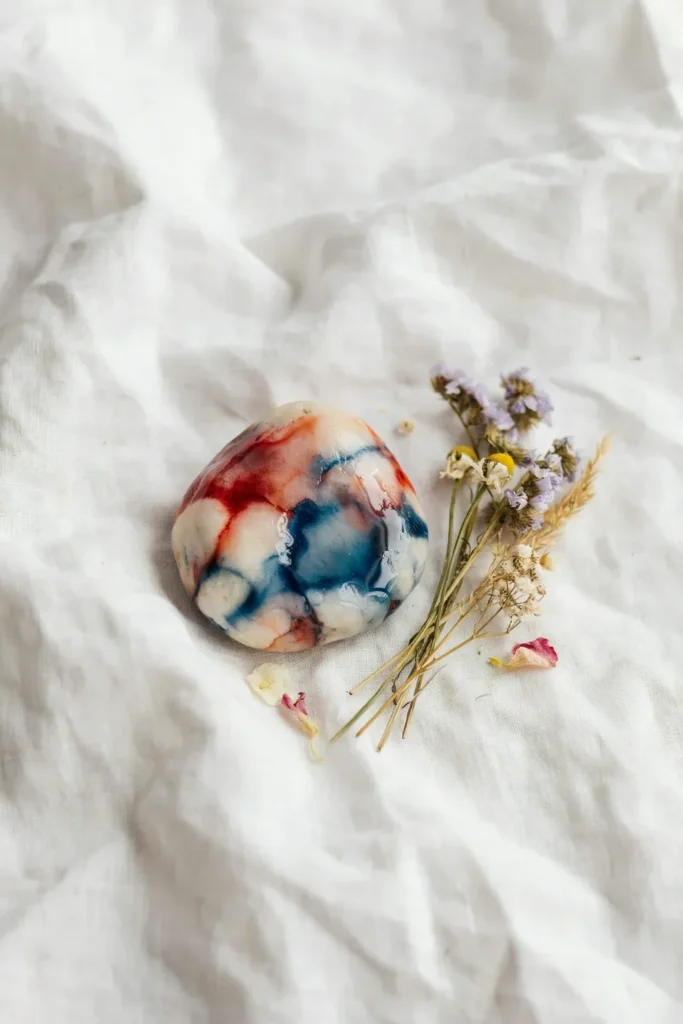
What you’re seeing: A medium-sized rock with a gorgeous, dreamy tie-dye effect in red, white, and blue. The colors bleed into each other in soft washes, creating a watercolor-like finish that looks almost too beautiful to be painted on a rock.
How to get this look: While your white base coat is still slightly wet, drop small amounts of diluted red and blue paint onto the rock and let them spread and blend naturally. Tilt the rock gently to encourage the colors to flow together. The wet-into-wet technique creates those soft, blooming edges.
Expert Tip: Work quickly — this technique requires the base coat to still be damp. If your paint is fully dry before you start adding colors, the bleeding effect won’t happen. Practice on a spare rock first to get a feel for the timing.
Why it works: The soft, artistic quality of this design appeals to people who love painted rocks but prefer a more “boho” or artistic look over traditional patriotic imagery. It’s uniquely feminine and photograph-worthy. Perfect for a small front porch display or grouped in a decorative bowl.
10. Memorial Day Poppy Rock
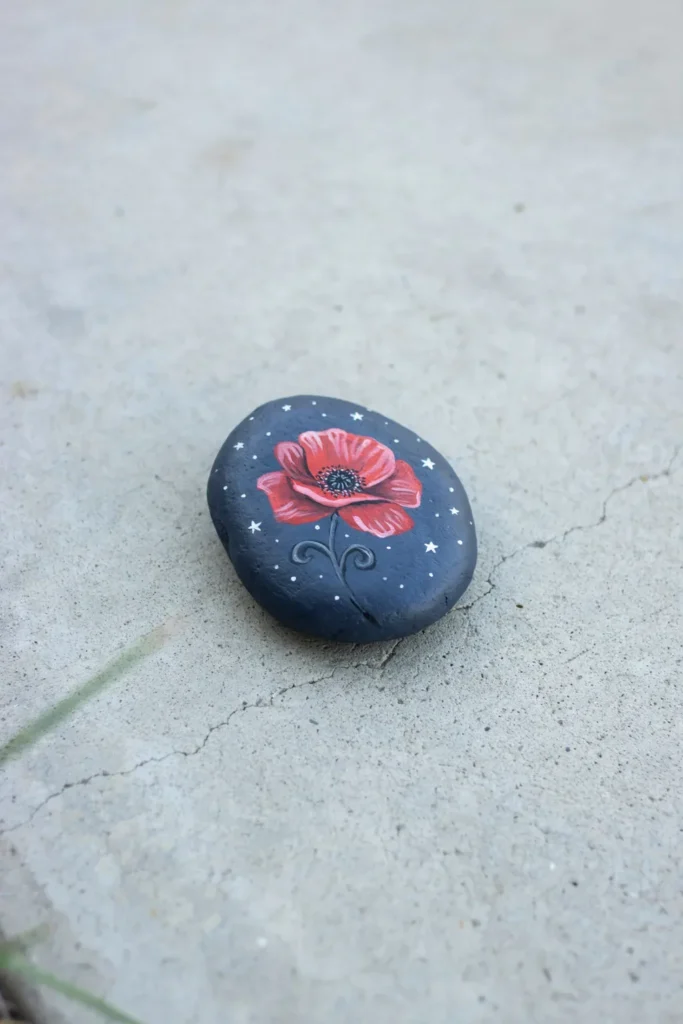
What you’re seeing: A smooth, dark navy rock with a single bright red poppy painted in the center — petals overlapping in deep crimson, with a dark center and a single green stem. Around the poppy, tiny white stars dot the dark background like a night sky.
Poppies are the traditional symbol of remembrance for fallen soldiers, making this the most emotionally significant design on the list.
How to get this look: Start with a navy base. Paint the poppy petals in bright red, layering from the outside in, building depth with darker red toward the center. The center is a small dark oval with tiny black lines radiating outward. Add white stars around the poppy using a toothpick or pencil eraser.
Expert Tip: For the most realistic-looking petals, load your brush with red paint and stroke each petal from the outer edge inward — this naturally creates a tapered, petal-like shape. Try to use a medium round brush for the best control.
Why it works: This is the design that will make people feel something. The red poppy on navy is striking and meaningful. It’s the kind of rock someone might keep on their mantle year-round as a quiet tribute — not just as seasonal decor. If you love this kind of meaningful craft, check out our DIY ideas for homemade birthday card ideas for more heartfelt project inspiration.
How to Display Your Patriotic Painted Rocks
Now that you’ve got 10 gorgeous ideas, let’s talk placement. A beautiful rock displayed poorly is a missed opportunity.
Here are the best ways to show off your collection:
- Line your front walkway with flag and star rocks on either side leading to your door
- Group 3–5 rocks of varying sizes in a galvanized metal tray or wooden crate for a porch vignette
- Place single statement rocks (eagle, “Home of the Brave”) at the base of a potted plant
- Fill a clear glass bowl with smaller mandala and firework rocks for an indoor centerpiece
- Nestle rocks among flowers in garden beds — they peek out like hidden treasures
The rule of odd numbers always applies: groups of 3, 5, or 7 look more natural and designed than even numbers.
How to Seal and Protect Your Painted Rocks
This is a step that most beginners skip — and then wonder why their rocks look faded after a season outdoors.
Here’s what I recommend:
- For outdoor rocks: Use Mod Podge Outdoor formula or a clear spray sealant labeled “UV resistant.” This protects against rain, sun fading, and chipping.
- Apply 2–3 coats, letting each dry fully between coats.
- For a glossy finish: Use a gloss sealant. For a more natural, matte look: matte sealant.
- Reapply every spring if your rocks live outdoors year-round.
Taking five extra minutes to seal your work means it will look beautiful for years — not just one summer.
Final Thoughts: Your Patriotic Rock Collection Starts Today
You now have everything you need: 10 complete ideas, supply lists, a budget breakdown, display tips, and sealing advice. There are no more excuses — only rocks waiting to become art.
Start with the design that called to you most. Maybe it was the classic American flag. Maybe it was the emotional Memorial Day poppy. Maybe the mandala caught your eye and now you can’t stop thinking about it.
Whichever one you choose, I promise: the first time you finish a painted rock and set it on your porch, you’ll be hooked. It’s one of those crafts that feels almost meditative — slow, intentional, and deeply satisfying.
Which idea are you trying first? Tell me in the comments — I read every single one!
And when you’re done with your rocks, come see what else we’ve been creating. If you loved this, you’re going to obsess over our Vintage Porch Decor Ideas — perfect for styling the space where your beautiful rocks are going to live. Or if you’re in a crafting mood, our roundup of 10 Easy Pine Cone Crafts and Ideas is calling your name.
Happy painting. 🇺🇸