10 Creative Things To Do With Sea Shells That Bring the Beach Home
This article was created in line with Trends Oraa’s research and content standards.
Most people don’t realize this.
That bowl of sea shells on the shelf is basically doing nothing.
That’s why a coastal-inspired room so often feels flat instead of finished.
The good news? Turning a handful of shells into real, eye-catching decor is way easier than people think — you just need the right ideas and a little direction.
You might also love our guide on Capiz Shell Decor Ideas if you want to go even further with that shimmery, coastal-glam look once you’ve finished this list.
In this post, I’m walking you through 10 genuinely creative ways to use sea shells around the home — not the boring “put it in a jar” stuff you’ve already seen a hundred times. These are projects that actually look intentional, designer-made, and worth the time.
By the end, you’ll have a project (or three) you’re ready to try this weekend.
Why Sea Shells Are Having Such a Big Decor Moment
Coastal style has quietly taken over a lot of homes lately, and sea shells are the easiest, cheapest way into that look.
They’re free if you collect them yourself. They’re textural. They photograph beautifully for Pinterest. And honestly? They carry a little bit of memory with them — that trip, that beach, that summer.
But here’s the important part: not every shell idea is created equal. Some look thoughtful and curated. Others look like clutter. The difference almost always comes down to how you use them, not how many you have.
Let’s get into the 10 ideas that actually work.
10 Creative Things to Do With Sea Shells (That Actually Look Designer-Made)
1. A Statement Sea Shell Wreath for Your Front Door
What You’re Seeing
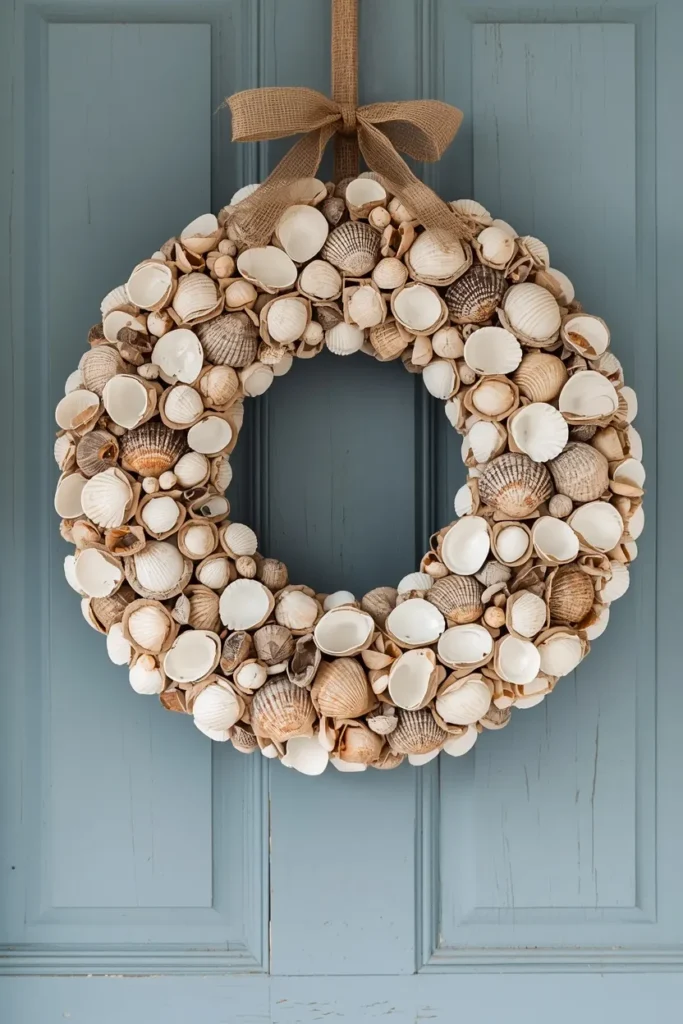
Picture a round wreath base completely covered in layered shells — scallops, clamshells, small whelks — fanned out in overlapping rows so no glue or wire is visible. It’s hung on a weathered blue front door with a simple jute ribbon.
Design Breakdown
A shell wreath works because it borrows a classic shape (the wreath) and gives it an unexpected material. Start with a foam or grapevine base, then hot-glue shells starting from the outer edge and working inward, layering smaller shells over the gaps.
Expert Tip
Mix shell sizes intentionally. Use your biggest, most dramatic shells as anchor points every few inches, then fill in around them with smaller pieces. This creates visual rhythm instead of a flat, uniform texture.
Why It Works
A wreath is the first thing guests see, so it sets the tone for your whole home instantly. It signals “coastal” without you needing to say a word — and it’s a conversation starter every single time.
Best For
- Small spaces
- Renters
- Budget makeovers
Common Mistake to Avoid
Using shells that are all the same size. It reads as messy instead of intentional. Variation is what makes it look curated.
Quick Wins
- Use a grapevine base for a more organic, less “craft store” look
- Seal shells with a matte spray sealant so they don’t look greasy or wet
- Add a few sprigs of dried sea grass for texture contrast
Which of these ideas would work best in your home? The wreath is honestly one of the lowest-effort, highest-impact projects on this entire list.
2. A Layered Sea Shell Centerpiece for Your Table
What You’re Seeing
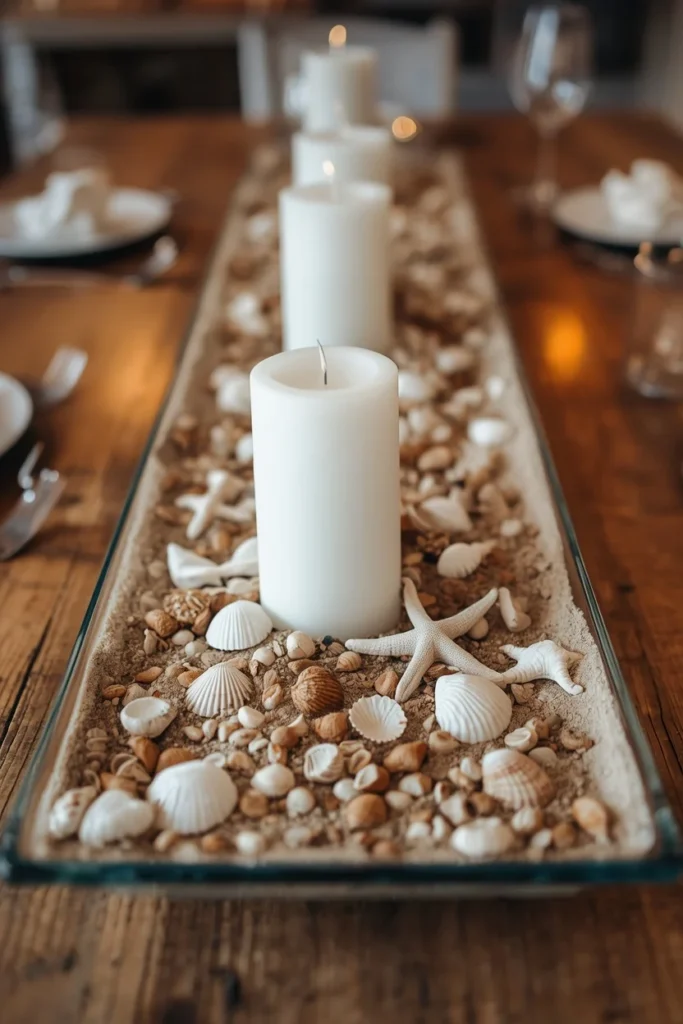
A low, wide glass dish filled with layered sand, then a scattering of shells arranged loosely (never perfectly symmetrical), with a single thick pillar candle nestled in the center.
Design Breakdown
Centerpieces fail when they’re too tall (you can’t see across the table) or too busy (you can’t focus on anything). This one stays low, uses negative space, and lets a handful of standout shells do the talking instead of a hundred small ones.
Expert Tip
Add the candle before the shells. Press it gently into the sand so it sits stable, then arrange shells around the base so they look like they grew there naturally.
Why It Works
Low centerpieces keep sightlines open during dinner, which sounds small but genuinely changes how a meal feels. Guests can actually talk to each other across the table — and the shells still do plenty of visual work.
Best For
- Families
- Budget makeovers
- Renters
Common Mistake to Avoid
Overfilling the dish. A crowded centerpiece looks cheap no matter how nice the shells are. Less really is more here.
Quick Wins
- Use a flat-bottomed glass dish so the arrangement doesn’t tip
- Stick to a 3-color palette of sand, white, and one accent shell color
- Swap candle scent seasonally to keep the look feeling current
If you’re already thinking about your dining setup, our guide on table settings ideas has a few more layering tricks worth stealing.
Most people don’t know this: the biggest difference between a “Pinterest-looking” centerpiece and a cluttered one isn’t the shells themselves — it’s the dish underneath. A wide, shallow dish instantly makes any arrangement look intentional, while a tall vase almost always looks chaotic once you add shells, sand, and a candle together. If you only change one thing about your current setup, change the container.
3. DIY Sea Shell Wind Chimes for the Patio
Most people waste more space than they realize — and an empty patio corner is usually exhibit A.
What You’re Seeing
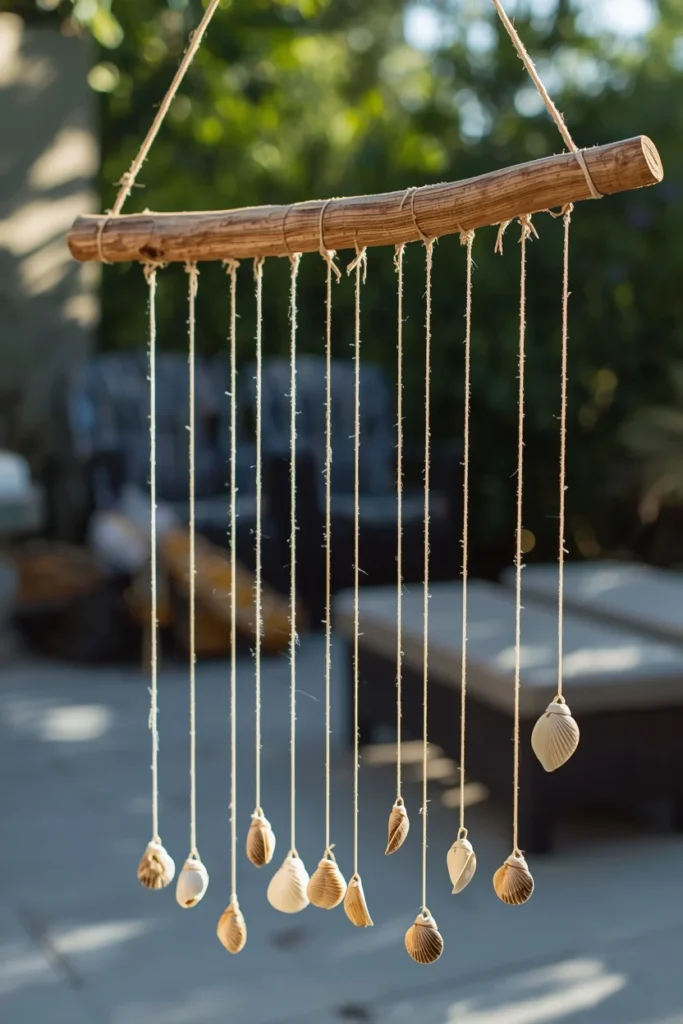
A driftwood branch hung horizontally, with five or six fishing-line strands dropping down, each strung with three to four shells that clink softly in the breeze.
Design Breakdown
This is one of those projects where the sound matters as much as the look. Drill a tiny hole through the top of each shell (a hand drill with a small masonry bit works fine), thread fishing line through, and tie off with small knots between shells so they don’t all clump at the bottom.
Expert Tip
Use shells of different thicknesses on the same strand. Thin shells create a higher, brighter sound, while thicker ones add a deeper clink — together they sound layered instead of flat.
Why It Works
Wind chimes engage a sense most decor ignores completely: sound. A patio that sounds like the beach feels far more immersive than one that just looks coastal.
Best For
- Small spaces
- Large spaces
- Budget makeovers
Common Mistake to Avoid
Drilling too close to the shell’s edge. It cracks almost every time. Drill closer to the center-top, where the shell is thicker and more stable.
Quick Wins
- Soak shells in warm water for 10 minutes before drilling — it reduces cracking
- Use clear fishing line so the shells look like they’re floating
- Hang chimes near a window or door where the breeze naturally funnels through
Picture yourself enjoying your morning coffee out there with that soft clinking in the background. It’s a small detail, but it completely changes how a patio feels.
You May Also Like:
- Outdoor Bathroom Ideas
- Small Balcony Garden Ideas
- Garden Bird Feeders Ideas
- Sunroom Ideas
- Patio Ideas for Florida Homes
4. A Sea Shell Mirror Frame for a Coastal Bathroom
What You’re Seeing
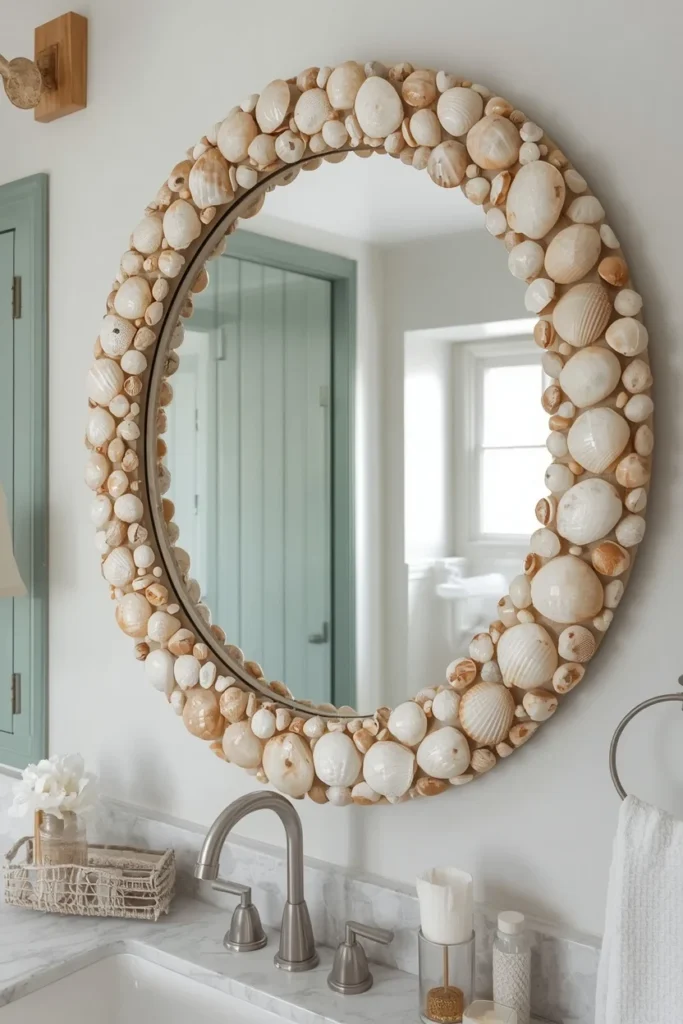
A round mirror completely rimmed in shells, glued edge-to-edge so none of the original frame is visible. Light bounces off the mirror’s surface and catches the pearly inside of each shell.
Design Breakdown
This works the same way a tile mosaic does — you’re building a continuous border around an existing object. Start with the biggest shells at the 12, 3, 6, and 9 o’clock positions to anchor the shape, then fill the gaps with smaller pieces.
Expert Tip
Choose a mirror with a flat, slightly raised lip rather than a beveled edge. Shells sit flush and glue far more securely on a flat surface.
Why It Works
Mirrors reflect light, and shells reflect light too — so a shell-framed mirror essentially doubles the shimmer in a room. In a smaller bathroom, that extra brightness makes the whole space feel bigger.
Best For
- Small spaces
- Renters
- Luxury homes
Common Mistake to Avoid
Skipping the sealant. Bathroom humidity will dull and eventually loosen shells that aren’t properly sealed. A matte marine-grade sealant solves this completely.
Quick Wins
- Use a hot glue gun with a high-temp setting for a stronger bond
- Group shells by color (all white, then all tan) for a cleaner gradient
- Add a thin strip of rope trim around the very outer edge to hide rough glue lines
Would you choose function or style for your next bathroom update? With this project, you genuinely don’t have to pick — it’s both.
5. Sea Shell Border Edging for Garden Beds and Planters
What You’re Seeing
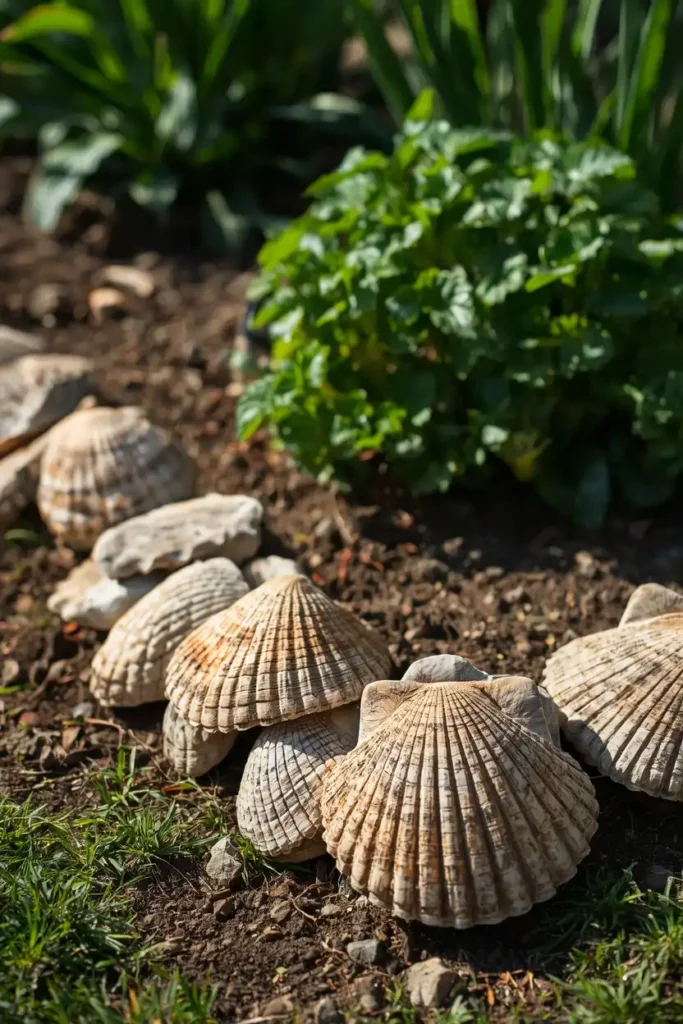
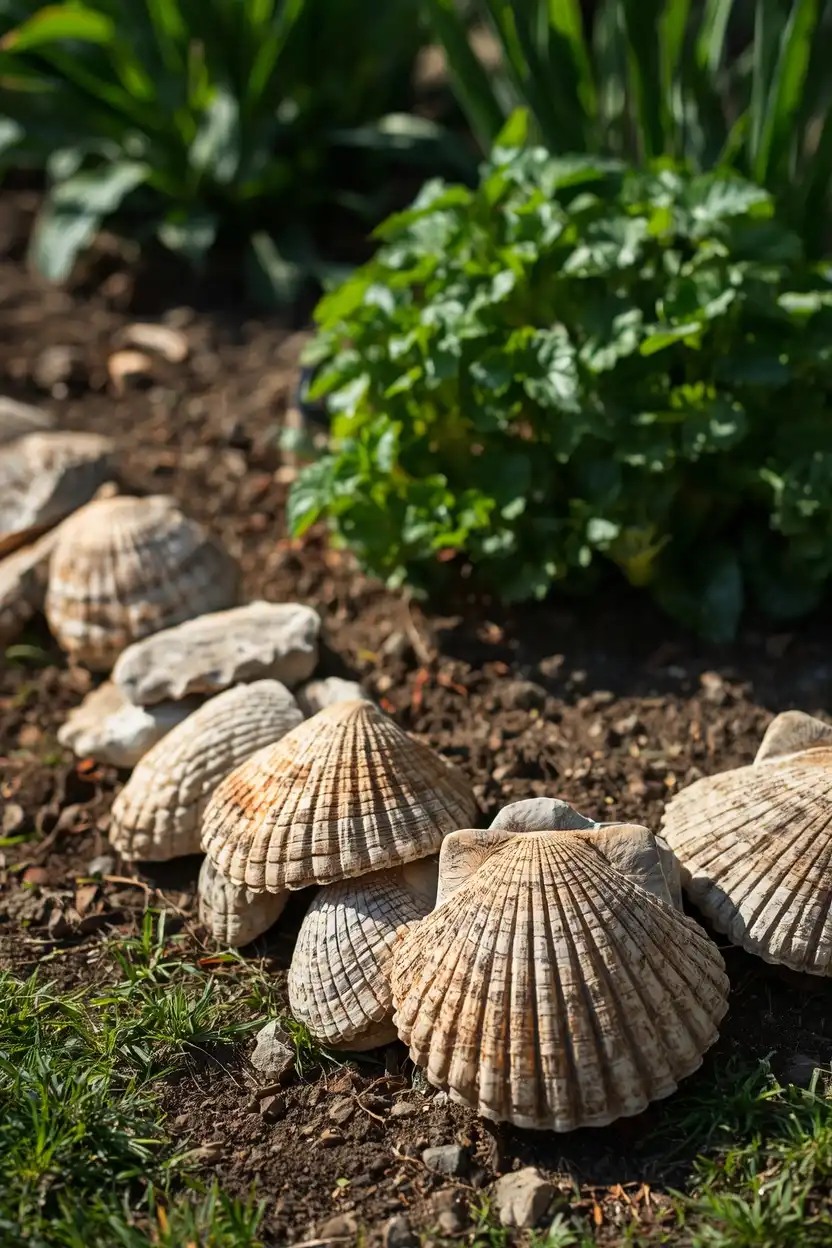
A raised garden bed lined along its edge with large, sturdy shells like clam and conch, partially embedded in the soil so they look like they washed up naturally.
Design Breakdown
This is less “craft” and more “landscaping.” You’re using shells the way you’d use stones or brick — as a functional border that also happens to be beautiful. Press shells halfway into the soil along the bed’s edge, slightly overlapping for a continuous line.
Expert Tip
Choose your hardiest, thickest shells for this one. Thin or delicate shells crack under foot traffic and weather exposure within a season.
Why It Works
Edging defines a space without needing a fence or hard border, which keeps the whole area feeling soft and beach-like instead of structured and formal.
Best For
- Large spaces
- Families
- Budget makeovers
Common Mistake to Avoid
Using shells with leftover salt residue. Rinse and soak thoroughly first — salt buildup can affect soil and nearby plants over time.
Quick Wins
- Rinse shells in fresh water for at least 24 hours before placing them in soil
- Mix shell sizes for a more natural, less “lined up” border
- Pair with ornamental grasses for a low-maintenance coastal garden look
If your outdoor space needs more than just edging, our guide on vegetable garden ideas has some great layout inspiration to pair with this.
One thing I’ve learned: shells break down slowly over time and actually add calcium to soil, which a lot of plants genuinely benefit from. It’s not just decorative — it’s functional. That said, don’t use shells around acid-loving plants like blueberries or azaleas, since the slow calcium release can shift soil pH in a direction those plants don’t like. Match the border to the right plants, and it’s a win on every level.
Here’s where it gets interesting — the next few ideas move indoors, and they’re where most people actually get the most compliments.
6. Sea Shell Night Lights and Lamp Accents
The next idea is one designers secretly love.
What You’re Seeing
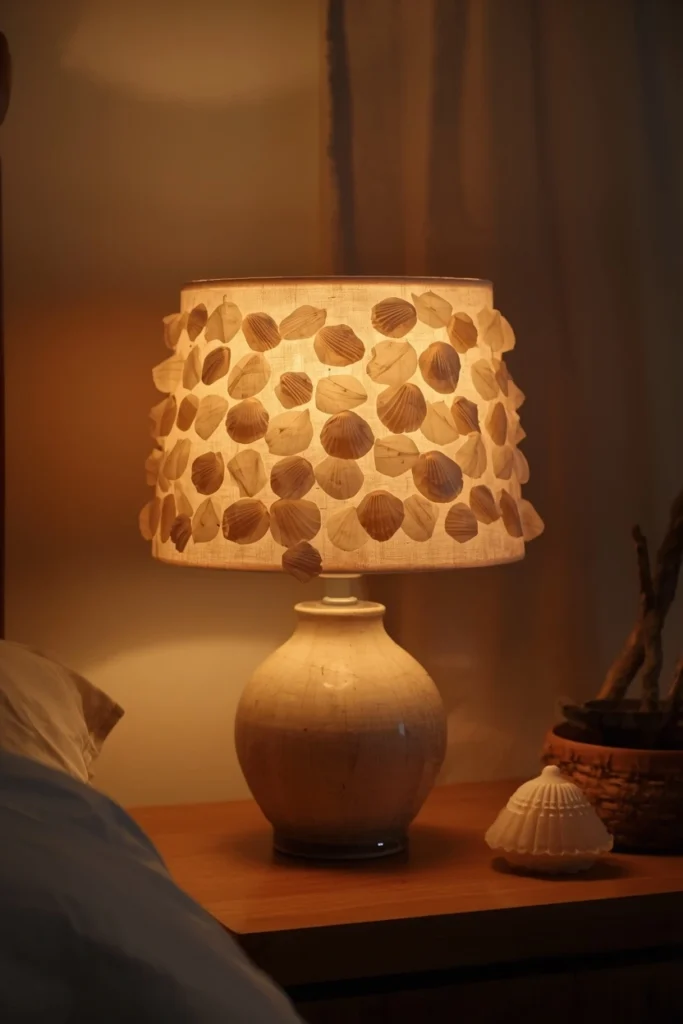
A small lamp base wrapped in a sheer fabric shade, with thin, translucent shells (think capiz or abalone) layered across the surface so light glows softly through them when lit.
Design Breakdown
Translucent shells diffuse light beautifully — it’s the same principle behind capiz shell pendant lights you’ve probably seen in coastal hotels. You can apply thin shell pieces directly to a paper or fabric lampshade with a clear-drying craft adhesive.
Expert Tip
Use only the thinnest shells you can find for this project. Thick shells block light entirely instead of glowing — translucency is the whole point.
Why It Works
Lighting sets mood more than almost any other design element, and shell-filtered light has a warm, dappled quality that’s genuinely hard to replicate with anything else.
Best For
- Small spaces
- Luxury homes
- Budget makeovers
Common Mistake to Avoid
Placing shells too densely. If they overlap too much, you lose the glow effect entirely and just end up with a dark, opaque shade.
Quick Wins
- Test shell placement with the lamp on before gluing anything permanently
- Use a warm-white bulb, not cool white, for a more flattering glow
- Leave small gaps between shells so light can pass through evenly
Visualize the difference a softly glowing shell lamp makes in a reading nook at night. It’s subtle, but it’s the kind of detail people notice immediately.
7. Sea Shell Soap Dishes and Bathroom Accessories
What You’re Seeing
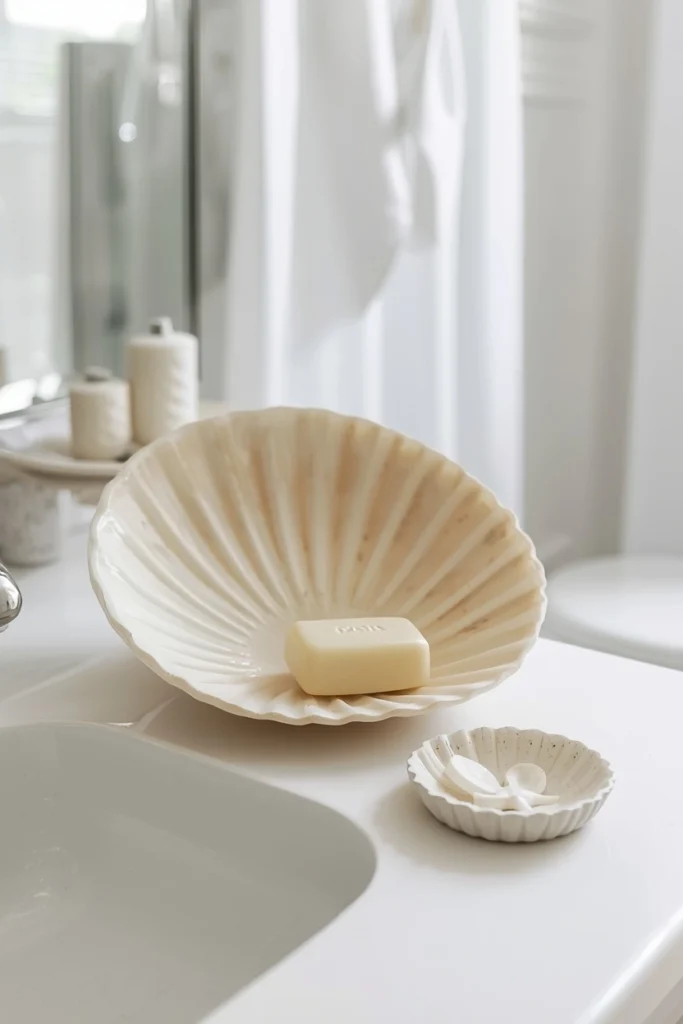
A large, naturally curved shell (like a scallop or clam) sitting on a bathroom vanity, holding a bar of soap, with a smaller shell nearby used as a ring dish.
Design Breakdown
This is the easiest idea on the entire list — and that’s exactly why it works. You’re not crafting anything. You’re simply repurposing a naturally functional shape for a job it’s already perfectly suited to.
Expert Tip
Choose shells with a deep, bowl-like curve so water actually drains away from the soap instead of pooling underneath it.
Why It Works
It’s a tiny detail, but tiny details are often what make a bathroom feel like a boutique hotel instead of a standard rental. Guests notice the small stuff first.
Best For
- Small spaces
- Renters
- Budget makeovers
Common Mistake to Avoid
Skipping a quick boil-and-bleach cleaning before use. Shells used as functional dishes need to be properly sanitized first, not just rinsed.
Quick Wins
- Boil shells for 10–15 minutes, then soak briefly in a mild bleach solution before first use
- Choose shells with a slightly glossy interior for the most polished look
- Rotate in seasonal shells if you collect different ones on different trips
What’s your biggest challenge right now when it comes to small bathroom upgrades? If it’s budget, this idea costs you absolutely nothing if you’ve already got shells on hand.
You May Also Like:
- Capiz Shell Decor Ideas
- Spa Bathroom Ideas
- Bathroom Accessories Ideas
- Soap Dispenser Set Ideas
- Beach Bedroom Ideas
Sea Shell Buying & Sourcing Guide: What to Know Before You Start
This is where many homeowners make a mistake — they jump straight into a project before figuring out where their shells are actually coming from, and it ends up costing them more time (and money) than it should.
Before you start any of the projects above, it helps to understand your sourcing options.
Option 1: Collecting Your Own
This is free, sentimental, and the most sustainable option — but it’s slow. You’ll need a lot of beach trips to gather enough shells for a wreath or mirror frame.
- Best for: patience over speed, sentimental projects, gift-giving
- Cost: $0, aside from travel
- Mistake to avoid: taking live shells with animals still inside them, which is illegal in many coastal areas and harmful to local ecosystems
Option 2: Craft Stores
Most craft stores sell mesh bags of mixed shells, typically sorted by size.
- Cost: roughly $5–$15 for a small bag, $20–$40 for larger mixed bags
- Best for: quick projects, consistent sizing, beginners
- Mistake to avoid: buying the cheapest bag without checking shell thickness — thin, fragile shells crack constantly during gluing and drilling
Option 3: Online Specialty Sellers
Sites that specialize in shells (rather than general craft retailers) tend to offer better variety, larger statement shells, and bulk pricing.
- Cost: bulk lots often run $15–$50 depending on size and rarity
- Best for: large projects like mirror frames, garden borders, or wreaths that need volume
- Mistake to avoid: not checking return policies — shells can arrive cracked, and reputable sellers will replace them
Option 4: Thrift and Estate Sales
Old shell collections show up at thrift stores and estate sales more often than you’d think, frequently for a few dollars total.
- Cost: usually under $10 for an entire box
- Best for: variety, rare or vintage shell types, budget makeovers
- Mistake to avoid: not cleaning thoroughly — older collections can carry dust, mildew, or musty odors that need addressing before use
A Quick Note on Cleaning
No matter where your shells come from, give them a proper clean before any project:
- Soak in warm water with a splash of dish soap for 30 minutes
- Scrub gently with an old toothbrush to remove debris
- Soak in a diluted bleach solution (1 part bleach to 10 parts water) for 10–15 minutes if shells will be used near food, soap, or skin
- Rinse thoroughly and let air-dry completely before gluing, drilling, or sealing
Skipping this step is one of the most common mistakes people make — shells that look clean can still carry odor-causing residue that shows up later, especially in humid bathrooms.
8. Sea Shell Shadow Box Wall Art
What You’re Seeing
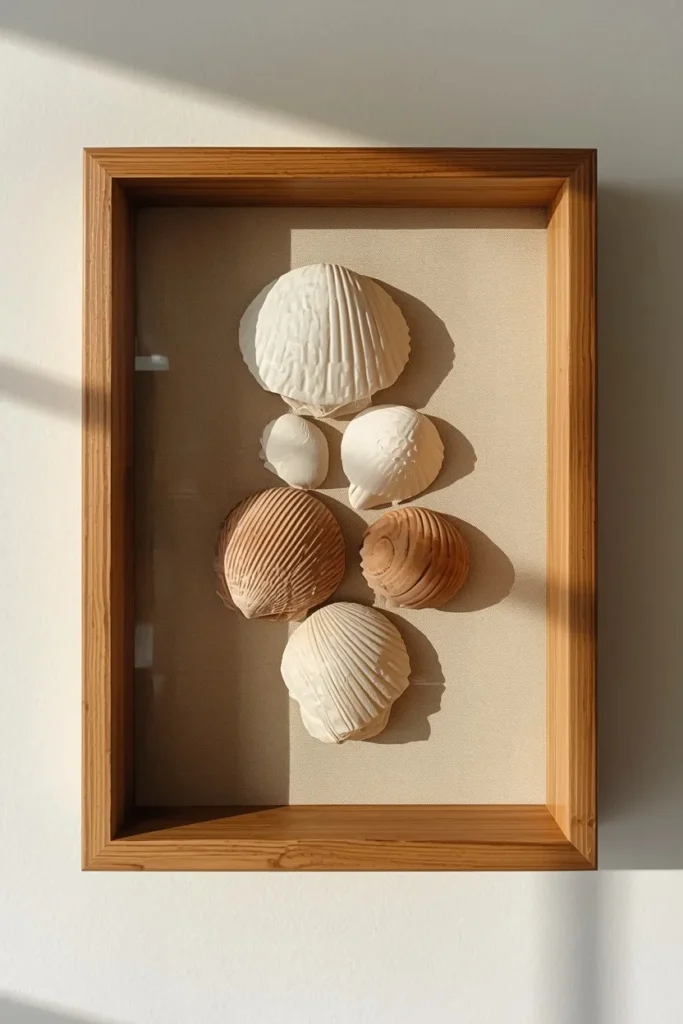
A deep wooden shadow box frame mounted on a wall, with shells arranged in a loose, asymmetrical grid against a soft linen background, casting small shadows thanks to the frame’s depth.
Design Breakdown
Shadow boxes solve the “where do I even put these” problem that loose shells always create. Arrange your best, most unique shells first, then fill in with smaller ones around them, securing each with a small dab of glue on the back.
Expert Tip
Use a neutral fabric or linen backing instead of a plain white mat. It adds texture and keeps the shells from looking like they’re floating on a blank page.
Why It Works
Framing turns a random collection into a curated display. The brain reads framed objects as intentional art, even when the contents themselves are simple.
Best For
- Small spaces
- Renters
- Luxury homes
Common Mistake to Avoid
Centering everything too perfectly. A slightly off-center, organic arrangement reads as collected and authentic, while a perfectly symmetrical grid can look stiff.
Quick Wins
- Use museum-mount squares instead of visible glue for a cleaner finish
- Group shells loosely by color rather than by size
- Hang in a hallway gallery wall alongside travel photos for added context
Let me know which one is your favorite so far — this one tends to be a top pick for people who want shells displayed without anything getting damaged or dusty.
Here’s where it gets interesting: the depth of your shadow box frame matters more than people expect. A shallow frame (under an inch) flattens your shells and removes the shadow effect entirely — which is the whole reason this project looks so much more polished than a flat display. Look for a frame with at least 1.5 to 2 inches of depth so each shell casts a visible, soft shadow against the backing. That tiny shadow is what makes the difference between “craft project” and “wall art.”
9. A Sea Shell Curtain for Doorways or Closets
This simple change can completely transform the room.
What You’re Seeing
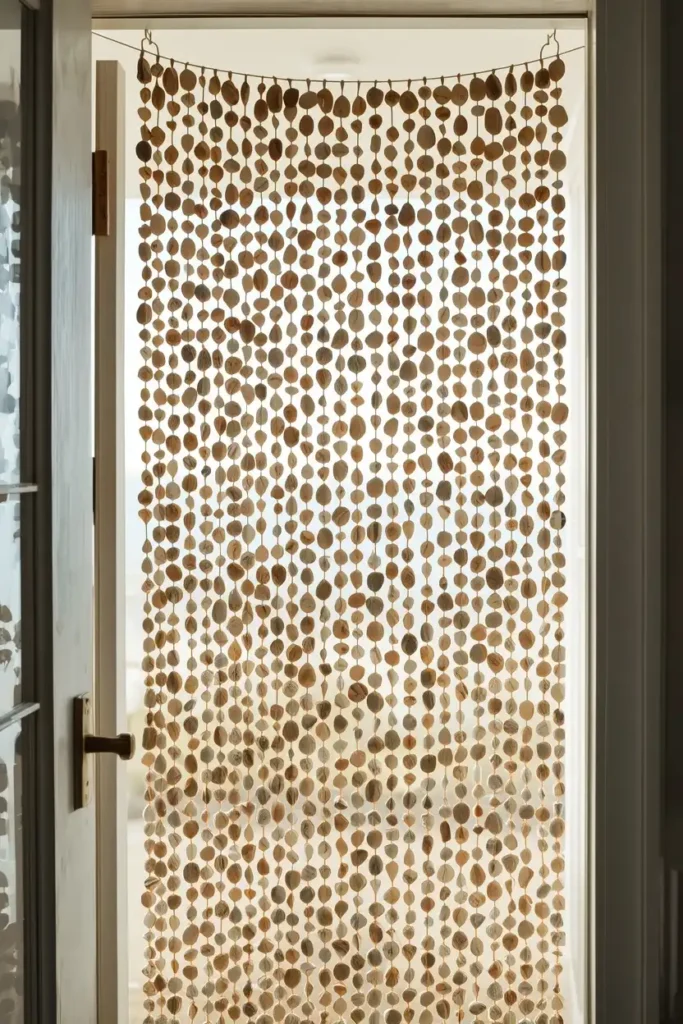
A beaded curtain hung in a doorway, but instead of plastic beads, each strand carries small drilled shells spaced evenly, gently clicking together whenever someone walks through.
Design Breakdown
This works as a soft room divider — perfect for closet doors, pantry entries, or even a laundry nook you want to visually close off without installing an actual door. Drill small holes through shells, then string them onto fishing line or thin cord at evenly spaced intervals, and attach the strands to a tension rod or curtain rod.
Expert Tip
Space your strands about 1.5 to 2 inches apart. Too close together looks cluttered; too far apart loses the curtain effect entirely.
Why It Works
It adds texture and movement to a doorway without blocking light or airflow the way a solid door would — and it’s a complete statement piece on its own.
Best For
- Small spaces
- Renters
- Budget makeovers
Common Mistake to Avoid
Using cord that’s too thin. It stretches over time under the weight of shells, leaving the curtain looking uneven and saggy within a few months.
Quick Wins
- Use waxed cord or thin nylon rope instead of standard string for durability
- Vary shell sizes slightly down each strand for a more organic look
- Add a single larger “anchor” shell at the bottom of each strand to weigh it down evenly
Imagine walking into your closet every morning to that soft, beachy clicking sound. It’s a small ritual, but it genuinely makes an ordinary doorway feel special.
10. Sea Shell Coasters for Everyday Use
What You’re Seeing

A stack of flat, wide shells (like clam or scallop shells) sitting on a coffee table, each holding a drink, with a thin layer of cork glued to the underside to protect the table surface.
Design Breakdown
This might be the most practical idea on the entire list. Flat shells are naturally the right size and shape for coasters, and adding a cork backing turns them into something you’ll actually use daily, not just display.
Expert Tip
Seal the top surface with a food-safe, matte finish so condensation doesn’t seep into the shell over repeated use.
Why It Works
Functional decor gets used — which means it stays visible and relevant in your daily life, instead of becoming another thing that just collects dust on a shelf.
Best For
- Small spaces
- Families
- Budget makeovers
Common Mistake to Avoid
Forgetting the cork backing. Without it, shells scratch wood and glass surfaces over time, which defeats the entire purpose of a coaster.
Quick Wins
- Cut cork sheets to size with regular scissors — no special tools needed
- Use a hot glue gun for a quick, secure bond between shell and cork
- Make a full matching set for an easy, cohesive gift idea
Don’t skip this one just because it sounds simple — it’s consistently one of the most-saved ideas on Pinterest precisely because it’s so easy to actually pull off.
You May Also Like:
- Table Settings Ideas
- Small Console Tables Ideas
- Empty Corner Decoration Ideas
- Key Holder for Wall Ideas
- Driftwood Craft for Kids
Related Coastal Decor Ideas You’ll Love
The next idea changes everything if you’re already loving this coastal direction — there’s a whole world of related projects worth exploring next.
If sea shells got you excited about beachy, textural decor, these guides will take things even further:
- Beach Bedroom Ideas
- Capiz Shell Decor Ideas
- Outdoor Bathroom Ideas
- Small Balcony Garden Ideas
- Garden Bird Feeders Ideas
- Sunroom Ideas
- Patio Ideas for Florida Homes
- Window Seat Ideas
Final Thoughts: Bring the Beach Home With Sea Shells
So here’s the recap, if you only remember a few things from this list: the shadow box display and the shell-framed mirror tend to get the most compliments, the wind chimes and night lights add a sensory layer most decor skips entirely, and the coasters and soap dishes prove you don’t need a single craft skill to make sea shells feel intentional in your home.
But here’s the important part — none of this matters if you don’t actually try one.
Pick the single idea that felt the most “yes, I want to do that” while you were reading, and commit to making it happen this week. Not someday. This week. Most of these projects take an afternoon, not a weekend.
So, which one is it going to be? Let me know which one is your favorite, and whether you’re team wreath, team mirror frame, or team wind chimes — I’d genuinely love to know what direction you’re leaning.
If this list got you in a coastal headspace, it’s worth exploring the rest of your space with that same lens. A few sea shells on a shelf can only do so much — but paired with the right textures, lighting, and layout elsewhere in the room, the whole look comes together in a way that feels finished instead of half-done.
And if you’re already thinking about what’s next, here’s a tease: there’s a whole category of coastal-inspired projects using driftwood that pairs unbelievably well with everything on this list — different texture, same beachy soul, and honestly just as easy to pull off. That one might be worth bookmarking for your next free afternoon.