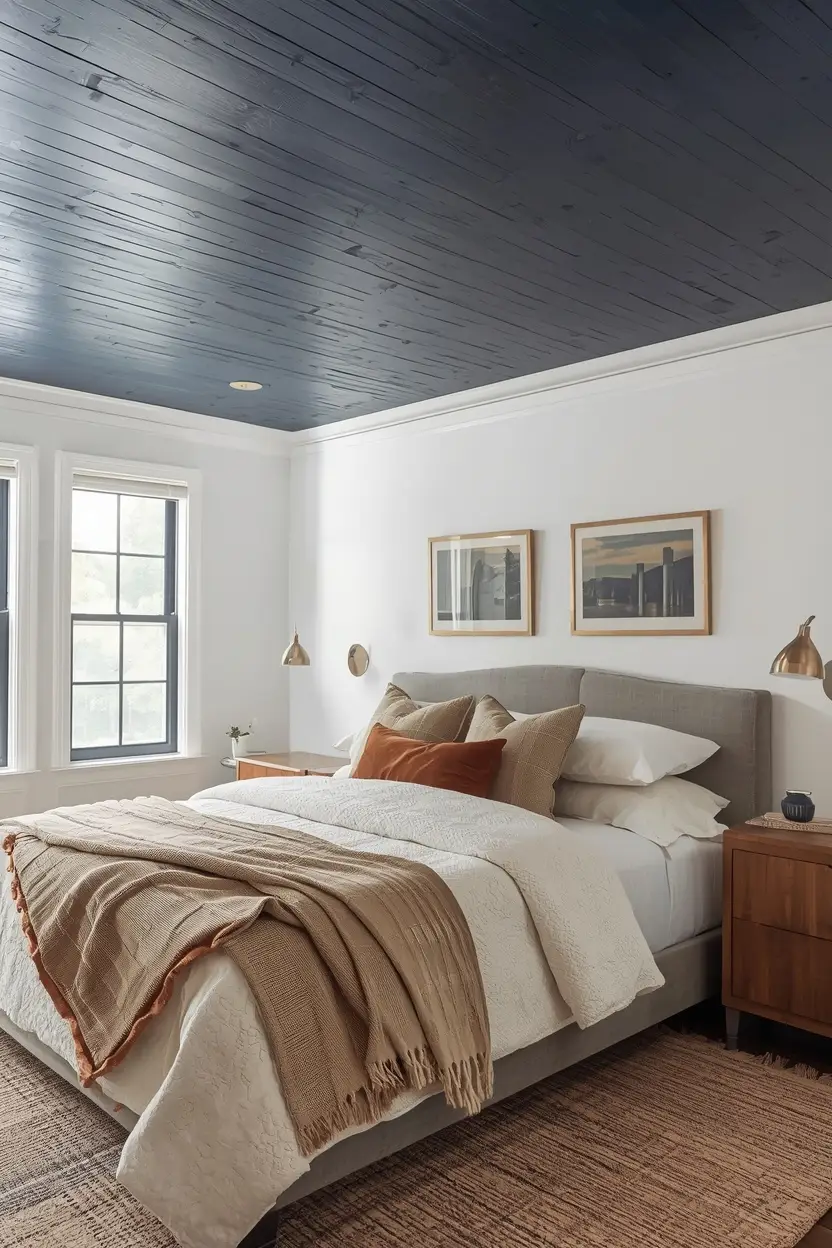
10 Cheap Wood Ceiling Ideas That Look Anything But Cheap
This article was created in line with Trends Oraa’s research and content standards.
Look up. Really look up. That blank, boring ceiling has been staring back at you for years, and you’ve never once given it a second thought.
Most of us pour every ounce of decorating energy into walls, floors, and furniture. The ceiling? Forgotten.
But here’s the thing — a plain white ceiling is a missed opportunity, and once you notice it, you can’t unsee it.
I’ve spent way too many hours scrolling Pinterest looking for cheap wood ceiling ideas that didn’t require a second mortgage, and I finally found the ones that actually deliver. This roundup is the result — ten real, budget-friendly, wildly doable wood ceiling makeovers that transform a room without draining your savings account.
You might also love our guide on high ceiling living room ideas if you’re working with extra vertical space and want to make the most of it.
Stick with me here, because idea #6 is the one designers quietly obsess over, and idea #9 might just change how you see your whole house.
Let’s get into it.
Why Cheap Wood Ceiling Ideas Are Having a Major Moment
Wood ceilings used to mean rustic cabins or luxury lodges. Not anymore.
Homeowners are realizing that a wood ceiling adds warmth, texture, and instant character — and you don’t need a contractor’s budget to pull it off.
Here’s why this trend isn’t going anywhere:
- It’s one of the few upgrades that changes the entire feel of a room without touching floor space
- Wood ceilings photograph beautifully, which is exactly why Pinterest is flooded with them right now
- Many of these ideas are weekend DIY projects, not month-long renovations
- They work in nearly every style — farmhouse, modern, coastal, moody, minimalist
Most people don’t know this, but some of the most stunning wood ceilings in magazine-worthy homes cost less than a single piece of furniture. It’s all about the technique, not the price tag.
Ready? Here are the ten ideas that made the cut.
1. Reclaimed Wood Plank Ceiling
What You’re Seeing
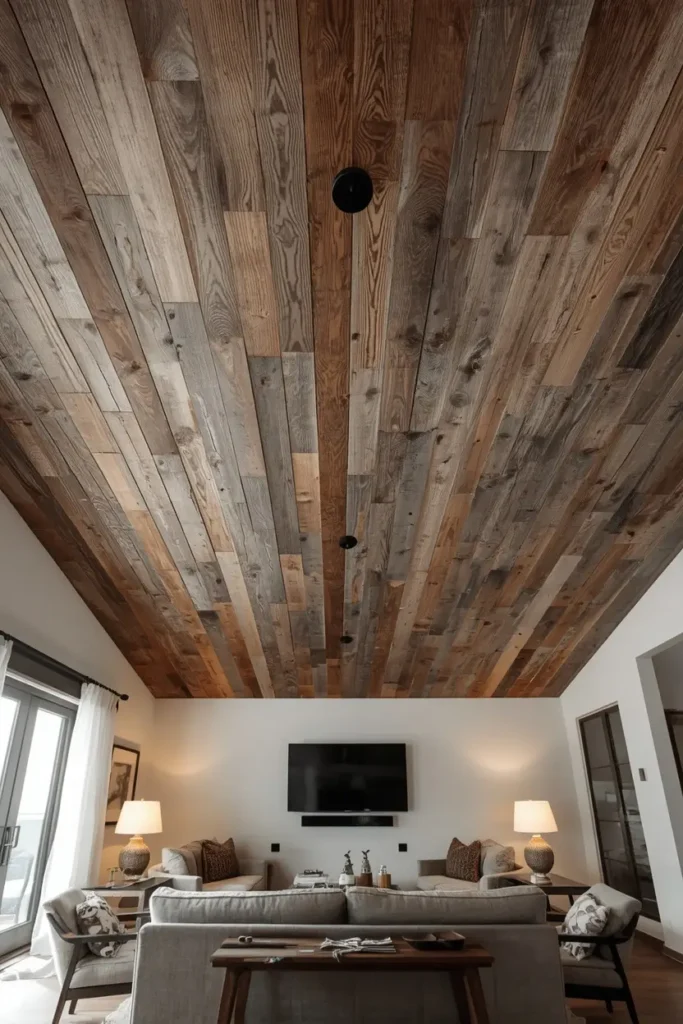
Picture a ceiling made from weathered, mismatched wood planks in varying shades of gray, brown, and honey — each board carrying its own history, nail holes and all.
Design Breakdown
Reclaimed wood is salvaged from old barns, pallets, fences, or demolished structures. No two boards look exactly alike, which is exactly the point.
You’re not buying “wood.” You’re buying character that took decades to develop naturally.
Expert Tip
Check local salvage yards, Facebook Marketplace, and construction demolition sites before buying reclaimed wood retail. I’ve found entire ceilings’ worth of material for the cost of a few new boards.
Why It Works
The imperfections trick the eye into reading the ceiling as expensive, curated, and intentional rather than cheap.
That visual texture also softens harsh overhead lighting, making rooms feel cozier immediately.
Best For
- Budget makeovers
- Farmhouse and rustic homes
- Large spaces
Common Mistake To Avoid
Sanding the wood too smooth. Over-sanding strips away the exact character you paid nothing for.
Quick Wins
- Source material locally to cut costs by 60-80%
- Seal with a matte polyurethane to preserve the aged look
- Mix plank widths for a more authentic, collected-over-time feel
- Pair with simple white walls so the ceiling stays the star
2. Whitewashed Wood Ceiling
What You’re Seeing
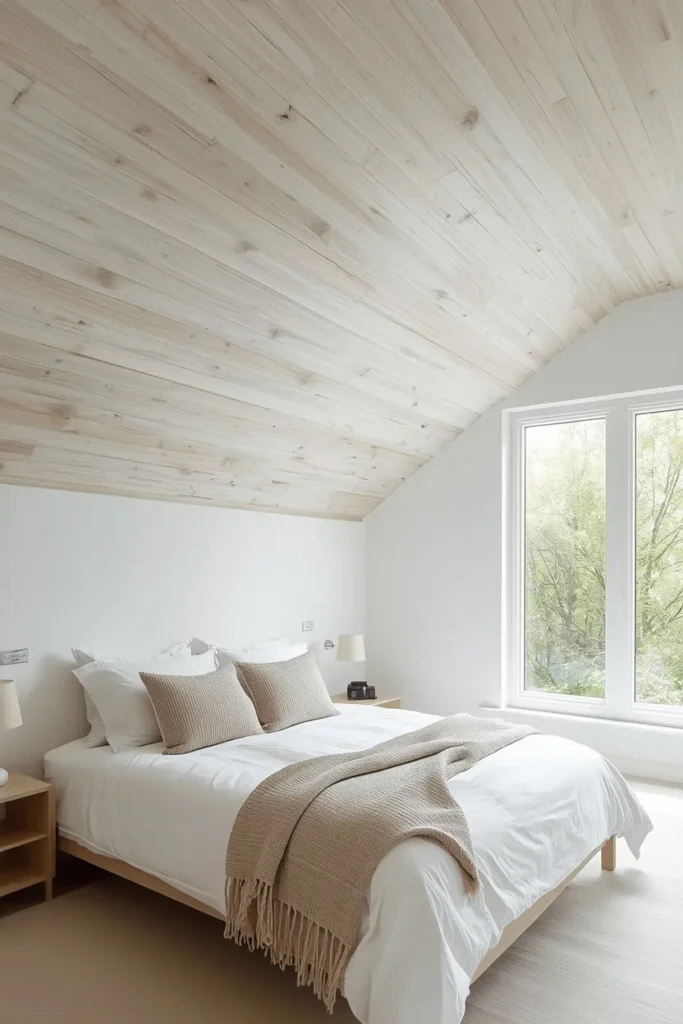
A ceiling of natural wood planks brushed with a thin, translucent white wash — the grain still visible underneath a soft, airy finish.
Design Breakdown
Whitewashing lets you keep the texture of real wood while brightening the room instead of darkening it, which is the number one fear people have about wood ceilings.
This technique works especially well in spaces that don’t get a ton of natural light.
Expert Tip
Mix one part white paint to one part water, then wipe (don’t brush) it onto raw wood for the most authentic, streaky, hand-done look.
Why It Works
Whitewashing solves the biggest objection to wood ceilings — that they make rooms feel darker or smaller. This technique brightens while still delivering texture.
Best For
- Small spaces
- Renters
- Budget makeovers
Common Mistake To Avoid
Applying the wash too thick. That turns your ceiling into a solid white surface and defeats the entire purpose.
Quick Wins
- Test the wash ratio on a scrap board first
- Wipe with the grain, never against it
- Use a lint-free cloth for the smoothest, most natural finish
But here’s the important part — whitewashing isn’t just a look, it’s a strategy. It’s how you get the warmth of wood without sacrificing brightness, which is exactly why so many small-space homeowners lean on this trick.
One thing I’ve learned after years of covering these projects: the finish you choose matters more than the wood species itself. A cheap pine board whitewashed correctly can look more expensive than pricey oak with a bad stain job. Don’t spend your entire budget on premium lumber — spend it on getting the finish right. Practice on scrap pieces, take your time, and let each coat dry fully before deciding if you need another layer. Patience here saves you from redoing the whole ceiling later.
Most people waste more space than they realize when they ignore the ceiling entirely. Let’s talk about how to actually use it.
3. Wood Slat Accent Ceiling
What You’re Seeing
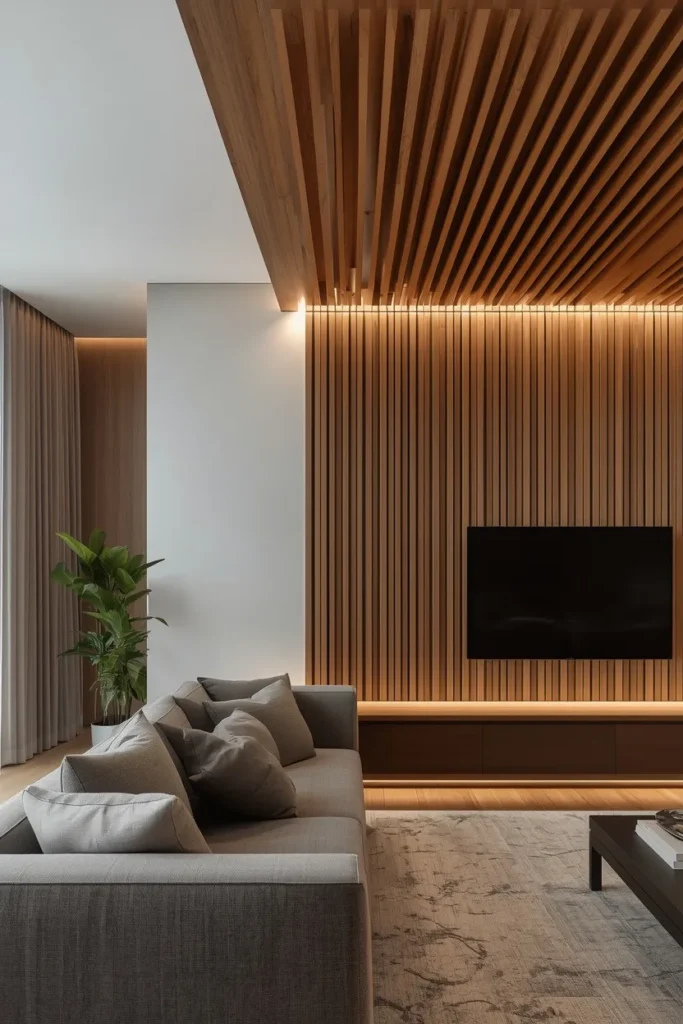
Thin, evenly spaced wood slats running in one direction across a section of the ceiling, creating a rhythmic, almost architectural pattern.
Design Breakdown
Slat ceilings are having a huge moment right now, and for good reason — they add serious visual interest using a fraction of the material a full plank ceiling requires.
You’re only using narrow strips, so material cost drops dramatically compared to solid coverage.
Expert Tip
Space slats using a scrap piece of wood as your spacer guide. Consistent gaps are what make this look intentional instead of unfinished.
Why It Works
The repetition of lines creates a sense of movement and draws the eye upward, making ceilings feel taller than they actually are.
Best For
- Small spaces
- Budget makeovers
- Renters (when using adhesive-mounted slats)
Common Mistake To Avoid
Running slats in a random or uneven pattern. Consistency is everything with this look — even small spacing errors are very noticeable overhead.
Quick Wins
- Use furring strips or cut plywood for an affordable slat option
- Paint slats a contrasting color to define the pattern further
- Add LED strip lighting behind slats for a dramatic nighttime glow
Imagine walking into a room where the ceiling itself feels like art — that’s exactly what a slat accent does, and it costs far less than most people assume.
Speaking of small-space tricks, if you’re working with limited square footage overall, our space saving furniture ideas guide pairs perfectly with this kind of ceiling upgrade.
You May Also Like:
- High Ceiling Living Room Ideas
- Wall Paneling Ideas
- Family Room Ideas
- Cozy Living Room Ideas
- Living Room Remodel Ideas
4. Peel-and-Stick Wood Panel Ceiling
What You’re Seeing
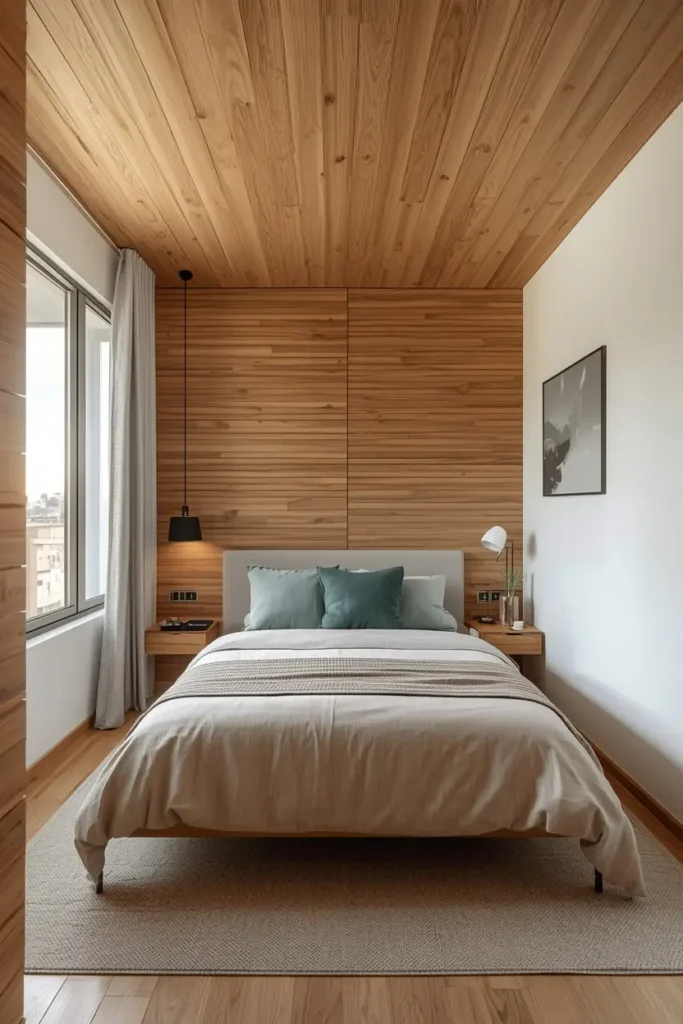
Sleek, uniform wood-look panels applied directly to the ceiling surface, with clean seams and a finished, almost professional look.
Design Breakdown
This is the fastest possible way to get a wood ceiling look without cutting a single board. Peel-and-stick panels have come a long way, and the good ones are genuinely convincing.
For renters especially, this is often the only realistic wood ceiling option available.
Expert Tip
Clean and prime your ceiling surface before applying panels — adhesive fails fast on dusty or textured popcorn ceilings.
Why It Works
It removes the two biggest barriers to a wood ceiling: cost and commitment. You get the visual payoff without the labor or permanence.
Best For
- Renters
- Budget makeovers
- Small spaces
Common Mistake To Avoid
Skipping the primer step on textured ceilings. Panels will start peeling within weeks if the surface isn’t prepped properly.
Quick Wins
- Order a sample panel first — lighting changes how wood tones read
- Start your first row from the most visible corner of the room
- Use a laser level to keep panel lines straight
Would you choose function or style here? The beauty of peel-and-stick is you genuinely don’t have to pick — this option delivers both.
5. Wood Ceiling Beams (Faux or Real)
What You’re Seeing
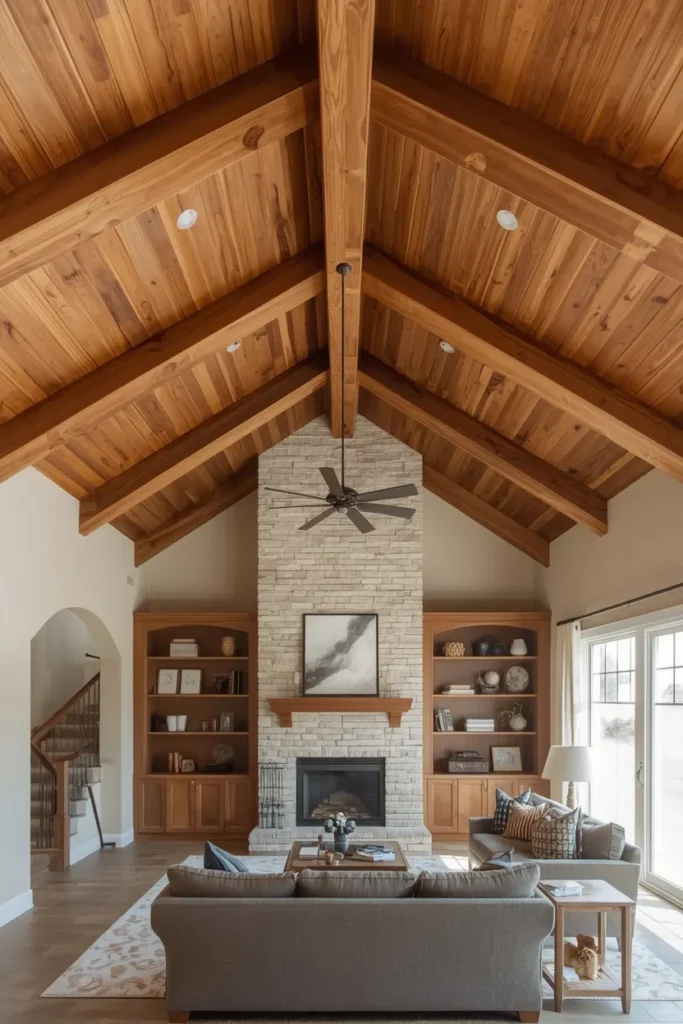
Thick, evenly spaced wood beams running across the ceiling, casting soft shadows and adding architectural depth to an otherwise flat surface.
Design Breakdown
Real structural beams are expensive and often impossible without major renovation. Faux beams, made from lightweight polyurethane or hollow wood boxes, mimic the exact same look for a fraction of the price and effort.
Most people can’t tell the difference from the floor.
Expert Tip
Hollow-box beams built from plywood and 1×4 boards can be assembled in an afternoon and mounted with basic hardware — no structural engineer required.
Why It Works
Beams break up a flat ceiling plane, add a sense of history and craftsmanship, and instantly elevate a builder-grade room.
Best For
- Large spaces
- Luxury homes
- Families
Common Mistake To Avoid
Installing beams too close together. Overcrowding the ceiling makes rooms feel lower and heavier instead of grander.
Quick Wins
- Stain beams a shade darker than your flooring for contrast
- Space beams using the room’s width divided evenly, not by guesswork
- Add small hooks to beams for hanging plants or string lights
Here’s where it gets interesting — the next idea completely reframes how you should think about materials.
Here’s where it gets interesting: the biggest myth about beam ceilings is that they only work in farmhouses. I’ve seen faux beams look incredible in coastal homes, modern minimalist spaces, even moody dark-painted rooms. The trick is matching the beam finish to your existing wood tones — flooring, furniture, trim. When those tones talk to each other, the beams feel like they were always part of the house, not an afterthought bolted on later.
What a Cheap Wood Ceiling Actually Costs
Let’s talk real numbers, because “cheap” means different things to different people.
I’ve broken this down by project type so you can plan accurately before you buy a single board.
Peel-and-Stick Panels
- Cost: roughly $2–$6 per square foot
- Time: a weekend, sometimes a single afternoon
- Best for: renters, first-time DIYers, quick refreshes
Reclaimed Wood Planks
- Cost: often free to $3 per square foot if sourced locally
- Time: 2-3 days including sealing and drying
- Best for: budget makeovers with a rustic, farmhouse, or industrial style
Wood Slat Accent Sections
- Cost: $1.50–$4 per square foot depending on wood type
- Time: one full day for an average-sized room
- Best for: accent areas, small spaces, modern homes
Faux Wood Beams
- Cost: $30–$150 per beam depending on length and material
- Time: a weekend for a full room
- Best for: living rooms, dining rooms, primary bedrooms
Full Solid Wood Ceiling
- Cost: $4–$10+ per square foot
- Time: several days, often needs an extra set of hands
- Best for: statement rooms, larger budgets, long-term homes
A few decision-making tips before you commit:
- If you’re renting, prioritize removable options like peel-and-stick or lightweight slat panels attached without adhesive damage
- If you’re in it for the long haul, reclaimed wood offers the best value per dollar because of the character it brings
- Always buy 10-15% more material than your measurements suggest — cuts, mistakes, and pattern matching eat into your supply fast
- Get samples before committing to a full room. Wood tone shifts dramatically under artificial light versus daylight
Common mistakes people make when budgeting:
- Underestimating labor time and rushing the install, which leads to visible gaps and uneven lines
- Forgetting to budget for sealant, stain, or primer — these “extras” can add 15-20% to your total cost
- Choosing the cheapest wood option without checking if it’s warped or unevenly cut
Would this fit your next home project? Take a minute and think about which category actually matches your situation — renter, homeowner, or somewhere in between — because that answer shapes everything else you do next.
6. Shiplap Wood Ceiling
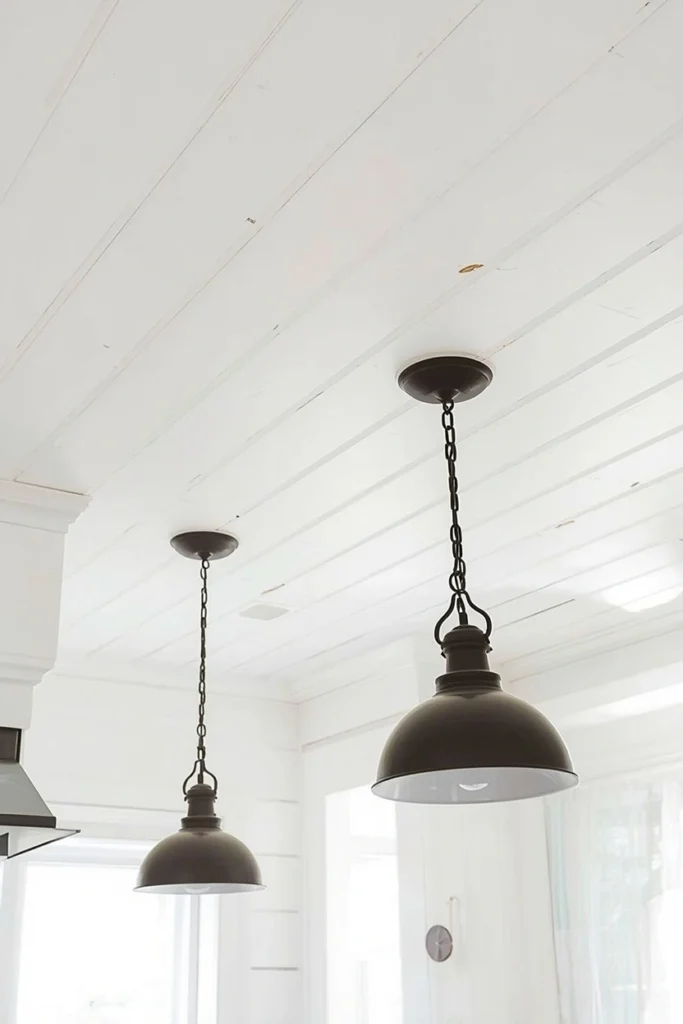
The next idea is one designers secretly love, and it’s probably the single most requested look I get asked about.
What You’re Seeing
Horizontal wood boards with narrow visible grooves between each plank, painted crisp white or left in natural wood tone, running the full length of the ceiling.
Design Breakdown
Shiplap isn’t just a wall trend anymore — it’s moved to ceilings, and the effect is stunning. The horizontal lines and subtle shadow gaps create texture without overwhelming a room.
It reads as classic, timeless, and expensive, even when it’s made from basic pine boards.
Expert Tip
Use a nickel or a scrap piece of quarter-inch wood as a spacer between boards to keep your grooves consistent from wall to wall.
Why It Works
Shiplap’s clean lines make ceilings feel taller and more finished, and the subtle shadows add dimension that flat drywall simply can’t replicate.
Best For
- Farmhouse homes
- Budget makeovers
- Families
Common Mistake To Avoid
Painting shiplap the exact same white as your walls with no contrast. A slightly different shade or a semi-gloss finish helps the ceiling detail actually show up.
Quick Wins
- Buy pre-primed shiplap boards to save a painting step
- Install perpendicular to your ceiling joists for the strongest hold
- Leave a portion natural wood-toned for a modern farmhouse mashup
Which of these ideas would work best in your home? If your style leans classic and cozy, shiplap is almost always the safest — and most photogenic — bet.
If shiplap has you thinking bigger picture, our rustic kitchen ideas guide shows how this same texture translates beautifully into kitchen spaces too.
7. Herringbone Wood Ceiling Pattern
Don’t skip the next tip — this is the idea that gets the most “wait, that’s a ceiling?” reactions.
What You’re Seeing
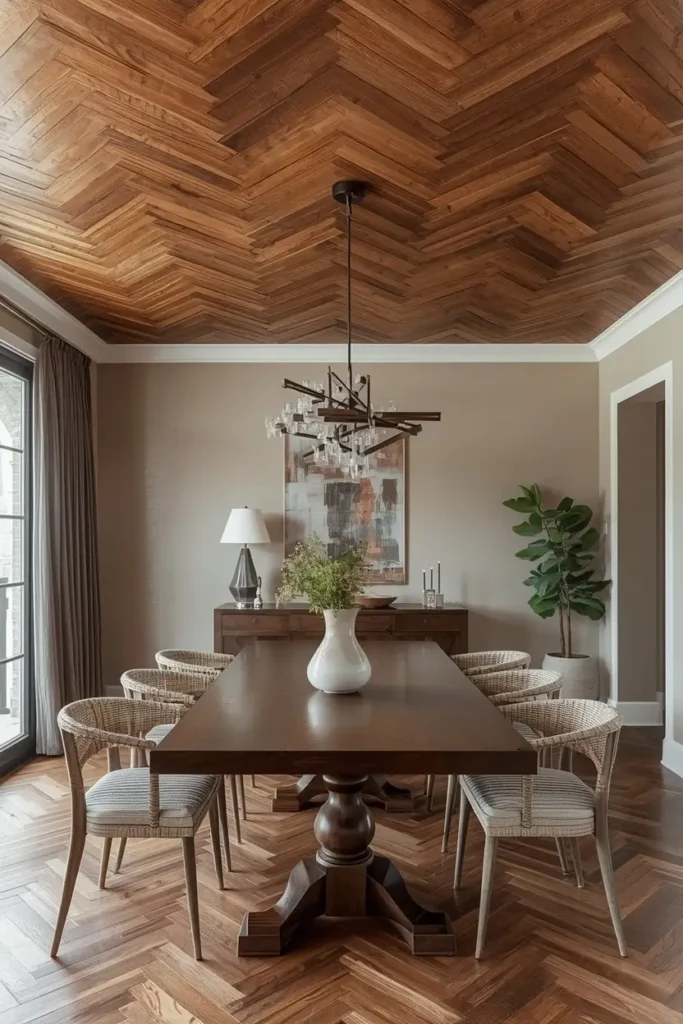
Short wood planks arranged in a diagonal zig-zag pattern across the ceiling, creating a woven, almost basket-like visual texture overhead.
Design Breakdown
Herringbone is typically reserved for floors, but bringing it overhead creates one of the most striking, high-end-looking ceiling treatments you can DIY.
Because the boards are shorter, you can often use scrap wood or cut-offs from other projects, which keeps costs surprisingly low.
Expert Tip
Start your pattern from the center of the room outward, not from a wall edge — this keeps the herringbone symmetrical even if the room isn’t perfectly square.
Why It Works
The diagonal lines create visual movement that flat or straight-plank ceilings simply can’t match, making the room feel custom-designed rather than store-bought.
Best For
- Luxury homes
- Large spaces
- Budget makeovers (using scrap wood)
Common Mistake To Avoid
Skipping the layout planning stage. Herringbone requires careful measuring — jumping straight into installation almost always results in a crooked, off-center pattern.
Quick Wins
- Chalk-line your center point and working lines before cutting any wood
- Use a miter saw for precise 45-degree angle cuts
- Stain in one uniform tone so the pattern, not the color, does the visual work
Think about how much easier your next dinner party feels when guests look up and immediately ask who did your ceiling.
You May Also Like:
- Modern Farmhouse Kitchen Ideas
- Country Farmhouse Decor Ideas
- Dining Room Ideas
- Home Theater Ideas
- Wood Desk Ideas
8. Plywood Ceiling With a Statement Stain
What You’re Seeing
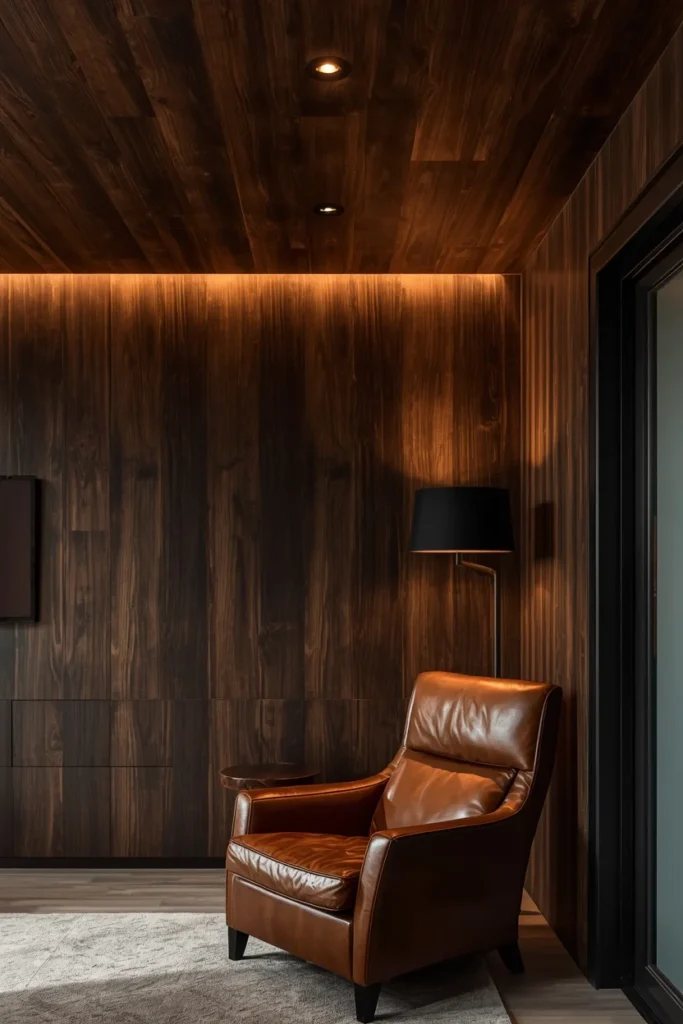
Large, seamless sheets of plywood covering the ceiling, finished with a rich, deep stain that highlights the natural wood grain running through each panel.
Design Breakdown
This might be the most underrated option on this entire list. Plywood is one of the cheapest wood materials available, but with the right stain, it looks nothing like the big-box store sheets it started as.
Using full sheets instead of individual planks also dramatically cuts down on install time.
Expert Tip
Choose a plywood grade with a visible, attractive grain (like birch or oak-veneer plywood) rather than the cheapest construction-grade option — the grain is what sells this look.
Why It Works
A dark, moody stain on plywood creates a dramatic, almost cocoon-like feel in a room, which has become one of the biggest interior trends for cozy, intimate spaces.
Best For
- Budget makeovers
- Large spaces
- Families
Common Mistake To Avoid
Choosing a stain color without testing it on the actual plywood first. Grain patterns absorb stain differently than solid wood, and results can look very different than expected.
Quick Wins
- Sand thoroughly before staining for even absorption
- Apply two thin coats rather than one thick coat
- Seal with matte polyurethane to prevent yellowing over time
Most people don’t know this, but plywood ceilings are a favorite trick among budget-conscious interior designers specifically because full sheets minimize visible seams. Fewer seams means a cleaner, more polished final look with less labor. If you’re nervous about staining, always test your exact stain-and-topcoat combination on a leftover scrap first — plywood can pull color unevenly depending on the grain direction, and you don’t want surprises sixteen feet above your head.
What’s your biggest challenge right now — budget, time, or DIY confidence? Plywood tends to solve at least two of those three at once.
9. Painted Wood Plank Ceiling in a Bold Color
This simple change can completely transform the room, and it’s the idea that surprised me the most when I started researching this list.
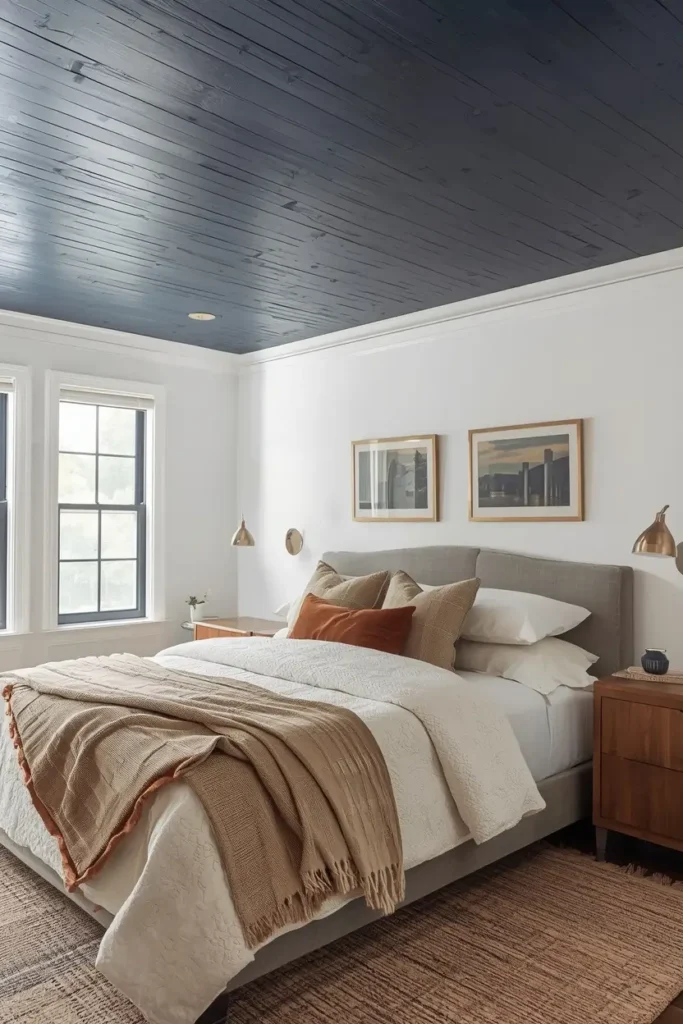
What You’re Seeing
Wood plank ceiling painted in a rich, saturated color — deep navy, forest green, or warm terracotta — while the walls stay neutral and calm.
Design Breakdown
We’re conditioned to think ceilings must be white or natural wood, but a bold painted wood ceiling (sometimes called a “fifth wall”) is one of the boldest, most talked-about design choices you can make.
The wood grain still shows through slightly depending on your paint sheen, giving you color and texture in one move.
Expert Tip
Choose a color already present elsewhere in the room — a throw pillow, a rug accent, artwork — so the ceiling feels connected rather than random.
Why It Works
A colored ceiling creates a psychological sense of coziness and intimacy, almost like being wrapped in the room rather than just standing in it.
Best For
- Luxury homes
- Families
- Budget makeovers
Common Mistake To Avoid
Choosing a trendy color without testing it under your room’s actual lighting. Colors shift dramatically overhead compared to on a wall sample.
Quick Wins
- Test paint swatches directly on the ceiling, not just the wall
- Use a flat or matte finish to minimize glare from overhead lighting
- Keep trim and walls lighter to balance the boldness above
Visualize the difference between walking into a plain white room versus one with a deep, saturated wood ceiling overhead — it’s not subtle, and that’s exactly the point.
If bold color has you inspired for other rooms too, check out our bedroom ceiling ideas for more ways to bring this trend into more intimate spaces.
10. Salvaged Pallet Wood Ceiling
What You’re Seeing
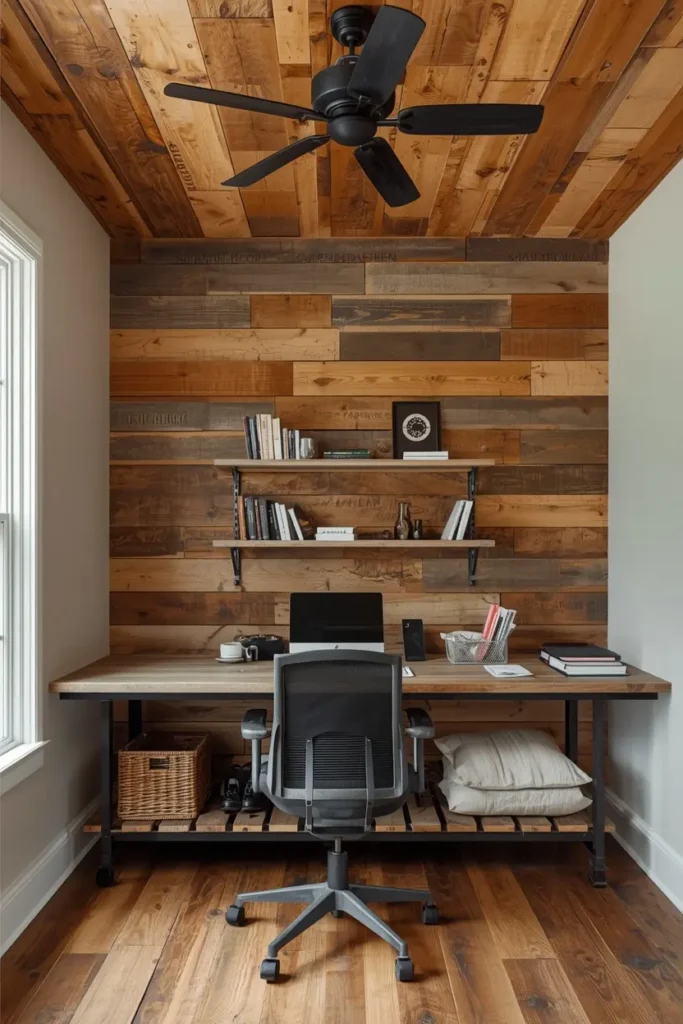
A ceiling built entirely from disassembled wooden pallets, showing raw grain, stamped markings, and varied wood tones pieced together like a puzzle.
Design Breakdown
This is the ultimate cheap wood ceiling idea, and I mean that literally — pallets are often free if you know where to look (hardware stores, moving companies, warehouses).
Disassembling them takes patience, but the material cost is close to zero.
Expert Tip
Use a reciprocating saw to cut through pallet nails instead of prying boards apart — it’s faster and causes far less wood damage.
Why It Works
Pallet wood carries visible history — stamps, weathering, imperfections — that gives a ceiling instant depth and story, something no new material can replicate.
Best For
- Budget makeovers
- Renters (in sectioned, removable panels)
- Small spaces
Common Mistake To Avoid
Skipping the cleaning and treatment step. Pallets can carry dirt, splinters, or chemical treatments — always clean and seal before installing overhead.
Quick Wins
- Sort boards by color tone before installing for a more cohesive final look
- Sand rough edges to avoid dust and splinters falling from above
- Seal thoroughly, especially if pallets were previously stored outdoors
Let me know which one is your favorite so far — I’m genuinely curious whether budget-driven ideas like this one or the bolder statement looks win people over more often.
Related Ceiling & Home Decor Ideas
If this list has you rethinking every blank surface in your house, you’re going to love exploring these next.
- Bedroom Ceiling Ideas
- High Ceiling Living Room Ideas
- Wall Paneling Ideas
- Living Room Remodel Ideas
- Cozy Living Room Ideas
- Country Farmhouse Decor Ideas
- Home Theater Ideas
- Family Room Ideas
Final Thoughts on Cheap Wood Ceiling Ideas
Here’s the truth: your ceiling has been the most overlooked surface in your entire home, and it’s been quietly holding your whole room back.
Out of everything we covered, a few ideas stand out as the highest-impact, lowest-cost options — whitewashed planks for brightness, peel-and-stick panels for renters, and shiplap for that timeless, magazine-ready look.
Pick just one. Not all ten, not even three. One idea, applied this week, is enough to completely change how a room feels every single time you walk into it.
So which of these cheap wood ceiling ideas are you leaning toward? I’d genuinely love to know which one speaks to your space.
If wood ceilings have you noticing every neglected surface in your home now, don’t stop here — our wall paneling ideas guide is the perfect next stop, and it might just be the project that surprises you even more than this one did.
Frequently Asked Questions
1. What is the cheapest way to add a wood ceiling? Peel-and-stick wood panels and salvaged pallet wood are the two most affordable routes, often costing just a few dollars per square foot or close to free if sourced locally.
2. Do wood ceilings make a room look smaller? Not if done correctly. Whitewashed finishes, lighter wood tones, and slat patterns actually help rooms feel taller and more open rather than closed in.
3. Can renters install a wood ceiling without damaging the space? Yes. Peel-and-stick panels and lightweight, removable slat systems are renter-friendly options that don’t require permanent alteration.
4. What type of wood is best for a budget ceiling project? Pine, plywood, and reclaimed or salvaged wood are the most affordable options and still deliver a high-end look with the right finish.
5. How long does it take to install a wood plank ceiling? Most DIY wood ceiling projects take anywhere from a single afternoon (for smaller accent areas) to a full weekend for an average-sized room.
6. Is it hard to install a wood ceiling by yourself? Simpler options like peel-and-stick panels or slat accents are very DIY-friendly. More complex patterns like herringbone require more planning and ideally an extra set of hands.
7. Do wood ceilings need to be sealed? Yes, especially reclaimed, pallet, or plywood ceilings. Sealing protects against dust, moisture, and yellowing over time.
8. What rooms work best for a wood ceiling? Living rooms, primary bedrooms, dining rooms, and home offices are especially popular, though even small bathrooms and hallways can benefit from an accent treatment.
9. Can I paint a wood ceiling instead of staining it? Absolutely. Painted wood ceilings, especially in bold colors, are one of the fastest-growing trends and work beautifully with texture from wood grain still showing through.
10. How do I keep a wood ceiling from making a room feel too dark? Stick to lighter wood tones, whitewashed finishes, or reflective matte sheens, and balance with brighter wall colors and adequate lighting throughout the room.