


This article was created in line with Trends Oraa’s research and content standards.
You open the door and immediately regret it.
Toys everywhere. Clothes on the floor. Zero floor space.
If that sounds familiar, you’re not alone — and the good news is that you don’t need a complete renovation to fix it. These declutter kids bedroom ideas are practical, budget-friendly, and actually work long-term.
Whether you’re dealing with a tiny shared room or a full-sized kids’ bedroom that somehow still feels chaotic, there’s something on this list for every family. You might also love our guide on space-saving furniture ideas — it pairs perfectly with everything you’re about to read.
Let’s get into it. By the time you finish this post, you’ll have a clear plan for transforming that disaster zone into a room your kid (and you) will actually love spending time in.
Why Decluttering a Kids Bedroom Feels So Overwhelming
Most parents know the room needs help. The problem isn’t motivation — it’s not knowing where to start.
Kids accumulate stuff at an alarming rate. Birthday gifts, school projects, fast-food toys, mystery items from grandparents. Before you know it, every drawer is stuffed and every corner is a hazard zone.
The key isn’t just cleaning up. It’s creating systems that make tidying automatic — even for little ones.
Which of these rooms sounds most like yours: total chaos, “organized mess,” or “one good declutter away from being beautiful”? Keep reading, because we’re covering all three scenarios.
10 Clever Declutter Kids Bedroom Ideas
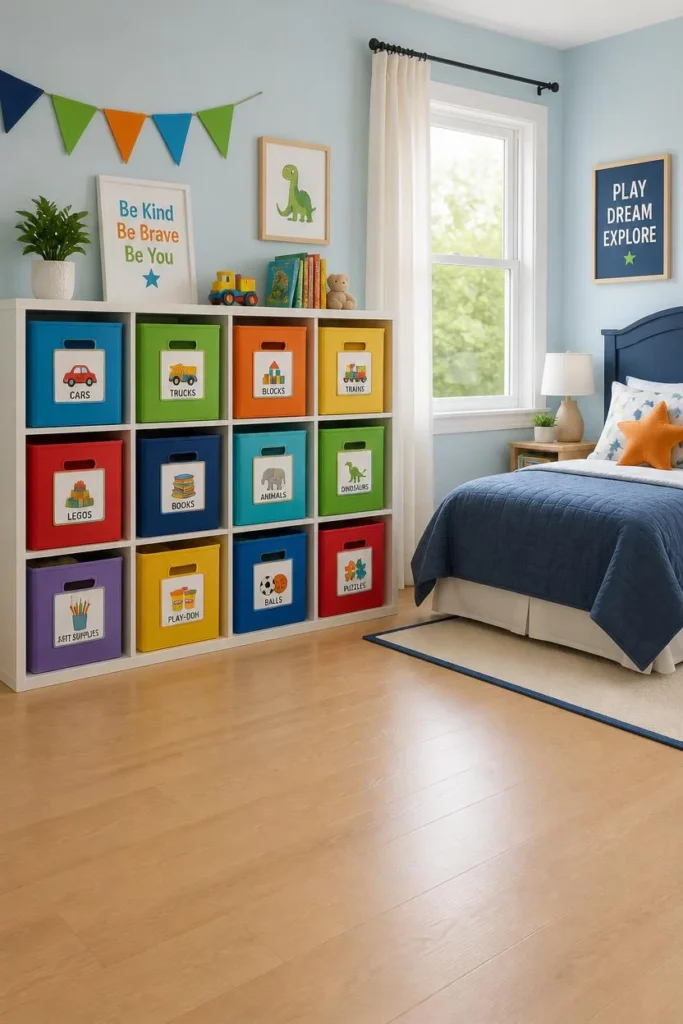
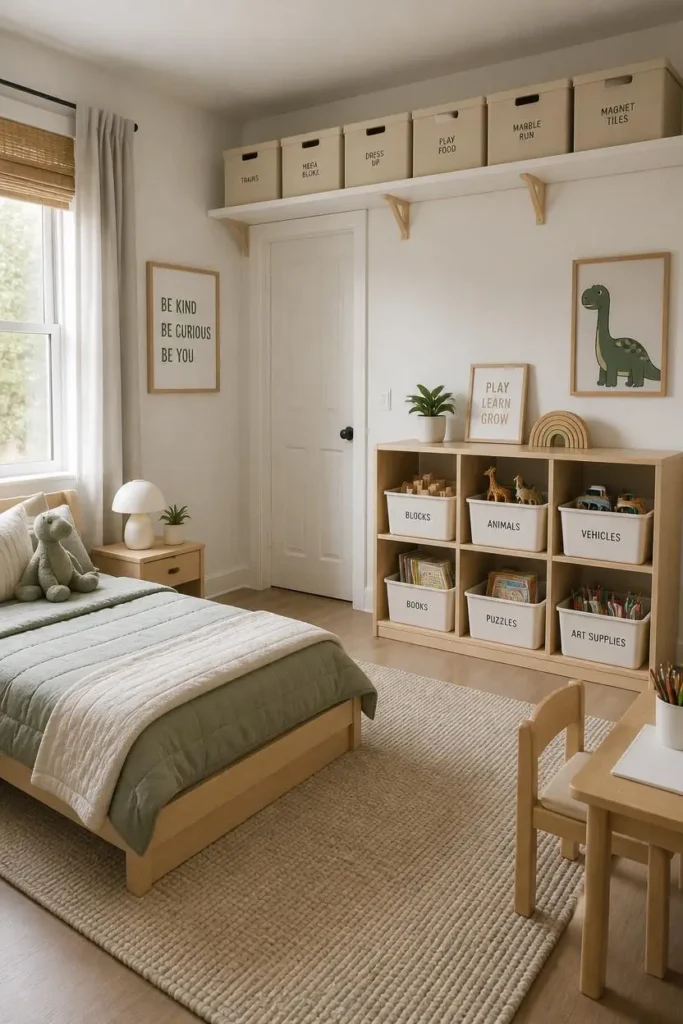
1. Use Labeled Bins for Every Toy Category
What You’re Seeing
Picture open shelving with rows of colorful fabric bins, each clearly labeled with a picture and word — “Cars,” “Blocks,” “Art Supplies.” The floor is clear. The room feels calm. A small child walks in, grabs the bin they need, and puts it back when they’re done.
Design Breakdown
The labeled bin system is one of the most effective declutter kids bedroom ideas for families with young children. The trick is pairing every category with a visual label, not just text. Kids who can’t read yet respond to pictures — a tiny illustration of a dinosaur on the “Dinosaurs” bin is all they need.
Open-face cube shelving units (like IKEA KALLAX) work brilliantly here. You can mix fabric bins, small baskets, and even clear containers depending on the type of item being stored.
Use bins in two sizes:
- Large bins for bulky toys (stuffed animals, balls, Lego sets)
- Small bins for tiny pieces (action figures, hair ties, crayons)
Expert Tip
Don’t organize by toy brand — organize by activity. A “Building” bin makes more sense to a child than separate bins for Duplo, Mega Bloks, and magnetic tiles. When things have one home, they return to it.
Why It Works
Clear categories eliminate decision fatigue. Kids don’t have to figure out where something goes — the bin tells them. This dramatically reduces the “I’ll just leave it on the floor” habit.
Best For
- Small spaces
- Families with toddlers and young kids
- Budget makeovers
Common Mistake to Avoid
Don’t create too many bins. If a child has 30 categories, the system collapses. Start with 8–12 bins max, then add only when truly necessary.
Quick Wins
- Use photos instead of (or alongside) written labels for pre-readers
- Rotate seasonal toys into storage to keep active bins manageable
- Color-code bins by child if siblings share a room
- Reassess and purge once every season — kids outgrow toys fast
2. Go Vertical With Wall-Mounted Storage
What You’re Seeing
A bedroom wall transformed into a storage feature — floating shelves at different heights, a pegboard panel hung at a child’s eye level, small hooks for backpacks and dress-up costumes. The floor is completely clear. The walls do all the work.
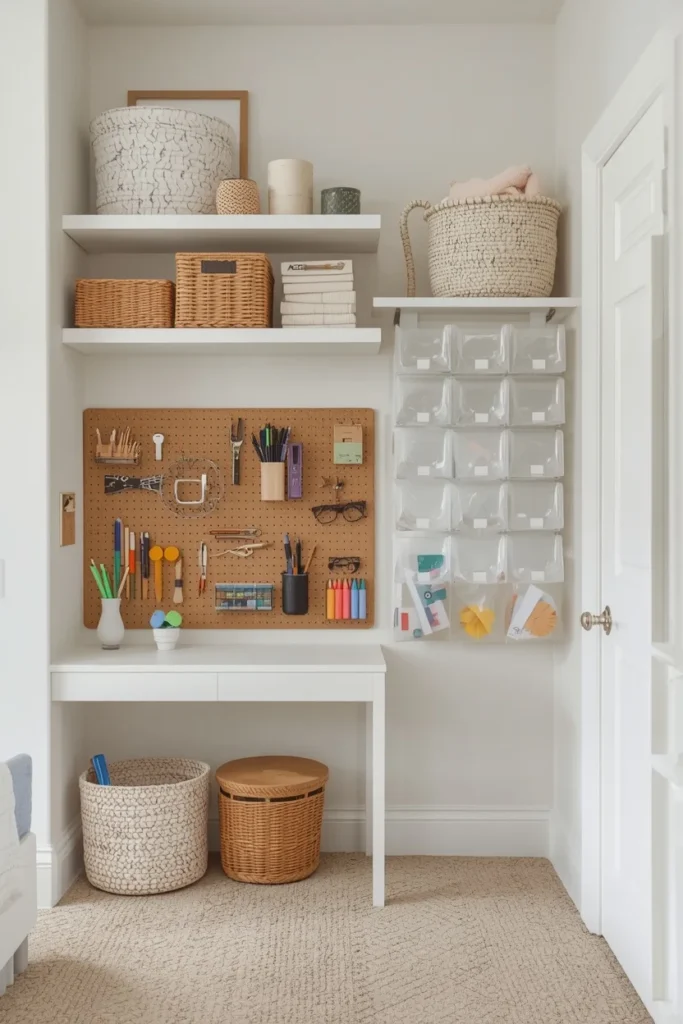
Design Breakdown
Floor space in a kids’ room is prime real estate. The moment you start treating walls as storage opportunities, everything changes.
Wall-mounted shelves let you:
- Display books face-out (so kids can actually see what they own)
- Store art supplies within reach but off the desk
- Show off collectibles without taking up surface space
A pegboard is especially versatile. It can hold crayons, scissors, small bins, and even a clock — and it’s endlessly reconfigurable as your child’s needs change.
Don’t forget the back of the door. An over-door organizer with clear pockets can hold everything from art supplies to socks to small toys.
Expert Tip
Mount one low shelf at your child’s height — about 24–30 inches from the floor for toddlers. When kids can reach their own stuff, they’re far more likely to put it away themselves.
Why It Works
Vertical storage dramatically increases the functional square footage of any room without requiring more floor space. It also makes a room look larger, which improves the overall feel.
Best For
- Small spaces
- Renters (pegboards require only a few anchor points)
- Budget makeovers
Common Mistake to Avoid
Don’t overload shelves with decorative clutter. Each shelf should have a function. If items sit there “just because,” that shelf is wasted storage.
Quick Wins
- Add a row of low hooks for backpacks and jackets near the door
- Use floating shelves for book displays — it encourages reading too
- Install a pegboard in the art/craft zone for instant supply access
- Use adhesive hooks on walls for lightweight items if you’re renting
💡 Expert Insight — One thing I’ve learned after helping dozens of parents reorganize kids’ rooms: The single biggest mistake is organizing around existing clutter instead of purging first. Before you buy a single bin or shelf, do a “keep, donate, trash” sweep. Get your child involved — even 3-year-olds can decide if they still love a toy. You’ll be shocked how much disappears naturally. The room almost organizes itself once the excess is gone. Only then should you invest in any storage solution. Buying more bins for more stuff is just relocating the chaos, not solving it.
3. Create a Dedicated “Everything In Its Place” Zone
What You’re Seeing
A small landing zone near the bedroom door: a low bench with cubbies underneath, three small hooks above it at different heights, and a shallow tray on the bench itself. Backpack, shoes, and jacket all have a spot. The rest of the room stays clean because everything gets dropped here first.
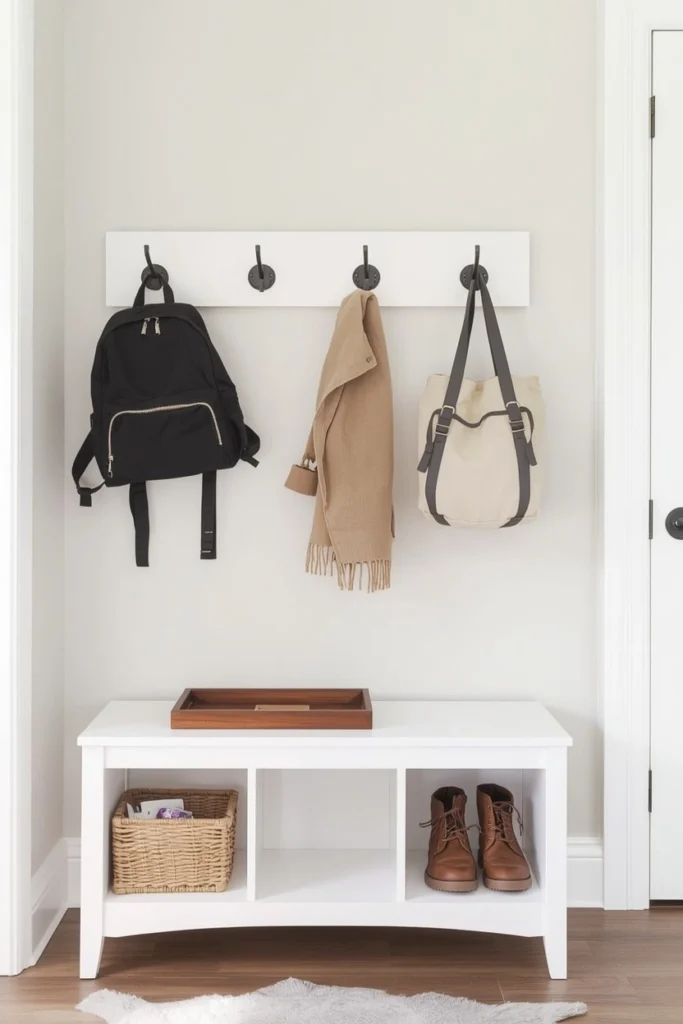
Design Breakdown
Think of this as a mini mudroom for your child’s bedroom. The idea is to intercept the clutter before it spreads across the floor.
The landing zone should include:
- Hooks for backpacks, jackets, and dress-up items
- A small tray or dish for things that live in pockets (coins, small toys, hair ties)
- A cubby or basket for shoes
This works especially well for school-age kids who bring new items home daily. When there’s a designated drop zone, they don’t need to think — they just use it.
Expert Tip
Keep a small trash bin at the landing zone. Kids come home with candy wrappers, broken pencils, and mystery paper scraps. A trash can right there means those things disappear immediately instead of ending up on the floor.
Why It Works
Most bedroom clutter happens in the first 60 seconds after a child walks in. By giving them a structured entry routine, you eliminate the scatter-before-it-starts problem.
Best For
- School-age children
- Families
- Small and large spaces alike
Common Mistake to Avoid
Don’t make the landing zone too complicated. If it requires thought, kids will skip it. Three hooks and a cubby is plenty.
Quick Wins
- Label each hook with the child’s name or a picture of what goes there
- Use a shallow tray for the “daily essentials” so nothing gets lost
- Add a small mirror above the bench — kids actually use it, which means they stop at the zone
- Include a charging spot for devices if your child has a tablet or reader
Most people waste more space than they realize. The area behind the bedroom door, the wall beside the closet, the space under the bed — these are goldmines. The next few ideas show you exactly how to use them.
You May Also Like:
- Small Bedroom Storage Ideas
- Wall Shelves Bedroom Ideas
- Space-Saving Furniture Ideas
- DIY Organization Hacks
- Apartment Organization Ideas
4. Maximize Under-Bed Storage
What You’re Seeing
A bed with clean lines and a low-profile frame. Underneath, flat rolling bins slide in and out with ease — one for out-of-season clothes, one for extra bedding, one for toys that don’t get daily use. Everything hidden, nothing wasted.
Design Breakdown
Under the bed is arguably the most underused storage zone in any child’s room. A standard twin bed offers roughly 40–50 cubic feet of storage space. That’s enormous.
You can make the most of it with:
- Rolling bins or drawers for easy access
- Vacuum storage bags for bulky seasonal items
- Flat crates on furniture sliders as a DIY solution
If your child has a loft bed, the area below it becomes an entire functional zone — a reading nook, a play area, a small desk setup. The possibilities multiply.
Expert Tip
Use clear bins so kids (and you) can see exactly what’s stored underneath. Opaque bins turn into mystery boxes that never get opened. Clear sides mean things get found and returned.
Why It Works
Under-bed storage keeps rarely-used items accessible without cluttering the main space. It’s invisible when not in use, which keeps the room feeling calm and tidy.
Best For
- Small spaces
- Budget makeovers
- All ages
Common Mistake to Avoid
Don’t store things under the bed that need daily access. Under-bed is for rotation items — seasonal clothes, extra blankets, infrequently played toys. Daily stuff needs to live above ground.
Quick Wins
- Measure your bed clearance before buying bins — sizes vary widely
- Roll a handled bin toward the foot of the bed for easiest access
- Label the front face of each bin so kids know what’s inside
- Add a small bed skirt if you prefer the hidden aesthetic without buying a new bed frame
5. Build a Book Display That Doubles as Decor
What You’re Seeing
A gallery-style book display wall — forward-facing shelves that show book covers like art. Picture books with bright spines become part of the room’s color story. A small reading corner sits below with a bean bag chair and a soft rug. The whole corner invites curling up.

Design Breakdown
Most kids’ rooms have books shoved into a standard shelf, spines out, crammed together. Kids can’t find what they want, so they don’t read. The fix is embarrassingly simple: face the books outward.
Forward-facing book displays:
- Show the cover, which is what actually attracts a child to a book
- Make rotating the book selection easy (one book in, one book out)
- Double as wall decor with zero additional effort
- Encourage independent reading because kids can self-select
You can buy purpose-built picture book rails (IKEA MOSSLANDA works beautifully), or mount simple ledge shelves. Either option costs under $40 for a full wall of display space.
Expert Tip
Keep only 10–15 books on display at a time. Rotate the rest from a box in the closet. When a “new” book appears on the shelf, kids treat it with fresh excitement — even if they’ve read it before.
Why It Works
Visible books get read. Hidden books get forgotten. A well-displayed reading corner also creates a calm zone in the room — a place kids actually want to be, separate from the play zone.
Best For
- All ages
- Small and large spaces
- Budget makeovers
Common Mistake to Avoid
Don’t mix toys and books on the same display. Keep the reading zone clearly defined. Mixing signals confusion about what the corner is for.
Quick Wins
- Paint the wall behind the book display a contrasting color — it elevates the whole corner
- Add a small lamp or string lights to make it feel cozy
- Let kids choose which books go “on display” — it creates ownership
- A low reading cushion or bean bag completes the zone without taking much space
💡 Expert Insight — Here’s where it gets interesting: Many parents think a dedicated reading corner is a luxury for big rooms. It’s actually more valuable in small rooms. A defined reading corner gives kids a mental “off switch” from play — a place to decompress that isn’t a screen. Even a corner nook with a cushion, a lamp, and a few books costs under $50 to create. The psychological benefit of having a “cozy corner” in a kids’ room is well-documented. Kids who have quiet reading spaces tend to settle better at night too. That’s a win for everyone.
Your Complete Planning Guide to Decluttering a Kids Bedroom
Before you buy a single bin or shelf, you need a plan. Here’s the step-by-step approach I’ve found works best — and the mistakes that derail most parents.
Step 1: Do the Purge First
This is non-negotiable.
Pull everything out of the room (or at minimum, out of drawers and shelves). Sort into three categories:
- Keep — actively used, loved, or developmentally appropriate
- Donate — good condition, but the child has outgrown or lost interest
- Trash — broken, incomplete sets, Happy Meal toys, mystery items
The rule I use: If your child hasn’t touched it in 3 months and doesn’t notice when it’s gone, it goes.
Get your child involved. For kids 3+, a “keep or donate?” question works well. Most kids give away more than you’d expect when they feel in control of the decision.
Expect to remove 30–50% of what’s currently in the room. That sounds dramatic, but it’s normal. Kids’ rooms accumulate at an alarming rate.
Cost: Free. Just time and boxes.
Step 2: Measure Before You Buy Anything
One of the most common (and expensive) mistakes: buying storage that doesn’t fit.
Measure:
- Floor space available for furniture
- Wall space for shelves (and distance between studs if you’re anchoring anything heavy)
- Closet dimensions (height, width, depth)
- Under-bed clearance
Don’t rely on memory. Write it down. Screenshot this section and add your measurements in the notes app on your phone.
Step 3: Map Out Zones
A well-organized kids’ bedroom has distinct zones. Even in a small room, mentally dividing the space helps enormously.
Common zones include:
- Sleep zone — bed, nightstand, reading lamp
- Play zone — toy storage, rug, open floor space
- Learning zone — desk or table, art supplies, books
- Landing/entry zone — hooks, cubbies, daily essentials
You don’t need a huge room to have zones. Even in a 10×10 bedroom, a small area rug defines the play zone. A desk in one corner defines the learning zone. Zones tell kids (and their brains) what kind of activity happens where.
Step 4: Choose Storage That Grows With Your Child
Here’s where many parents overspend.
Avoid hyper-themed, character-specific storage. That PAW Patrol bin is adorable at age 4 and embarrassing at age 7. Choose neutral storage shapes and colors, then add personality with labels, paint, or decals that are easy to swap.
Storage that grows with kids:
- Open cube shelving (IKEA KALLAX, Threshold, Closetmaid)
- Simple fabric bins in neutral colors
- Pegboards (infinitely reconfigurable)
- Floating shelves in standard sizes
- Under-bed rolling drawers
Approximate costs:
- Fabric bins: $5–15 each
- Cube shelving unit (4–8 cubes): $40–100
- Floating shelf set (3 shelves): $25–60
- Pegboard panel + accessories: $30–70
- Under-bed rolling bin: $15–30
Step 5: Involve Your Child in the Setup
Kids maintain systems they helped create. Systems imposed on them fall apart in days.
Let them:
- Choose bin colors
- Make or choose labels
- Decide where their favorite toys live
- Create “rules” for their own room (it becomes their idea, not yours)
This is especially effective for kids 5 and up. Even a simple “I made these rules for my room” poster on the wall — made by the child — can dramatically improve tidiness habits.
Common Mistakes to Avoid
- Buying storage before purging — you’ll just buy more bins for more junk
- Creating systems too complicated for the child’s age — a 4-year-old can’t maintain 20 categories
- Storing everything at adult height — kids can’t maintain systems they can’t reach
- Ignoring the closet — a well-organized closet can double the functional storage in a room
- Trying to do everything in one day — phase the project over a weekend to avoid overwhelm
6. Install a Pegboard for Craft and Art Supplies
What You’re Seeing
A bright, organized pegboard mounted in the art corner of a kids’ room. Small bins hold crayons, markers, and paint brushes at easy-reach height. Scissors hang from a hook. A roll of craft paper mounts at the side. Everything visible, everything accessible. The desk below stays completely clear.
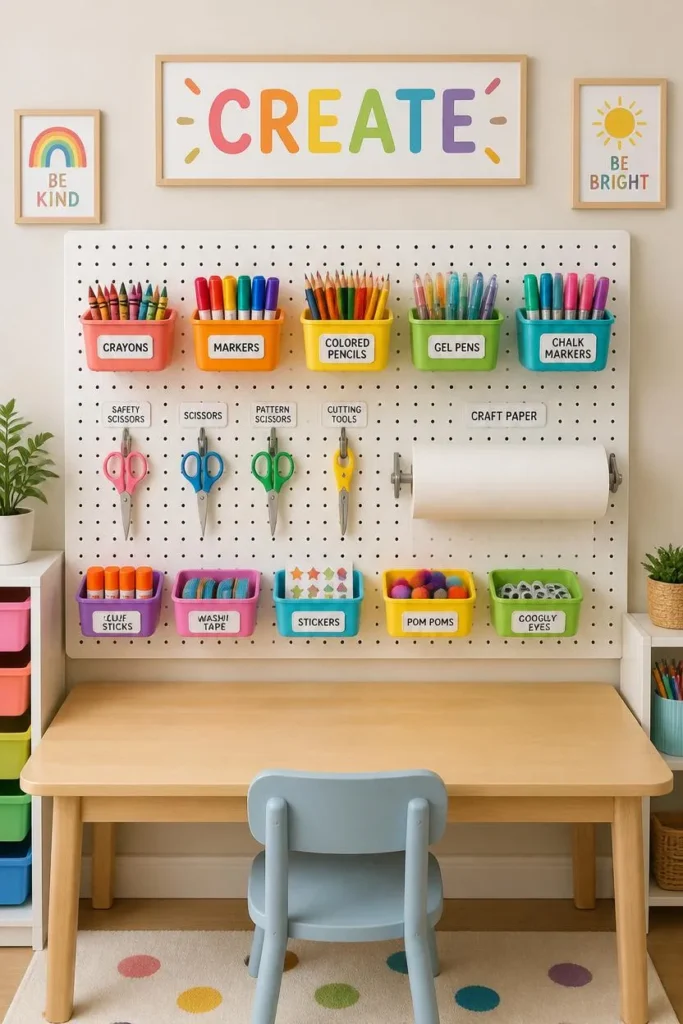
Design Breakdown
Art supplies are notoriously difficult to organize. They come in dozens of shapes, sizes, and quantities. Drawers become junk drawers. Shelves become piles. A pegboard solves this completely.
Pegboards are sold at most hardware stores (and online) in white, natural wood, or painted colors. The accessories — hooks, small bins, trays, and holders — are cheap and infinitely rearrangeable.
In a kids’ art zone, you want:
- Bin hooks for crayons, colored pencils, and markers
- Horizontal hooks for scissors (pointed tips in, handles out)
- Small shelves or trays for paint, glue sticks, and tape
- A large hook for aprons or smocks
Expert Tip
Trace the outline of tools onto the pegboard with a permanent marker. This shows kids exactly where each item goes — and makes it obvious at a glance when something is missing. It sounds like extra effort, but it takes 10 minutes and lasts for years.
Why It Works
When art supplies are visible and accessible, kids use them more. And because there’s a clear place for everything, cleanup takes about 2 minutes instead of 20.
Best For
- Creative kids
- Small and large spaces
- Budget makeovers
- All ages
Common Mistake to Avoid
Don’t mount the pegboard at adult height. It should be accessible to the child using it — typically 24–48 inches from the floor depending on age.
Quick Wins
- Paint the pegboard a bold color to make it a design feature, not just a storage piece
- Add a small shelf below for sketchbooks and larger paper pads
- Use a strip of washi tape around the pegboard zone to visually define the art corner
- Label each bin with a picture so younger kids can sort independently
The next idea is one designers secretly love. It looks expensive, creates enormous storage capacity, and most parents never think to try it.
7. Upgrade the Closet With a Simple Organizer System
What You’re Seeing
A kids’ closet that looks almost magazine-worthy. Double hanging rods — one at child height, one higher up — maximize the vertical space. Shallow shelves hold folded clothes and shoes. A small drawer unit sits on the floor. Everything is visible, reachable, and labeled.
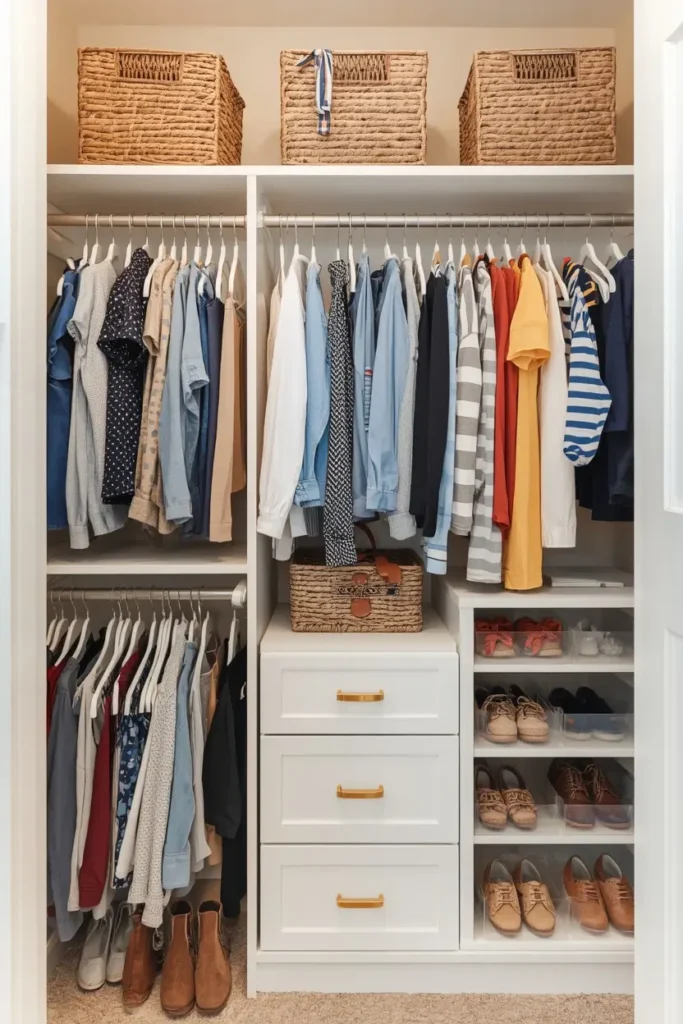
Design Breakdown
Most kids’ closets come with a single high rod and one shelf — designed for adults, useless for children. A simple closet organizer system transforms that dead space.
The game-changer is a double hang rod — two rods stacked vertically, the lower one at a height the child can reach. Kids’ clothes are short. You don’t need 5 feet of vertical clearance per garment. Stack two rods and instantly double the hanging capacity.
Then add:
- A small drawer unit on the floor for folded basics (socks, underwear, pajamas)
- Shallow shelves on one side for shoes and folded items
- A few hooks on the inside of the closet door for tomorrow’s outfit, belts, or bags
Expert Tip
The “tomorrow’s outfit” hook is one of the biggest morning game-changers for school-age kids. Each night, they choose what they’re wearing the next day and hang it on their designated hook. Morning chaos reduced by at least 50%.
Why It Works
When a closet is organized at a child’s scale, kids can dress and undress independently. That means fewer items dropped on the floor, fewer requests for help, and a dramatically more functional morning routine.
Best For
- Families with school-age kids
- Small spaces
- Budget makeovers (a basic closet rod kit costs $20–30)
Common Mistake to Avoid
Don’t store everything in the closet. The closet is for clothes and out-of-season items. Toys in the closet become forgotten toys, and forgotten toys make the closet a junk zone within weeks.
Quick Wins
- Use a tension rod to create a second hanging bar at no cost and without drilling
- Add a small light inside the closet — dark closets don’t get used well
- Store shoes in clear boxes so kids can see what they have
- Keep only the current season’s clothes accessible; box up the rest
You May Also Like:
- Clothes Storage Ideas
- Boys Bedroom Ideas
- Teen Girl Bedroom Ideas
- Small Bedroom Ideas for Men
- Bedroom Bookshelf Ideas
8. Create a Toy Rotation System
What You’re Seeing
Two sets of toys: the ones actively available in the room (neatly stored in bins), and a second set in labeled boxes on a high shelf or in a separate closet. The available toys change every few weeks. The room always looks manageable. The child is always excited about their “new” toys.
Design Breakdown
Toy rotation is one of the most underused declutter kids bedroom ideas — and one of the most powerful.
Here’s the concept: most kids have far more toys than they need or actually play with. By keeping only a fraction accessible at any time and rotating the rest in from “storage,” you accomplish three things:
- The room is physically easier to tidy
- The child is more engaged with fewer options (decision fatigue is real, even for kids)
- “Stored” toys feel new and exciting when they reappear
How to set it up:
- Sort all toys into 3–4 groups
- Keep one group active, rotate in a new group every 2–4 weeks
- Store rotation boxes out of sight but accessible to you (closet shelf, garage, storage bin)
- Include the child in the rotation — make it a “toy swap day” event
Expert Tip
Watch which toys rarely get touched during the rotation period. Those are your donation candidates. If a toy sits untouched for two full rotations, it’s not getting played with — and it’s just taking up space.
Why It Works
Fewer toys = easier cleanup + happier kids. Research consistently shows children play more creatively and for longer stretches with limited toy choices. Less truly is more.
Best For
- All ages
- Small spaces
- Large collections
Common Mistake to Avoid
Don’t rotate so frequently that kids never deeply engage with any one set of toys. Two to four weeks per rotation is a good baseline.
Quick Wins
- Label rotation boxes by theme: “Building,” “Pretend Play,” “Vehicles,” “Art”
- Take a photo of each box’s contents so you know what’s coming out next
- Use rotation as a natural opportunity to assess and purge
- Let older kids have input on rotation timing — it builds ownership of the system
💡 Expert Insight — Most people don’t know this: Toy rotation isn’t just a storage hack — it’s a developmental tool. When children have too many choices, they engage less deeply. Studies on play behavior consistently show that kids with fewer available toys engage in longer, more complex play sessions. They problem-solve more, use more imagination, and show less frustration. Limiting access isn’t depriving your child. It’s actually the opposite. A room with 10 well-chosen toys in rotation beats a room stuffed with 100 toys every single time — for the child and for whoever has to keep it tidy.
This simple change can completely transform the room. It costs almost nothing and takes one afternoon. Don’t skip the next two ideas.
9. Use a Command Center for Papers, Reminders, and School Stuff
What You’re Seeing
A small wall-mounted command center near the bedroom door — a cork board for papers and reminders, a pocket organizer for school folders, a small whiteboard for weekly schedules or homework reminders. No papers on the desk. No “where is my permission slip” panic. Just a designated landing place for everything information-related.
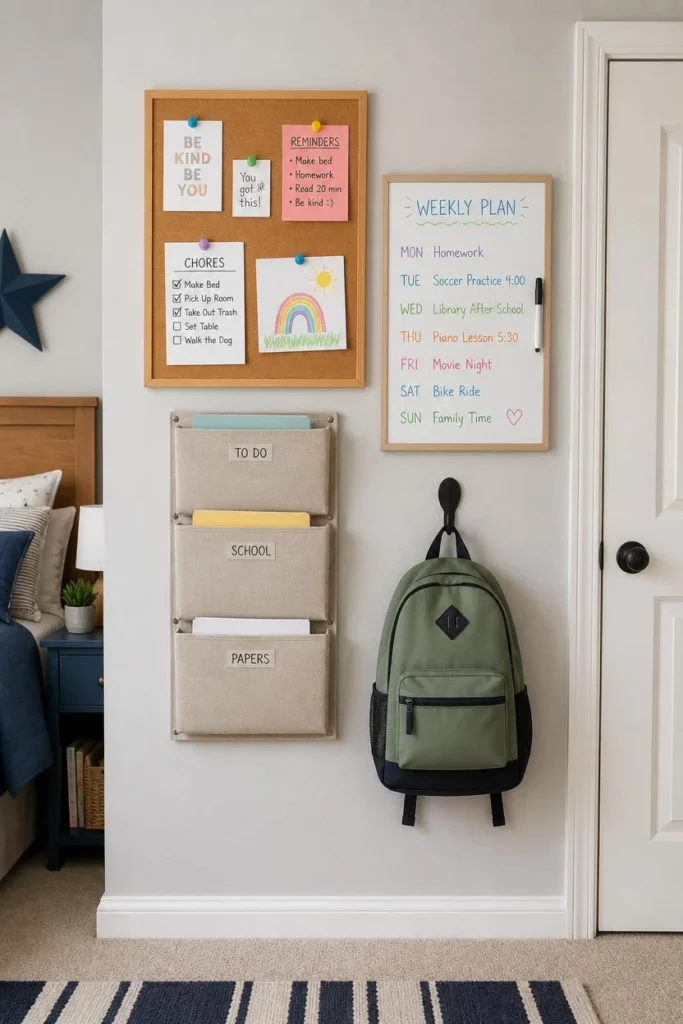
Design Breakdown
Paper clutter is invisible until it suddenly isn’t. Permission slips, homework sheets, artwork, birthday invitations, report cards — they pile up fast. A wall-mounted command center intercepts all of it.
For school-age kids, the ideal command center includes:
- A cork board or magnetic panel for current papers and reminders
- A multi-pocket wall file for folders and larger documents
- A small whiteboard for the week’s key dates or homework list
- A hook or clip for weekly backpack checks
Expert Tip
Teach kids the “in/out” habit early: everything that comes home goes directly into the command center for a parent to check. Everything that needs to go back to school gets placed in a specific pocket or hook the night before.
Why It Works
Paper clutter on desks and floors is one of the most frustrating forms of kid-related mess. A command center gives paper a destination. Once paper has a home, the desk stays clear, mornings go smoother, and nothing gets lost.
Best For
- School-age kids
- Families
- All room sizes
Common Mistake to Avoid
Don’t let the command center become a dumping ground for everything. Keep it curated — one in, one out. Old papers get sorted weekly.
Quick Wins
- Use a small daily checklist on the whiteboard: pack bag, check homework, pick tomorrow’s outfit
- Color-code folders by subject for older kids
- Add a small hook for keys if your child is old enough to have one
- Make a weekly “Friday clear-out” ritual to keep the board from getting overwhelming
10. Design a Specific Spot for Stuffed Animals
What You’re Seeing
A corner of the room with a hammock-style stuffed animal holder mounted diagonally in the corner — dozens of plushies stored neatly up high, like a zoo of sorts. Below it, the floor is completely clear. The animals are visible and accessible, but completely off the ground.
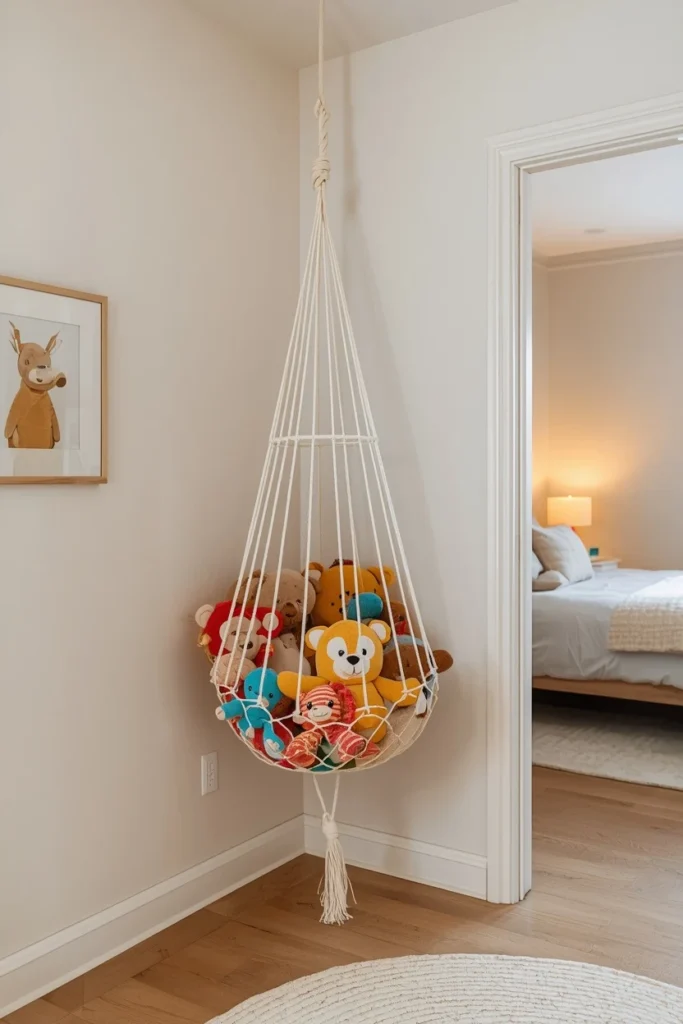
Design Breakdown
Stuffed animals are one of the hardest categories to organize. They’re awkward shapes, emotionally significant, and seem to multiply. Standard bins and shelves rarely work well.
The best solutions for stuffed animal storage:
- Corner hammock net — mounts in a corner, holds dozens, takes up zero floor space
- Large woven basket with a flat bottom — corrals them in one spot
- Floating shelves for displaying only the most-loved ones, with the rest in rotation
- A dedicated “stuffed animal bench” with storage inside and display on top
The key principle: give the stuffed animals one place. Not the bed AND the shelf AND the floor. One designated zone.
Expert Tip
Do a stuffed animal purge with your child by asking: “Would you notice if this one was gone?” For most kids, they genuinely love 5–10 plushies and are indifferent to the rest. The ones they don’t care about can be donated without tears.
Why It Works
Stuffed animals scattered around a room read as clutter even when the rest of the room is organized. Giving them a single, visually appealing storage spot instantly makes the room look tidier — even if nothing else changed.
Best For
- All ages
- Small and large spaces
- Budget makeovers (corner hammocks are under $20)
Common Mistake to Avoid
Don’t store all stuffed animals on the bed. It’s hard to make the bed properly, sleeping space gets cramped, and they end up on the floor every morning.
Quick Wins
- A corner net hammock takes 10 minutes to install and costs $15–20
- Let your child choose their 3–5 “bed friends” — the rest go to the designated zone
- Use a large woven basket as an elegant, no-tool solution
- Rotate seasonal or themed plushies the same way you’d rotate toys
Related Kids Bedroom and Organization Ideas
Love these tips? Keep exploring for even more inspiration.
- 15 Genius IKEA Kids Playroom Ideas
- Boys Bedroom Ideas
- Teen Girl Bedroom Ideas
- Luxurious Girls Bedroom Ideas
- Small Bedroom Storage Ideas
- 17 Innovative Small Bedroom Storage Ideas
- 10 Genius IKEA DIY Storage Hacks for Small Bedrooms
- Space-Saving Furniture Ideas
Your Declutter Kids Bedroom Ideas Action Plan
You just read through 10 genuinely useful declutter kids bedroom ideas. The question now isn’t whether any of these will work — they will. The question is which one you’ll actually do this week.
Here’s my challenge to you: pick just one idea. Not ten. Not five. One.
If your biggest problem is toy overflow, start with the labeled bin system or toy rotation.
If your biggest problem is surfaces and shelves drowning in stuff, start with the vertical wall storage or pegboard.
If mornings are the issue, tackle the landing zone and command center first.
Small wins compound. You fix the entry zone and suddenly mornings are calmer. You fix the book display and suddenly your kid reads more. You install a corner hammock and the floor stays clear for three whole days. Each small win builds momentum for the next one.
Which of these ideas resonated most with you? Are you dealing with a full-on toy avalanche, a paper clutter situation, or a stuffed animal situation that’s taken on a life of its own? Drop your biggest challenge in the comments — I’d genuinely love to hear what’s going on in your kids’ room right now.
And when you’re done here, don’t miss our full guide on small bedroom storage ideas — it’s packed with even more clever ways to squeeze function out of every inch.
Coming up next: you won’t believe what a few simple space-saving furniture ideas can do for a kids’ room that still needs to grow with your child. Stay tuned.