10 Homemade DIY Forge Plans That Actually Work (No Welding Degree Required)
This article was created in line with Trends Oraa’s research and content standards.
You want to build things with your hands. Real things. Metal things. And you’re tired of paying someone else to do it.
That dream of hammering hot steel in your own backyard? It’s closer than you think — and way cheaper than you’d imagine.
In this guide, I’m walking you through 10 of the best homemade DIY forge plans you can actually build this weekend. Whether you’re a total beginner or a seasoned hobbyist, there’s something here that’ll get your fire burning — literally.
You might also love our viral guide on 15 DIY French Drain Ideas that transforms your yard with zero contractor fees
And stick around, because Plan #7 is the one most people completely overlook — and it might just be the most versatile forge on this entire list.
Why Build Your Own Forge in the First Place?
Great question. Commercial forges cost anywhere from $300 to over $1,500. A homemade forge? You can build a solid one for as little as $30 to $80 in materials — and it’ll perform just as well for hobby blacksmithing, knife making, and metalworking.
But here’s the important part: building your own forge teaches you how it works. That means you can fix it, tweak it, and improve it as you go. You’re not just a consumer — you become the craftsman.
Now let’s get into the plans.
The 10 Best DIY Forge Plans You Can Build at Home
1. The Classic Brake Drum Forge
What you’re looking at: An old car brake drum turned into a fire pot, mounted on a simple steel frame with an air supply pipe running underneath. This is the beginner’s forge — simple, reliable, and surprisingly capable.
It uses a standard steel brake drum (grab one from any auto salvage yard for free or nearly free), a shop vac or hair dryer as the air blower, and a handful of plumbing fittings to direct airflow into the coal bed. The setup takes about two to three hours on a Saturday afternoon.
Expert Tip: Look for a drum with a deeper bowl — it holds more coal and creates a better fire pot. Drums from trucks or larger vehicles work better than compact car drums.
Why it works: The brake drum’s shape is nearly perfect for a solid fuel forge. It holds the coal, directs airflow from below, and concentrates heat right where you need it. The ash dump at the bottom lets you clean the fire without tearing everything apart. This forge is beginner-proof, which is exactly why it’s been the #1 starter plan for decades.
2. The Propane Coffee Can Forge
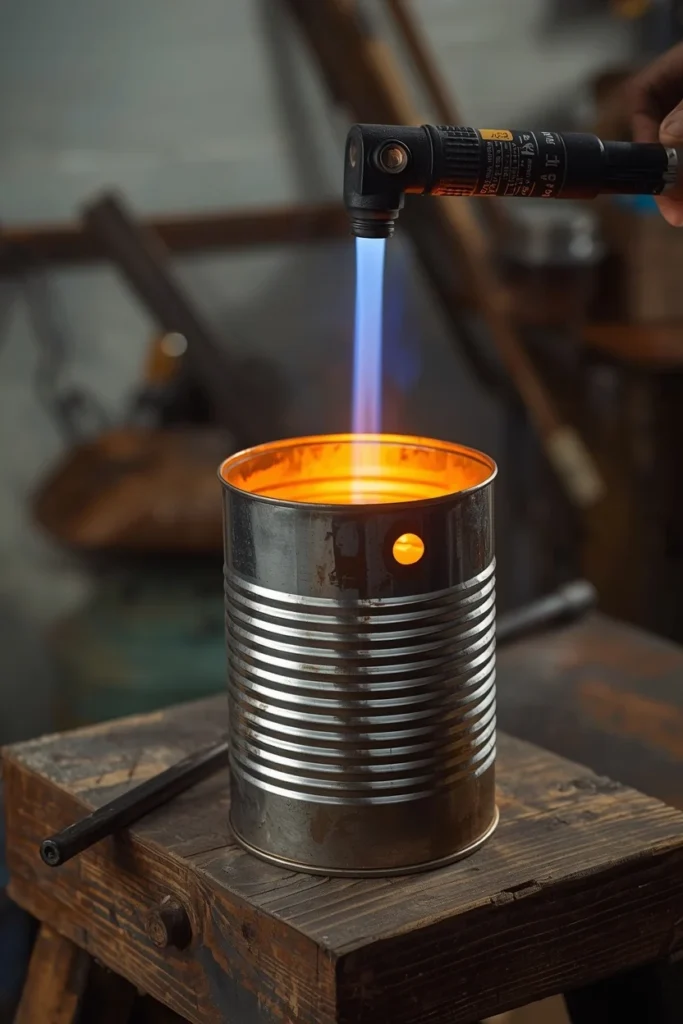
What you’re looking at: A small metal coffee can lined with refractory cement, fitted with a propane burner. This is the ultralight, ultra-portable mini forge — perfect for knife making and small metal projects.
The whole thing sits on your workbench. You line the inside of a large metal coffee can with Kastolite 30 or similar castable refractory cement, cut a hole for your propane burner, and let it cure. Total cost is usually under $60 when you factor in the refractory and a basic propane torch attachment.
Expert Tip: Don’t skip the rigidizer coat. After your refractory cures, hit the inside with a ceramic fiber rigidizer spray. It dramatically extends the life of your forge lining and improves heat retention.
Why it works: Propane forges heat up fast — we’re talking 10 to 15 minutes to forging temperature. There’s no coal or coke to manage, no ash to deal with, and you get a consistent, controllable heat. For anyone who wants to do small-batch knife making or jewelry metalwork, this plan is unbeatable for the price.
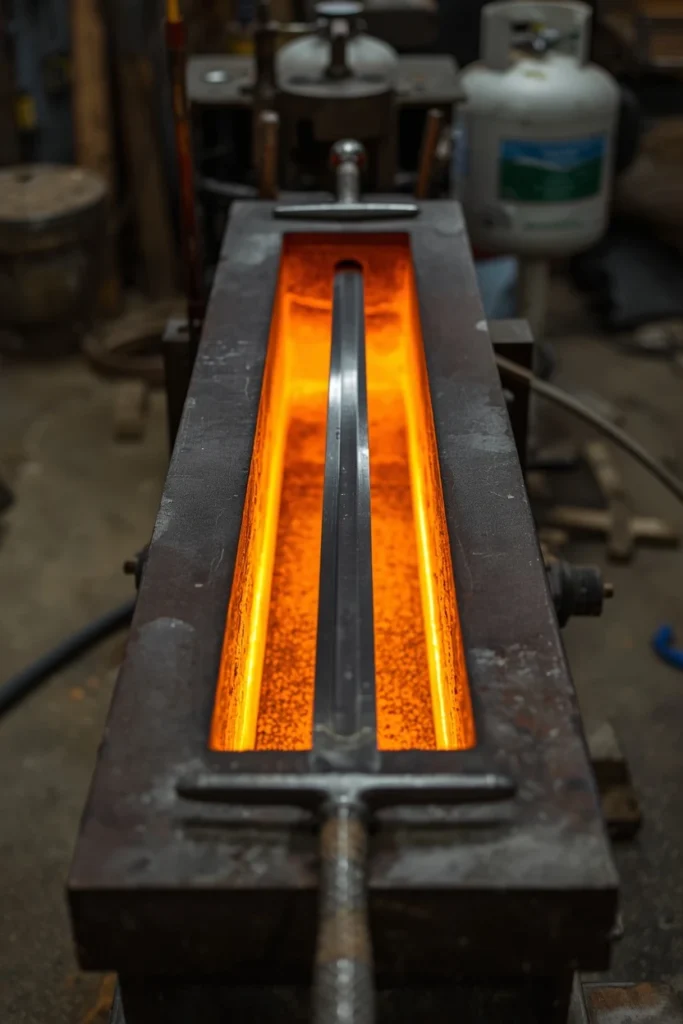
3. The Steel Pipe Ribbon Burner Forge
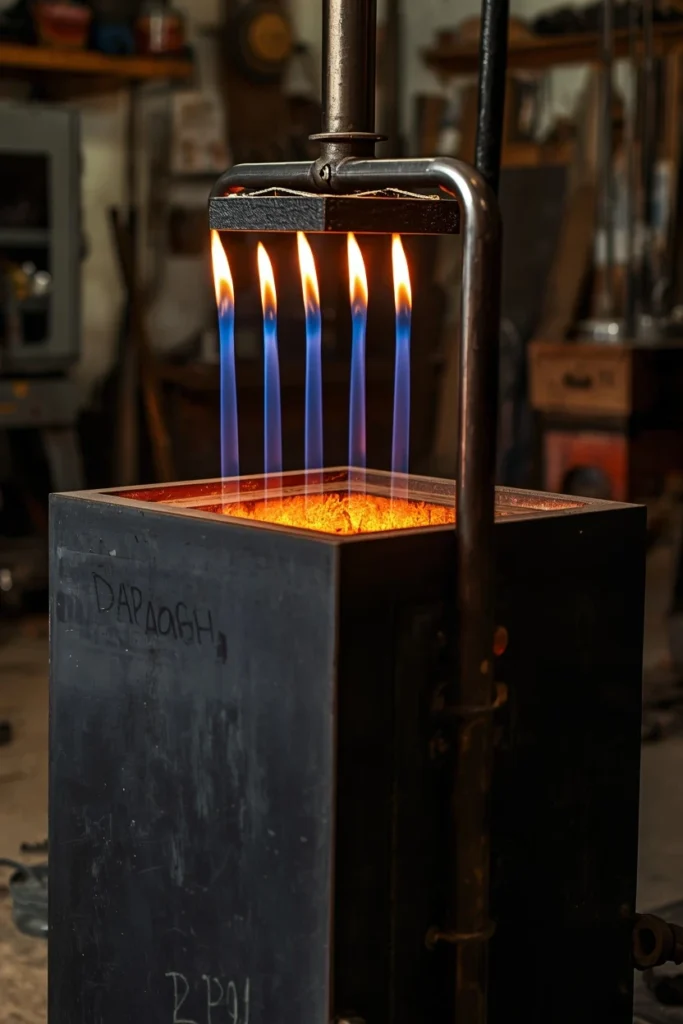
What you’re looking at: A rectangular steel box forge with a ribbon-style burner that distributes flame evenly across the chamber. This is the intermediate build — more complex than a brake drum or coffee can, but produces a dramatically better heat environment.
A ribbon burner uses a grid of small holes to create dozens of tiny flames instead of one large torch. The result is a much more even heat distribution inside the forge chamber, which is essential when you’re working longer pieces of stock.
Expert Tip: Cast your ribbon burner head in castable refractory and let it cure slowly over 48 hours. Rushing the cure causes cracks that’ll ruin the burner. Patience here pays off in months of reliable performance.
Why it works: Even heat = better forging. When you’re working a 12-inch bar of steel, you don’t want one end glowing orange and the other barely warm. The ribbon burner solves that problem in a way that single-port burners simply can’t match. This is the forge plan that takes your work from hobbyist to serious craftsman.
Which of these first three forge styles fits your workshop setup best? Drop your answer in the comments — I’d love to hear what you’re working with!
4. The Cinderblock Backyard Forge
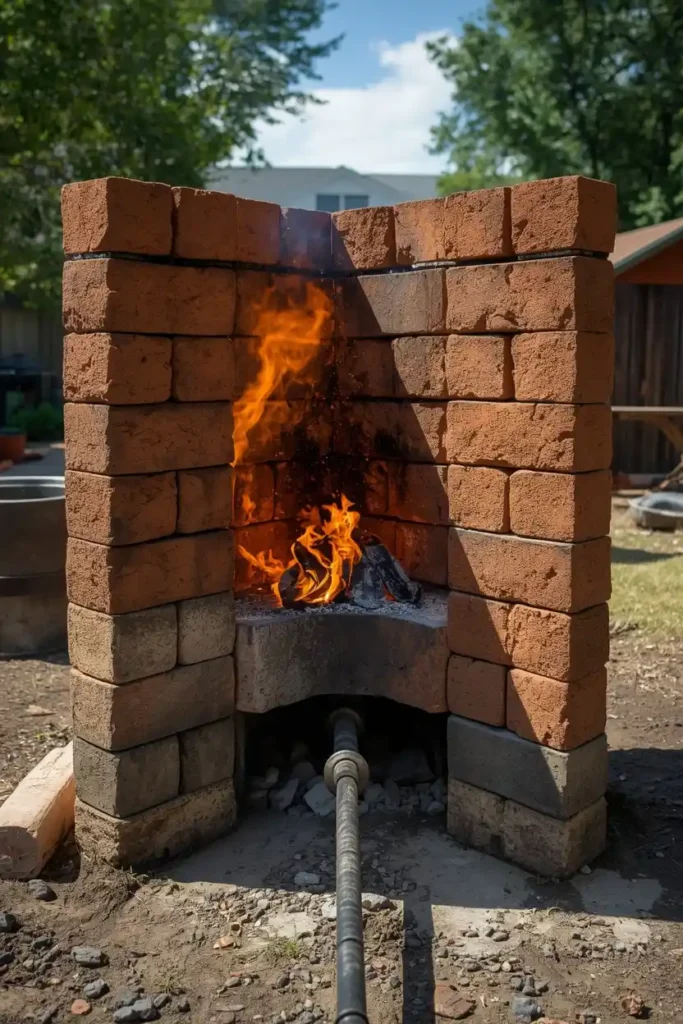
What you’re looking at: A solid fuel forge built from standard cinderblocks stacked into a U-shape, lined with firebricks, and fitted with a pipe tuyere at the base. This is the most budget-friendly large forge you can build.
You’re essentially building a contained firebox out of masonry materials. Stack the cinderblocks in a U-shape, mortar them together with refractory mortar, lay a few firebricks at the bottom and sides, and run a steel pipe through the base for your air supply. It’s rough, it’s functional, and it will last for years.
Expert Tip: Use firebricks for the inner walls, not standard cinderblocks. Cinderblocks can crack and even explode when exposed to direct forge heat. Keep cinderblocks for the outer structure and firebricks for anything touching the fire.
Why it works: Size matters in blacksmithing. If you want to forge larger tools, axes, or architectural hardware, you need a bigger fire pot than a brake drum or coffee can can provide. This cinderblock design gives you a generous working area at a cost that’s hard to beat — usually $40 to $80 for all materials if you shop around.
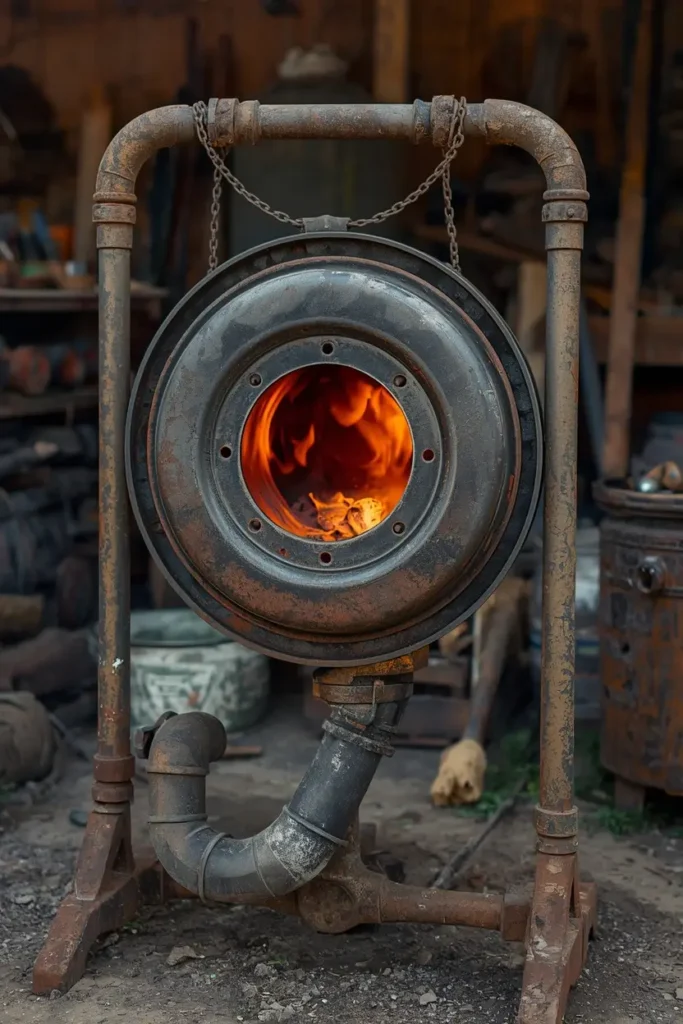
5. The 55-Gallon Drum Charcoal Forge
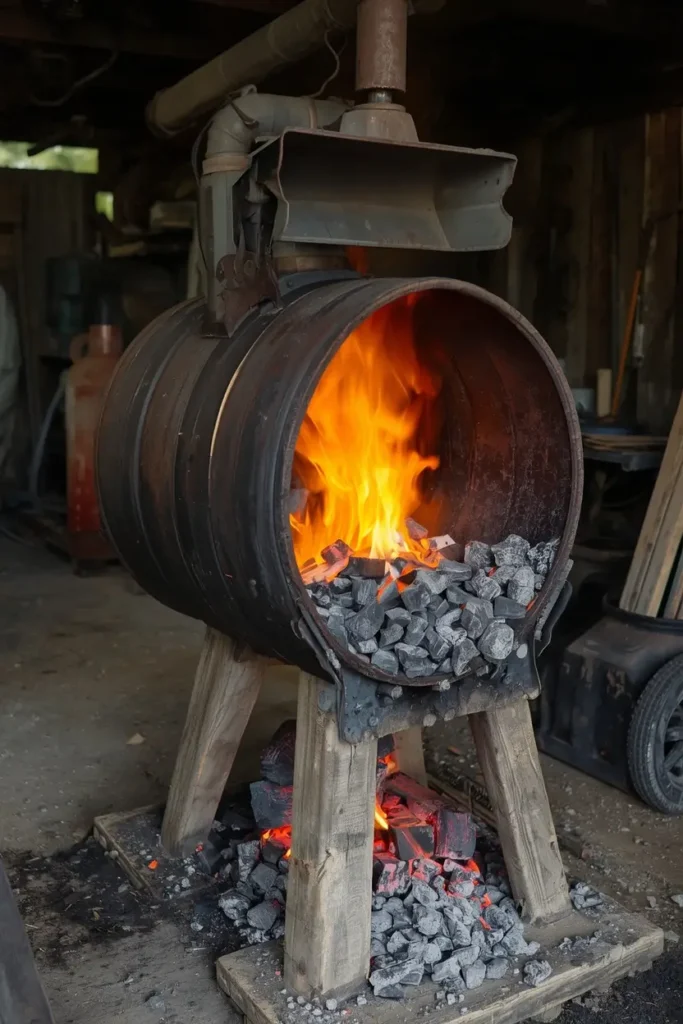
What you’re looking at: A cut and welded 55-gallon steel drum converted into a charcoal-burning forge with an attached blower. This is the large-scale DIY forge for serious backyard smiths.
You’ll cut the drum in half horizontally, weld in a fire grate, and mount a pipe blower system on the side. The upper half can serve as a hood to contain heat. This build requires basic welding skills — but if you have them, you’ll end up with an incredibly capable forge that rivals commercial units.
Expert Tip: Use hardwood charcoal, not briquettes. Briquettes contain binders and additives that create uneven heat and leave nasty residue on your steel. Real hardwood charcoal burns cleaner, hotter, and more predictably.
Why it works: Volume matters when you’re doing a full blacksmithing session. This forge holds enough fuel for hours of work without constant reloading. The drum walls also act as excellent heat retention, meaning you’re spending less fuel to maintain your working temperature over a long session.
Here’s where it gets interesting: the 55-gallon drum forge is also one of the easiest to convert into a charcoal retort — meaning you can make your own forge fuel from scrap wood. That’s almost entirely free fuel once the system is set up.
6. The Kaowool Gas Forge Box
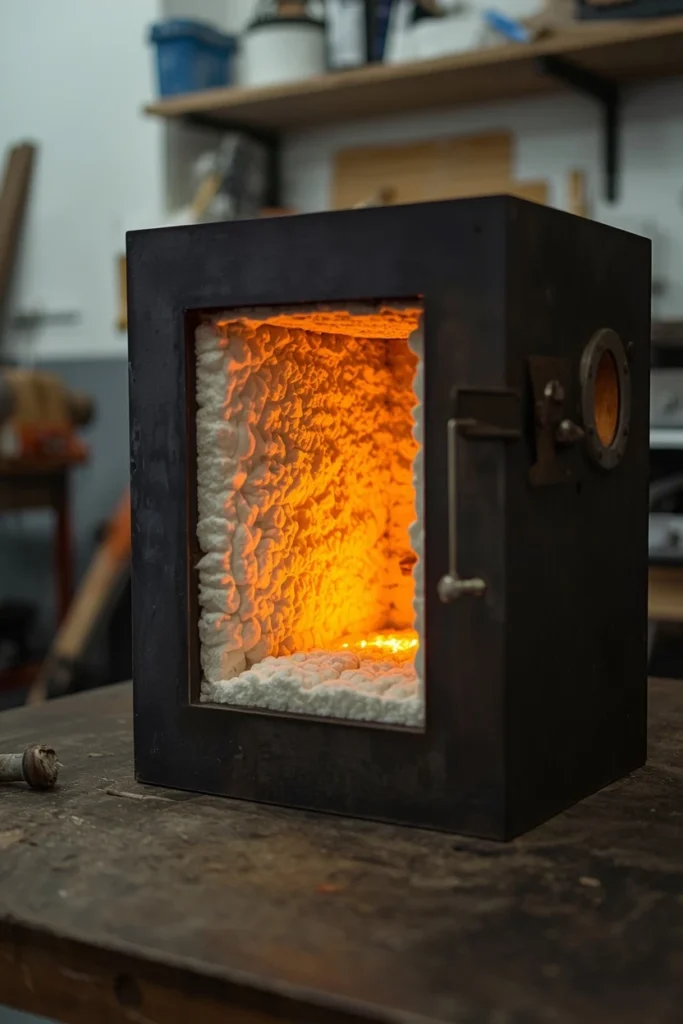
What you’re looking at: A steel rectangular forge shell lined with ceramic fiber blanket (Kaowool) and coated with ITC-100 reflective coating, powered by a single T-Rex or Reil-style propane burner. This is the plan most often used by serious hobbyist knife makers.
The combination of ceramic fiber insulation and reflective coating creates an extremely efficient heat chamber. Your forge heats up in under 10 minutes and reaches welding temperatures. The steel shell is easy to fabricate from angle iron and sheet steel.
Expert Tip: Apply two coats of ITC-100 (or a similar high-temperature reflective coating) to your Kaowool lining. This seals the fibers — which are dangerous to breathe when loose — and reflects radiant heat back into the chamber, boosting efficiency by as much as 30%.
Why it works: Ceramic fiber forges are simply more efficient than solid refractory forges. They heat faster, use less propane, and reach higher temperatures with less fuel consumption. If you’re paying for propane, this design will save you money on every single heat.
7. The Flower Pot Forge
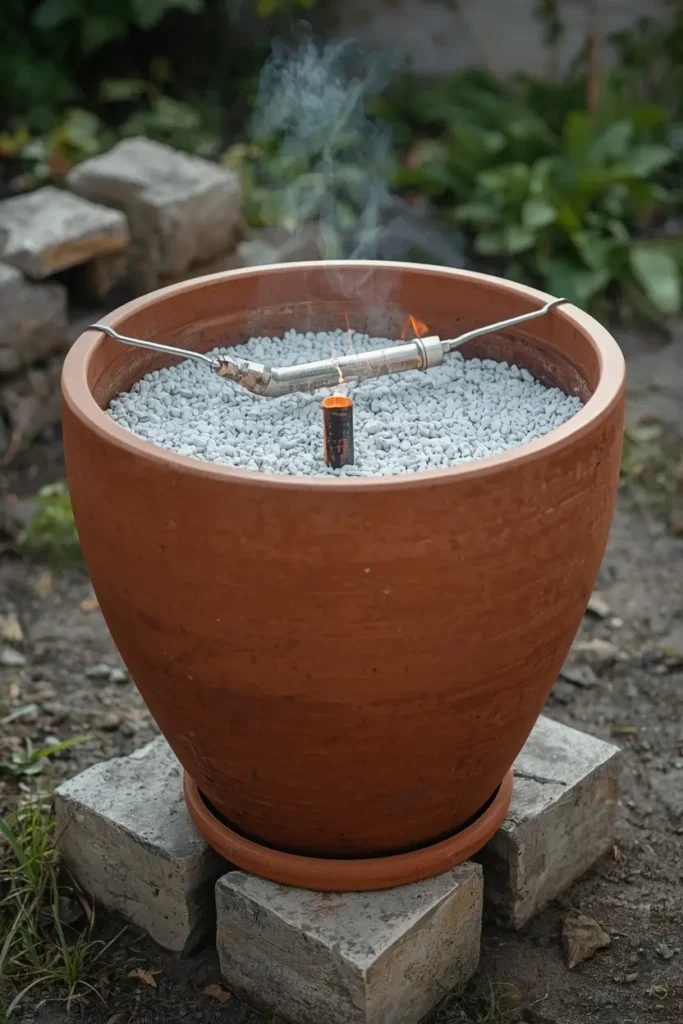
What you’re looking at: A large terracotta flower pot, lined with refractory cement or perlite-cement mix, used as a mini charcoal forge. This might be the most surprising entry on the list — and the most underrated.
Most people don’t know this, but terracotta can handle surprisingly high temperatures when it’s properly lined. You fill the pot with a perlite-Portland cement mix (1:1.5 ratio), push in a steel pipe for your air supply, and let it cure. Total cost? Sometimes under $20.
Expert Tip: Don’t use glazed ceramic pots — the glaze will crack and the pot may shatter. Plain, unglazed terracotta is the only type that will survive forge temperatures safely. And always cure slowly by running small fires for the first two or three uses.
Why it works: The flower pot forge is perfect for making small tools, hooks, hinges, and decorative ironwork. It’s genuinely portable — you can carry it to a campsite or friend’s backyard. For anyone curious about blacksmithing but not ready to commit to a big build, this is the perfect “test the waters” forge. It’s also completely beginner-friendly and requires no welding or metalworking experience to build.
Have you ever tried a flower pot forge, or does this seem too simple to be real? I get that reaction a lot — tell me in the comments!
8. The Railroad Track Anvil + Mini Forge Combo
What you’re looking at: A pair of railroad track sections — one used as an anvil, one used as the base of a small solid fuel forge. This is the traditional “start from scratch” blacksmith setup that requires minimal investment.
Railroad track is incredibly hard steel and makes an excellent improvised anvil. A short section bolted to a wood stump gives you a working surface. The second piece is used to build a simple fire box with a blower attachment. Together, you have a complete starter blacksmithing station for potentially zero cost if you can source salvage materials.
Expert Tip: Railroad track can be found legally at metal salvage yards — never take it from active rail lines. A 2-foot section runs $20 to $40 and will outlast you as an anvil surface.
Why it works: This combo plan is about getting started fast and cheap. Many legendary blacksmiths started on exactly this setup. The railroad track anvil has enough mass to do serious work, and the companion forge setup keeps everything compact and self-contained. It’s an entire starter workshop you can set up in a single afternoon.
9. The Double-Chamber Sword Maker’s Forge
What you’re looking at: An elongated gas forge with two separate chambers connected by a pass-through slot, specifically designed to heat longer stock like sword blanks and tool handles. This is the most advanced plan on the list.
This build requires welding, careful refractory work, and two matched propane burners. The double chamber allows you to heat a 24-inch or longer piece of steel evenly — something no single-chamber forge can do well.
Expert Tip: Balance your two burners carefully. If one runs hotter than the other, you’ll get a gradient heat across your steel. Use adjustable needle valves on each burner and spend time dialing them in before you start forging.
Why it works: If you want to make knives, short swords, or agricultural tools like hoes and billhooks, you need a longer heat zone. Commercial sword forges start at $800. This DIY version can be built for around $200 in materials and will produce identical results. It’s a serious investment in time and skill — but it unlocks an entirely new tier of projects.
Now, avoid this mistake: many people build the double-chamber forge with a single large opening instead of a pass-through slot. A single large opening bleeds heat aggressively and you’ll burn through twice the propane. The narrow pass-through slot is the key to this design’s efficiency.
10. The Coke Can Mini Forge (For Jewelry and Small Work)
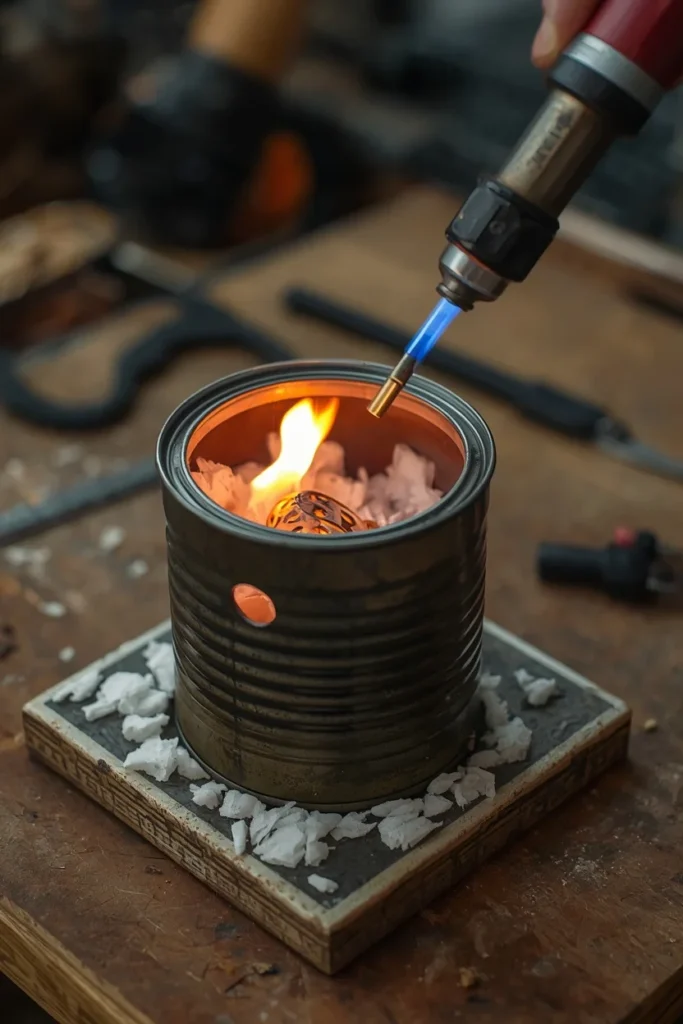
What you’re looking at: A miniature forge built from a steel paint can or large soup can, lined with ceramic fiber, and powered by a small butane or propane torch. This is the tiniest functional forge you can build — designed for jewelry making, small knife tips, and art metalwork.
This plan is completely accessible to anyone. The entire build takes about an hour, costs under $15, and produces enough heat to work copper, bronze, silver, and even small pieces of mild steel.
Expert Tip: Use ceramic fiber blanket scraps — often available cheaply or free from HVAC insulation suppliers — rather than casting refractory for this size. Scraps cut with scissors to fit the interior of your can give you excellent insulation without the curing wait time.
Why it works: Not every project needs a full-size forge. Jewelry work, small decorative pieces, and copper or bronze forging don’t require the heat mass of a large coal or propane forge. This mini forge gives you precise, controlled heat in a setup that fits on a desk. It’s also a fantastic first build for anyone who wants to understand how forge insulation and burner geometry work before committing to a bigger project.
What kind of metalwork are you most interested in — knife making, jewelry, decorative ironwork, or something else entirely? I’d genuinely love to know!
DIY Forge Plans: Budget Breakdown and Buyer’s Guide
Before you pick a plan, let’s talk money and materials — because this is where most people get tripped up.
Entry Level Builds ($15–$50)
The flower pot forge and the coke can mini forge both land here. These are “prove the concept” builds that teach you the fundamentals without risking much. Perfect for beginners or anyone who wants to test the hobby before investing more.
Mid-Range Builds ($50–$150)
The brake drum forge, the coffee can propane forge, the cinderblock forge, and the Kaowool gas forge box all fall in this range. These are genuine working forges capable of producing real projects. Most serious hobbyists end up with one of these as their daily driver.
Advanced Builds ($150–$300)
The ribbon burner forge, the 55-gallon drum forge, and the double-chamber sword forge sit here. These are weekend-to-two-week builds that require more skill and planning — but the results are genuinely professional-quality equipment.
Key Materials to Know Before You Shop
Kaowool (ceramic fiber blanket): The best insulation material for gas forges. Available from pottery and kiln supply shops or online. A standard 25-square-foot roll runs about $30 to $45 and will build one or two forges.
ITC-100 or Plistix 900F: High-temperature reflective coating for ceramic fiber linings. Critical for sealing the fibers and improving forge efficiency. About $25 to $35 for enough to coat one forge.
Castable refractory cement: Used for solid refractory forges and burner heads. Kastolite 30 and Mizzou are popular choices in the DIY community. A 50-pound bag runs $40 to $60 and will build multiple small forges.
Propane burners: You have two main choices — buy a commercial burner like a T-Rex or Reil-style (around $50 to $100) or build your own from online plans using plumbing fittings (around $15 to $25 in parts). Commercial burners are more consistent; DIY burners are more satisfying.
Safety Gear You Actually Need
This isn’t optional. A forge produces serious heat and real hazards.
- Leather welding gloves (not cotton work gloves — those will catch fire)
- #5 shade welding goggles or safety glasses rated for hot work
- Leather apron if you’re doing extended forging sessions
- Fire extinguisher within reach — always
- Natural fiber clothing only: no synthetics near an open forge
Most people don’t know this: the biggest danger in hobby blacksmithing isn’t the forge itself — it’s the anvil work. Hot steel bouncing off an anvil can send sparks and fragments in unexpected directions. Always work in a clear space and keep bystanders at least six feet back.
Pros and Cons of Building Your Own Forge vs. Buying Commercial
DIY Forge Pros
You understand every inch of your equipment, which means faster troubleshooting and easier upgrades. The cost savings are real and substantial. Building the forge is genuinely part of the craft experience for most people in this hobby. You can customize the chamber size, burner setup, and fuel type exactly to your needs.
DIY Forge Cons
Building takes time — typically one to two weekends for a mid-range build. Material sourcing can be frustrating if you don’t have good local options. Refractory work requires patience with curing schedules. And honestly, a poorly built forge can be a safety hazard if you cut corners on materials.
Commercial Forge Pros
Ready to use out of the box. Consistent, tested performance. Warranty coverage. Better resale value.
Commercial Forge Cons
Cost. A decent commercial propane forge starts around $300, and quality units run $600 to $900+. You also get a fixed design — no tweaking the chamber geometry or burner placement without voiding the warranty.
The verdict: For most hobby blacksmiths, a DIY build is the better choice for your first or second forge. Once you know exactly what you need from your equipment, investing in a quality commercial piece makes more sense.
Final Thoughts: Your First Fire Is Closer Than You Think
You don’t need a professional workshop, a welding certification, or a big budget to start forging metal at home.
Start with the brake drum forge or the flower pot forge. Build it this weekend. Get a few successful heats under your belt. And then — when you know what you love about the process and what you want to do differently — build a better one.
That’s how every great backyard blacksmith started. Not with perfect equipment. With curiosity and a willingness to try.
If you’re the kind of person who loves building things from scratch and turning raw materials into something useful, I have a feeling you’re going to fall completely in love with this craft.
And when you’re ready for your next build project, don’t miss our guide on DIY Grill Station ideas you can build cheap — because a blacksmith who can build a forge can absolutely build the best backyard cooking setup on the block.
Now go build something great.