10 Easy Indoor Hydroponic Gardening Ideas (No Green Thumb Required)
Your plants keep dying. Again.
You’re not alone.
Here’s the good news: hydroponic gardening fixes almost every mistake that kills regular houseplants. No soil to mess up. No guessing on watering. No bugs tracking dirt across your counter.
In the next few minutes, I’m going to walk you through 10 ridiculously easy indoor hydroponic setups that actually work — even if you’ve killed a cactus before (we’ve all been there).
Stick around, because idea #7 is the one most beginners skip… and it’s the one that makes the biggest difference.
You might also love our viral guide on 20 Brilliant DIY IKEA Dresser Hacks — perfect if you’re redoing your whole space this season.
Why Hydroponics Just Makes Sense Indoors
Let’s get this out of the way first.
Hydroponics means growing plants in water (with nutrients) instead of soil.
That alone solves so many problems:
- No soil mess on your counters or floors
- Plants grow faster because roots get nutrients directly
- Way fewer pests (bugs love soil, not water)
- You can grow herbs and greens year-round, even in winter
Most people don’t know this… but you don’t need fancy equipment to start. Some of the best setups use stuff you already own.
Let’s get into the ideas.
1. The Mason Jar Herb Garden
What you’re looking at
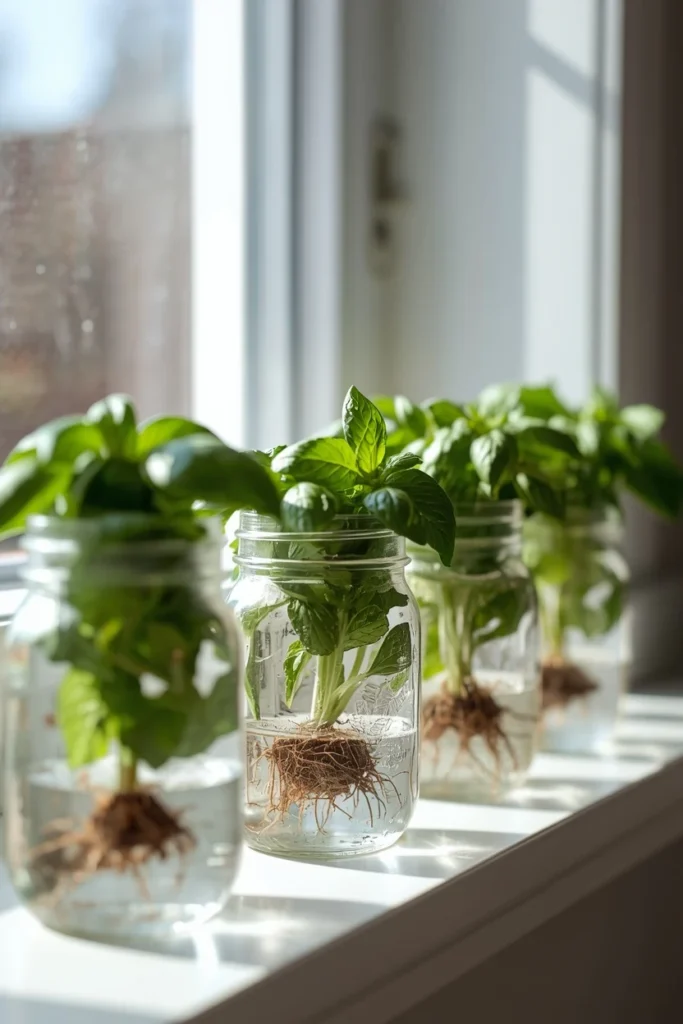
A row of clear mason jars lined up on a sunny windowsill, each holding a single herb cutting suspended just above the water line with a net pot lid or simple lid with a hole cut out.
Expert Tip: I always start with basil or mint cuttings because they root in water faster than almost anything else. Within 5-7 days, you’ll see little white roots forming, and that’s honestly one of the most satisfying things to watch.
Why it works: Mason jars are cheap, you probably have a few in your pantry already, and the clear glass lets you actually see the roots growing. This visibility keeps people engaged with their plants (you’ll check on them daily, I promise), and that consistency is what keeps hydroponic herbs thriving long-term.
2. The Floating Foam Raft System
What you’re looking at
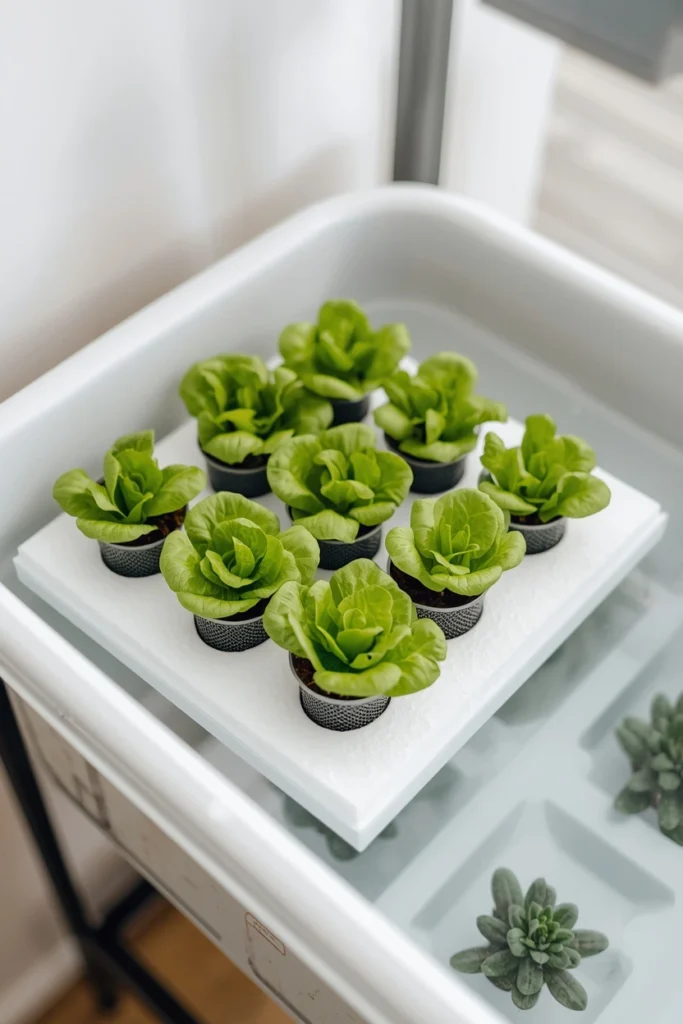
A shallow plastic bin filled with nutrient water, topped with a sheet of foam board that has holes cut for small net pots holding lettuce or leafy greens.
Expert Tip: Use a piece of pool noodle or craft foam — don’t overthink this. Cut holes just slightly smaller than your net pots so they sit snug without falling through.
Why it works: This setup, sometimes called a “raft system,” lets the roots dangle freely into oxygen-rich water while the foam keeps everything stable on top. It’s beginner-friendly because there’s almost nothing that can go wrong mechanically. Plus, leafy greens grow noticeably faster this way compared to soil — many people see harvestable lettuce in just three to four weeks.
Which of these setups feels more “you” so far — the cute mason jars or the bigger raft system? Let me know, because the next idea might change your answer.
3. The Kitchen Window PVC Tower
What you’re looking at
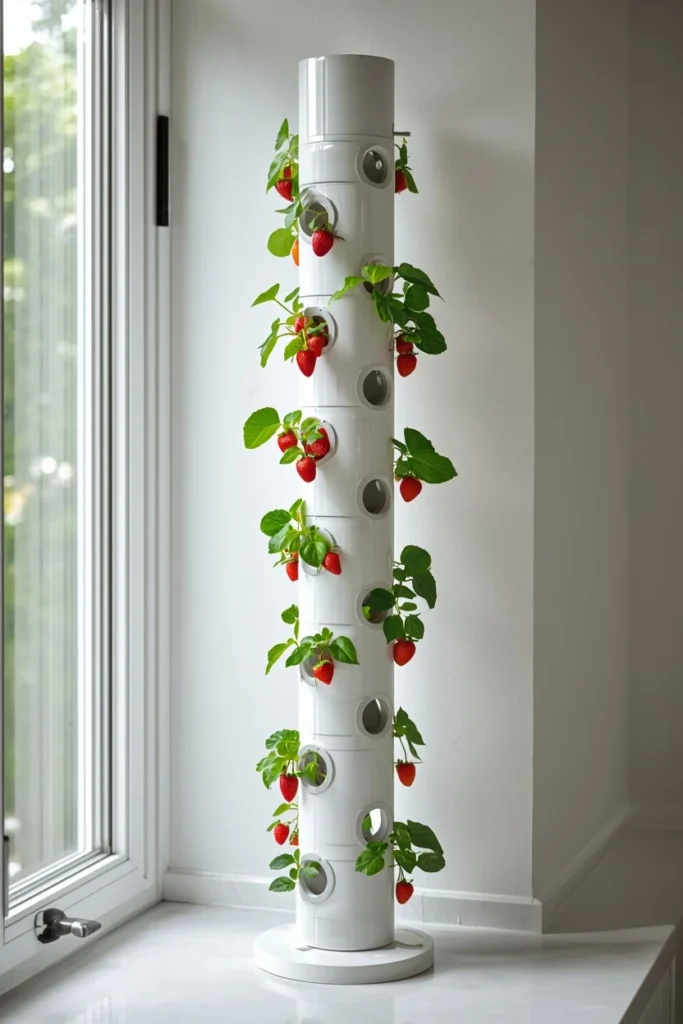
A vertical white PVC pipe mounted near a kitchen window, with small holes drilled in a spiral pattern, each one holding a leafy green or strawberry plant.
Expert Tip: Drill your holes at a slight downward angle. This small detail keeps water from pooling around the plant stems, which prevents rot — a mistake I made on my very first tower (and definitely won’t repeat).
Why it works: Vertical gardening is a game-changer for small kitchens because it grows up instead of out. You can fit ten or more plants into the footprint of a single houseplant. It also looks incredibly impressive to guests, and honestly, that little ego boost keeps a lot of people consistent with their gardening routine.
But here’s the important part… vertical towers need a small water pump to recirculate nutrients from the base back to the top. Don’t skip this step, or your top plants will dry out fast.
4. The Repurposed Fish Tank Aquaponics Mini-System
What you’re looking at
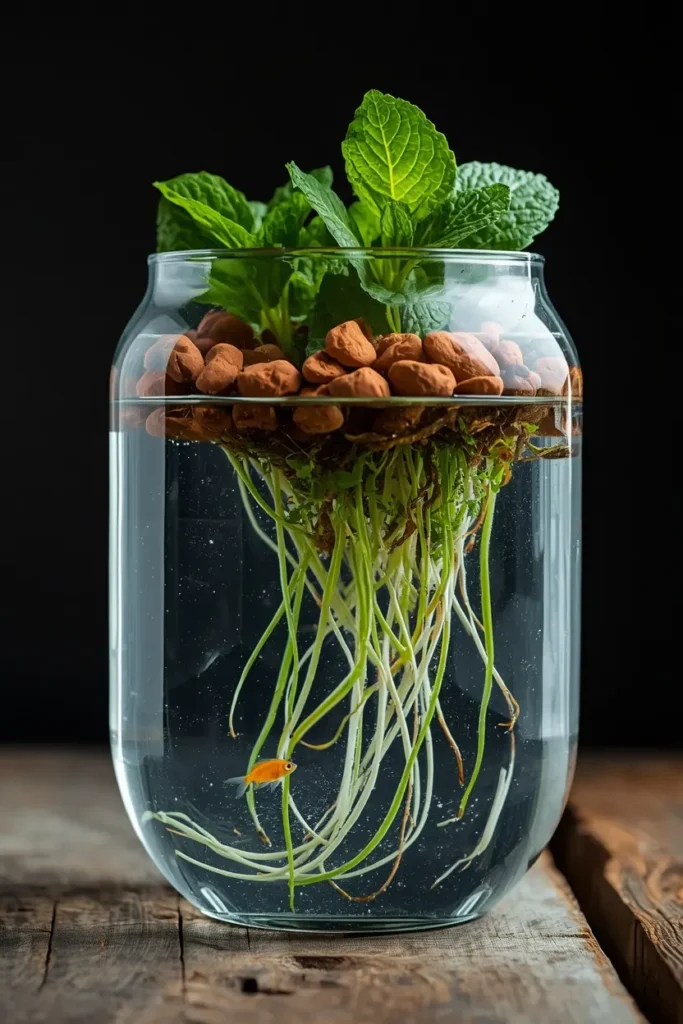
An old aquarium with a small layer of clay pebbles on top, where plants like spinach or mint are growing with their roots reaching down into the fish tank water below.
Expert Tip: You don’t need fish for this to work, but if you already have a betta fish or goldfish, their waste actually becomes plant fertilizer. It’s a win-win — the plants clean the water, and the fish feed the plants.
Why it works: This is one of those “wow” setups that gets saved and shared constantly, because it combines two hobbies into one beautiful display. It’s also surprisingly low-maintenance once it’s balanced, since the ecosystem basically takes care of itself.
5. The Test Tube Propagation Wall
What you’re looking at
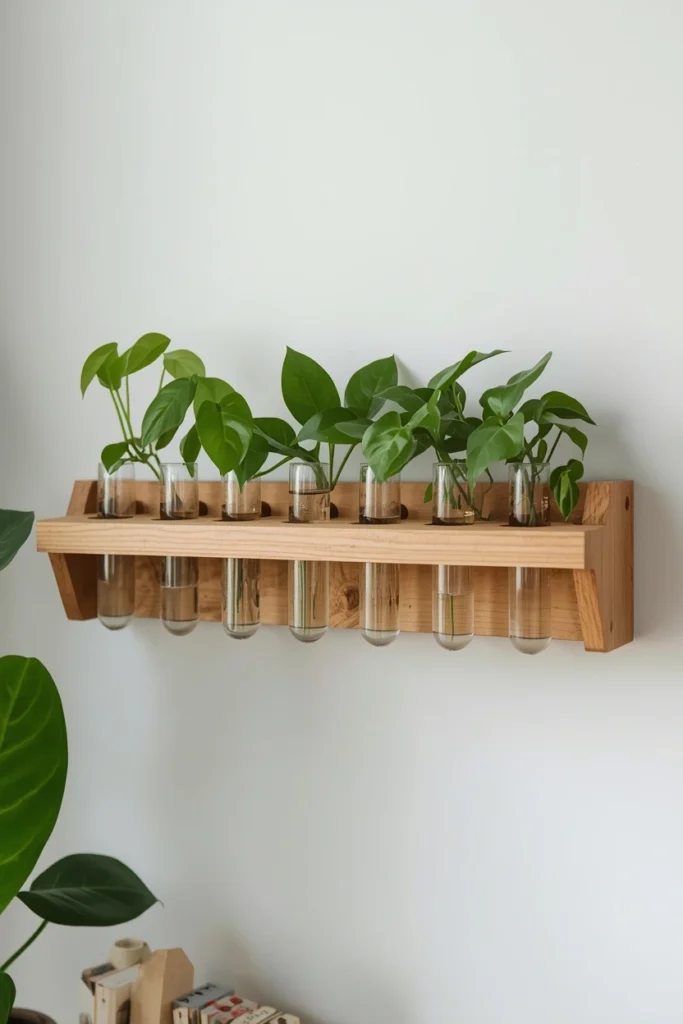
A wooden or metal wall-mounted rack holding multiple glass test tubes at an angle, each one filled with water and sprouting a different houseplant cutting like pothos, philodendron, or spider plant.
Expert Tip: Group cuttings by color and leaf shape. Trust me, the visual pattern makes a huge difference, and it’s the kind of detail that turns a simple plant wall into something that looks designer-made.
Why it works: This isn’t just decor — it’s a living propagation station. Once roots are established, you can transplant the cuttings into soil or keep growing them in water permanently (pothos especially loves this). It’s also one of the cheapest projects on this list since test tube racks cost very little.
Now, avoid this mistake… don’t place this wall in direct, blazing afternoon sun. The glass tubes heat up fast and can actually cook the roots. Bright, indirect light is the sweet spot.
If you’re loving the idea of propagation walls, you’ll probably enjoy our deep dive on 10 Creative Ways to Grow Pothos — it pairs perfectly with this setup.
6. The Countertop Smart Garden
What you’re looking at
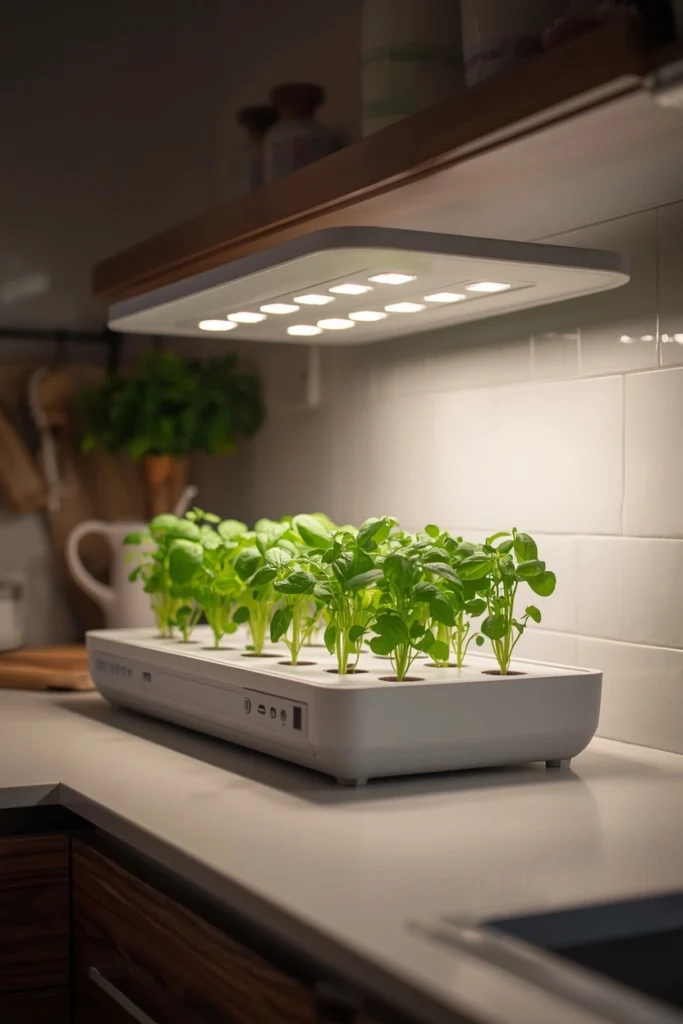
A sleek, compact appliance-style hydroponic unit sitting on a kitchen counter, with built-in LED grow lights glowing softly above a row of small herb pods.
Expert Tip: These units are genuinely “set it and forget it.” Just top off the water tank every week or two and swap the nutrient pods when the app tells you to.
Why it works: If you’re someone who wants the benefits of hydroponics without any of the DIY work, this is your category. The built-in lights mean you don’t even need a window, which is huge for apartments or basement kitchens. It’s an investment, but for busy people, the convenience alone often justifies the cost.
Here’s where it gets interesting… let’s talk about whether these countertop units are actually worth the money, because that’s probably the question on your mind right now.
The Real Deep Dive: Budget Breakdown for Every Skill Level
Okay, let’s talk numbers, because this is where most “hydroponics for beginners” articles fall short.
Beginner setups (under $25):
- Mason jars: $0 if you already have them, or about $10 for a set
- Net pots and clay pebbles: roughly $8-12 online
- Liquid nutrient solution: around $10, lasts for months
Mid-range setups ($25-75):
- Foam raft kits or DIY PVC towers: $30-50 depending on size
- Small water pumps for vertical systems: $15-25
- Grow lights (if your window light is limited): $20-40
Premium setups ($75-300+):
- Countertop smart gardens: $80-200 depending on brand and size
- Aquaponics tank setups: $50-300 depending on whether you’re reusing an existing tank
- Multi-tier vertical towers with automated pumps: $150-300
Here’s the thing nobody tells you: the cheapest setups often grow plants just as well as the expensive ones. What you’re really paying for with premium options is convenience and aesthetics, not necessarily better plant health.
My honest recommendation? Start with idea #1 or #2. Spend under $20. If you fall in love with it (and you will), upgrade from there. Don’t drop $200 on a smart garden before you know if you’ll actually stick with it.
7. The Mushroom-Style Mason Jar Sprouting Station
What you’re looking at
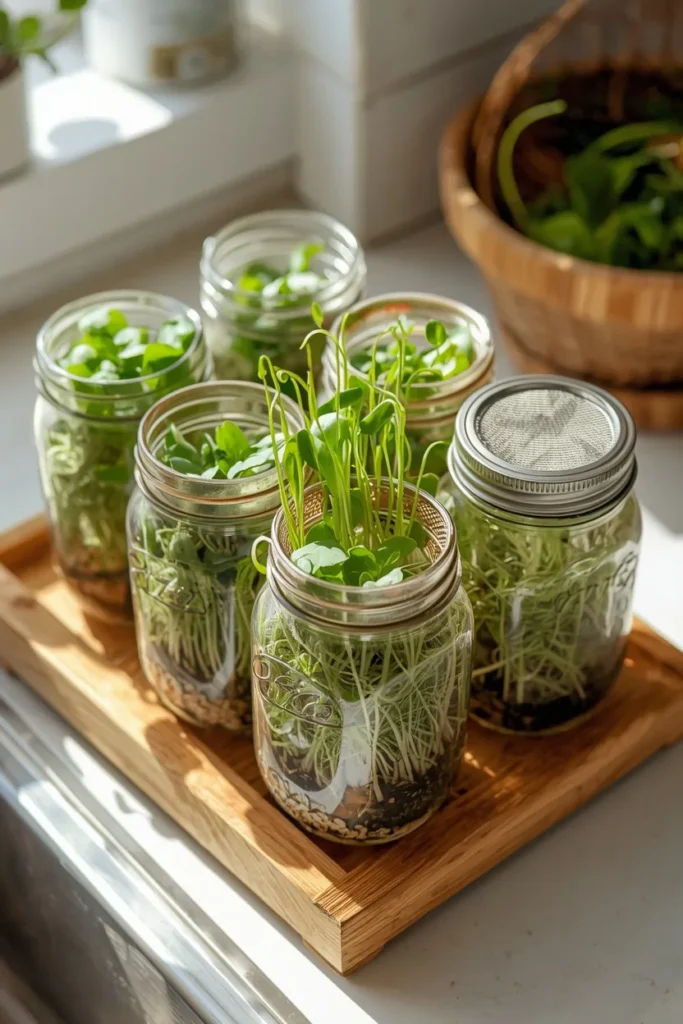
Several wide-mouth mason jars with mesh lids, tilted at an angle on a drying rack, filled with sprouting seeds like microgreens, alfalfa, or broccoli sprouts in various stages of growth.
Expert Tip: Rinse your sprouts twice a day, morning and night, and always tilt the jar so excess water drains out completely. This is the step everyone skips, and it’s the #1 reason sprouts get moldy.
Why it works: This is technically hydroponics in its simplest form, and it’s the fastest way to get fresh, nutritious greens — often ready in just 3-5 days. It’s also incredibly cheap and great for small kitchens with zero counter space, since the jars can sit in a sink or drying rack.
8. The Hanging Net Pot Window Garden
What you’re looking at
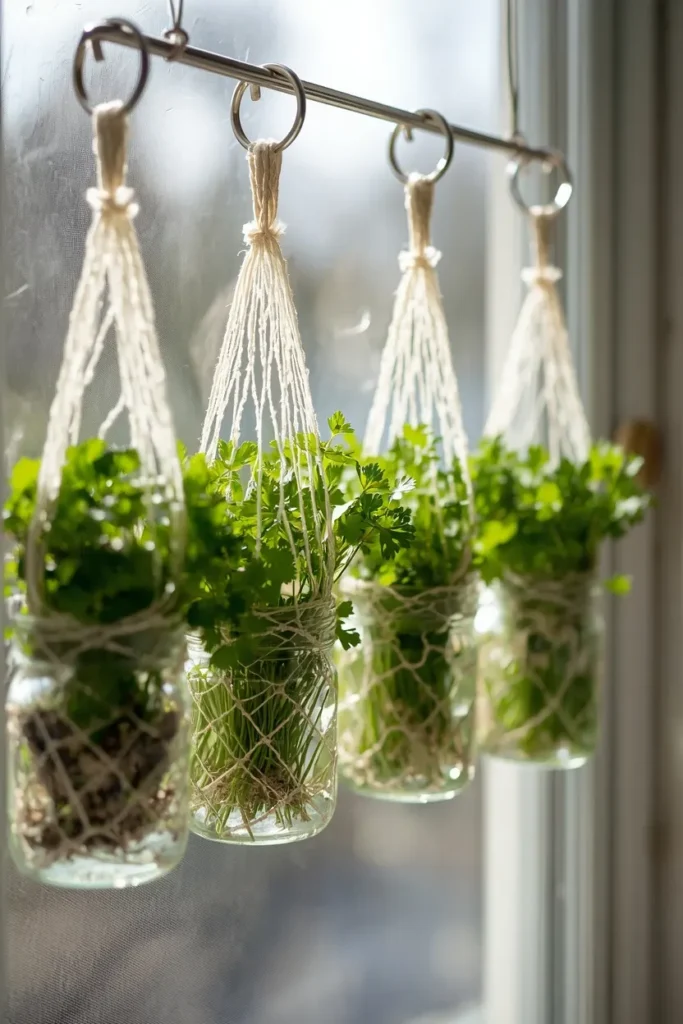
Several clear net pots hanging from a tension rod across a window, each suspended in its own small jar of water, holding herbs like cilantro, parsley, or chives at different growth stages.
Expert Tip: Stagger your planting by a week or two for each jar. That way you’re never harvesting everything at once and running out of fresh herbs the next week.
Why it works: Hanging systems free up your counter and windowsill space entirely, which is huge for tiny kitchens or apartments. It also makes watering almost effortless — you just glance up and check water levels without bending over or rearranging anything. The visual effect of herbs floating at eye level is also surprisingly calming.
9. The Repurposed Wine Bottle Self-Watering Planter
What you’re looking at
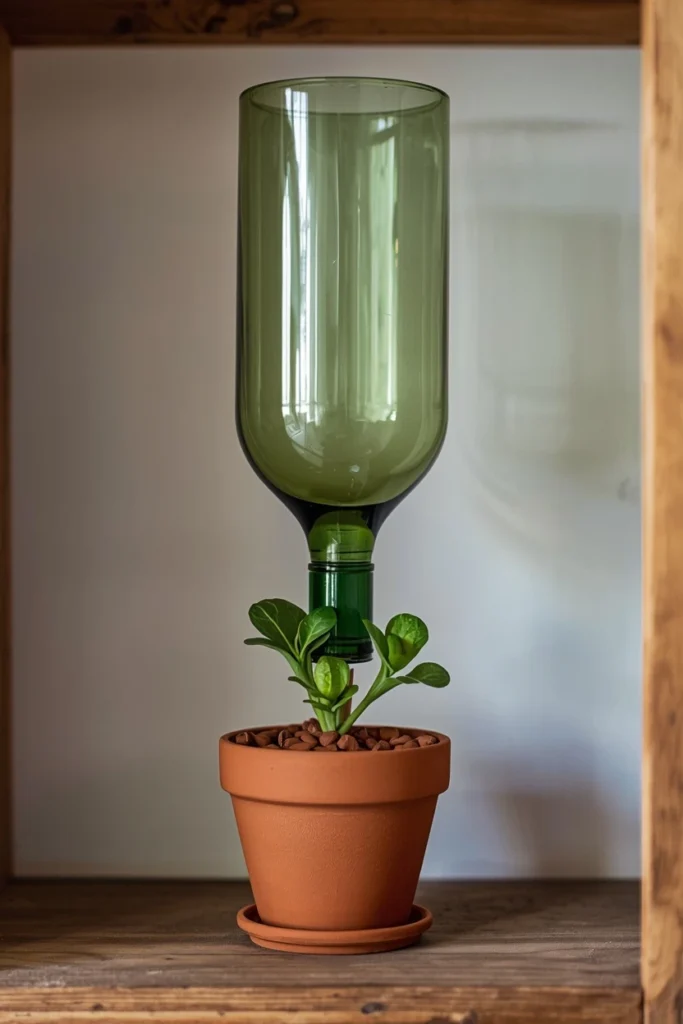
An empty glass wine bottle flipped upside down into a small pot of clay pebbles, slowly releasing nutrient water into the growing medium below where a plant like lettuce or basil sits.
Expert Tip: Fill the bottle, then quickly flip and insert it into the pebbles in one smooth motion. A little water will spill — that’s normal, just keep a towel handy.
Why it works: This is the ultimate “I forgot to water my plants for a week and they’re somehow fine” solution. It’s also a fantastic way to reuse bottles instead of tossing them, which feels good and looks rustic-chic on an open shelf.
Which of these nine ideas would you try first if you only had time for one this weekend? I’m genuinely curious — drop it in the comments.
10. The Multi-Tier Rolling Cart Garden
What you’re looking at
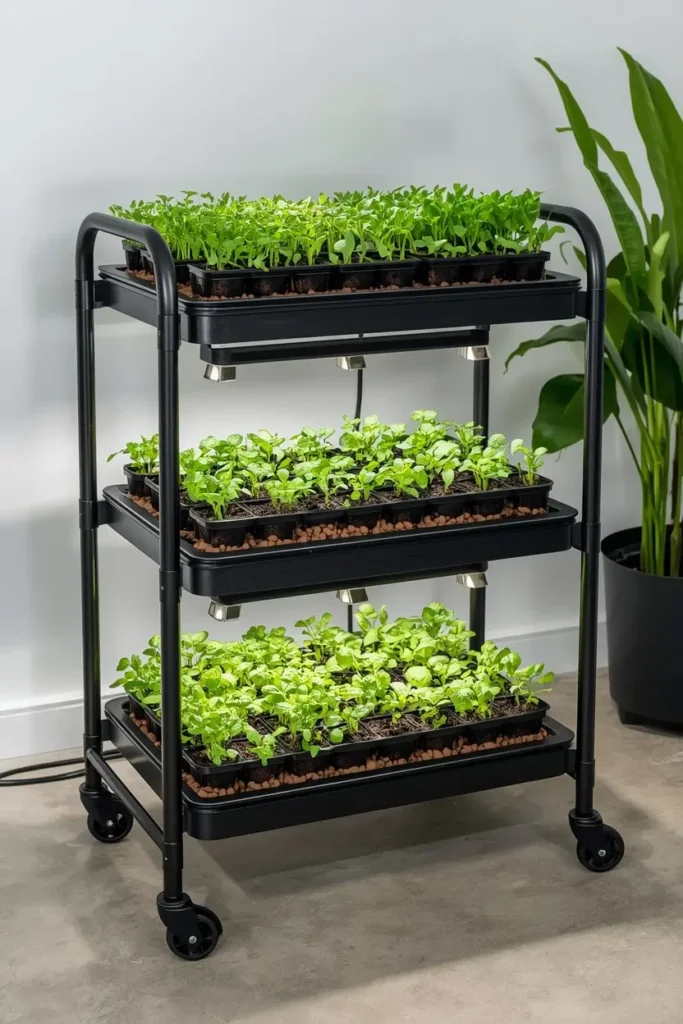
A three-tier metal rolling cart, each shelf lined with a shallow tray of net pots and clay pebbles, with small clip-on grow lights attached to the underside of each shelf above the one below.
Expert Tip: Put this on wheels (literally) so you can roll it toward a window during the day and tuck it into a corner at night. Flexibility is everything when you’re working with limited space.
Why it works: This setup is basically a mini indoor farm disguised as furniture. It’s perfect for people who want to grow a variety of plants — herbs on one shelf, lettuce on another, microgreens on the bottom — without dedicating an entire room to it. The built-in lights mean you’re not dependent on natural sunlight at all, so even a windowless laundry room can become a productive growing space.
Quick Recap Before You Go
Here’s the truth: you don’t need a greenhouse, a green thumb, or a huge budget to grow fresh herbs and greens indoors.
You just need one jar, one cutting, and a little patience.
Start small. Pick one idea from this list — preferably one of the under-$25 options — and try it this week. Once you see those first roots forming, I promise you’ll be hooked.
And hey, if you’re already thinking about where to put your new hydroponic setup, why not give your whole space a refresh while you’re at it?
Check out our 17 Best Chicken Coop and Garden Layout Ideas if you’re dreaming bigger and want to take your growing setup outdoors too.
Happy growing — and don’t forget to come back and tell us which idea worked best for you!