


This article was created in line with Trends Oraa’s research and content standards.
You’ve been putting it off long enough.
Every spring you scroll through Pinterest, save a hundred garden photos, and tell yourself this is the year.
The good news? Raised bed gardens are one of the easiest, most rewarding outdoor upgrades you can make — and you don’t need a massive yard, a green thumb, or a huge budget to pull it off. Whether you’re starting from scratch or upgrading what you already have, these 10 raised bed garden ideas will give you everything you need to build something beautiful and functional.
You might also love our guide on Vegetable Garden Ideas — it’s packed with layout tips and planting inspiration you’ll want to bookmark.
Let’s get into it.
10 Raised Bed Garden Ideas to Inspire Your Next Build
1. Classic Cedar Rectangle Beds with Gravel Pathways
What You’re Seeing
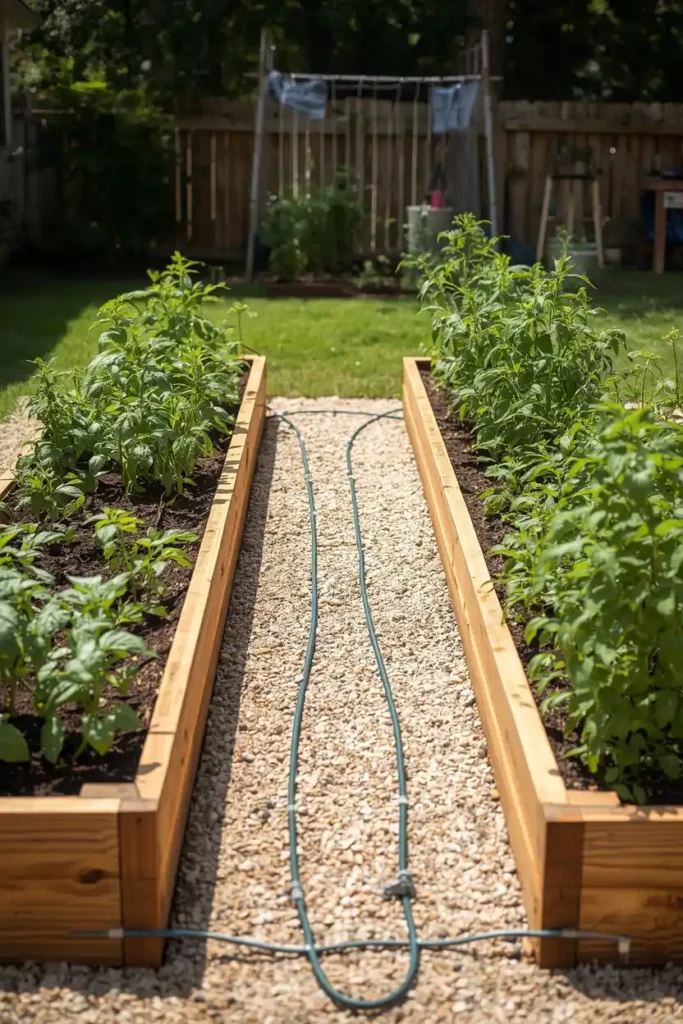
Picture a tidy backyard with two or three long rectangular cedar beds running parallel to each other, separated by clean gravel pathways. The wood is a warm, honey-toned cedar — slightly weathered but well-maintained. Inside the beds, rows of tomatoes, herbs, and leafy greens grow in organized abundance. A simple drip irrigation line runs along the base of each plant.
Design Breakdown
This is the gold standard of raised bed gardening — and for good reason. Cedar is naturally rot-resistant, which means your beds can last 10–20 years without chemical treatment. The rectangular layout maximizes planting space while the gravel paths eliminate muddy footprints after rain.
Most gardeners build these at 4 feet wide so you can reach the center from either side without stepping in. Lengths vary from 4 to 8 feet depending on your space.
Expert Tip
Build your beds at least 12 inches deep. Deeper beds (up to 18 inches) give root vegetables like carrots and beets plenty of room to grow — and your soil will drain better, which means fewer root rot issues.
Why It Works
Cedar has natural tannins that repel insects and resist moisture damage without any chemical treatment. The clean lines of this layout also make the garden look intentional and polished, even mid-season when things get a little wild.
Best For
- Families with kids who love to grow their own food
- First-time gardeners who want a structured setup
- Anyone with a medium to large backyard
Common Mistake to Avoid
Don’t use pressure-treated lumber near edible plants. Older treated wood contains arsenic compounds that can leach into the soil. Stick to cedar, redwood, or food-safe composite materials.
Quick Wins
- Use cedar or redwood for longevity without chemicals
- Keep beds 4 feet wide for easy reach from both sides
- Add gravel or mulch paths to reduce weeding between beds
- Install drip irrigation from day one — you’ll thank yourself in July
2. Tiered Raised Beds on a Slope
What You’re Seeing
Imagine a gently sloping backyard transformed into a lush multi-level garden. Three tiers of raised beds step down the hillside like a miniature terrace farm. Each level is framed in dark stained wood, with overflowing herbs on the top tier, flowering vegetables in the middle, and sprawling squash plants at the bottom. String lights hang between two nearby trees, making the whole space feel like something out of a magazine.
Design Breakdown
Tiered raised beds are the smartest solution for sloped yards. Instead of fighting the grade, you work with it. Each tier acts as a mini retaining wall, preventing soil erosion while creating flat, workable planting surfaces.
The key is stepping each tier back into the slope so they’re stable and the soil doesn’t shift. Use longer corner posts driven into the ground for extra support.
Expert Tip
Plant heavier, larger crops at the bottom tier where soil is deepest and moisture collects. Reserve the top tiers for herbs, lettuce, and shallow-rooted plants that don’t need as much depth.
Why It Works
Tiered designs turn a landscaping challenge into a design feature. They also naturally create different microclimates — upper tiers tend to get more sun and drain faster, while lower tiers stay moister and cooler. Smart planting based on those differences can dramatically increase your yields.
Best For
- Sloped or uneven yards
- Homeowners who want a garden that looks designed, not dropped in
- Gardeners who want to grow a variety of crops with different needs
Common Mistake to Avoid
Don’t skip the gravel drainage layer at the base of each tier. Without it, water pools at the bottom and your lower beds become waterlogged after heavy rain.
Quick Wins
- Use the natural slope to your advantage instead of regrading
- Drive corner posts deep for structural stability
- Vary plantings by tier based on sun exposure and moisture
- Add lighting to make the tiers a nighttime focal point
💡 Expert Insight: Most people don’t know this…
The fill you put inside your raised beds matters just as much as the structure. A common mistake is using straight garden soil or topsoil — it compacts quickly in a raised bed environment. The ideal mix is roughly 60% topsoil, 30% compost, and 10% perlite or coarse sand. This blend drains well, stays loose, and feeds your plants all season. Refresh the top few inches with new compost every spring and your beds will keep performing year after year without major overhauls. Check out our deep dive on what topsoil actually does for your garden for more on this.
Which of these first two styles feels most like your backyard? Drop a comment below — I read every single one.
Most people waste more space than they realize. The next few ideas will show you how to use every inch.
3. Corner L-Shaped Raised Beds to Maximize Yard Space
What You’re Seeing
Visualize a backyard corner that used to feel awkward and underused, now transformed into a productive L-shaped raised bed. The two arms of the bed extend along both fence lines, creating a cohesive frame for the outdoor space. Inside, a mix of tall trellised tomatoes, trailing cucumber vines, and compact pepper plants create layers of height and texture.
Design Breakdown
The L-shape is one of the cleverest raised bed configurations for standard residential yards. It uses two fence lines or walls to anchor the design, which means you’re turning dead space into productive planting area.
The corner junction of the L is typically the deepest point — great for planting a focal plant like a dwarf fruit tree or a tall flowering vegetable. The arms extend to whatever length works for your space, typically 6–8 feet each.
Expert Tip
Build the inner corner of the L slightly lower than the arms — around 12 inches versus 18 inches. This prevents shading issues and makes it easier to access plants at the center of the design.
Why It Works
Corner beds feel intentional and architectural. They also create a natural enclosure that defines the garden zone of your yard — visually separating it from the lawn or patio without needing a fence or divider.
Best For
- Small to medium yards with underused corners
- Renters with permission to add garden beds (can be built freestanding)
- Anyone who wants their garden to double as a landscape feature
Common Mistake to Avoid
Don’t plant tall trellised crops in the inner corner of the L — they’ll shade the entire bed. Reserve the corner for short or medium-height plants and run your trellis along one arm instead.
Quick Wins
- Use corners to anchor L-shaped beds for a clean, designed look
- Keep the inner corner shallower than the arms
- Add a trellis along one arm for vertical growing
- Use this design to create natural outdoor room dividers
You May Also Like:
- Small Garden Design Ideas
- Vegetable Garden Ideas
- Small Balcony Garden Ideas
- DIY Elevated Garden Bed Plans
- Indoor Hydroponic Gardening Ideas
4. Raised Herb Garden Beds Near the Kitchen Door
What You’re Seeing
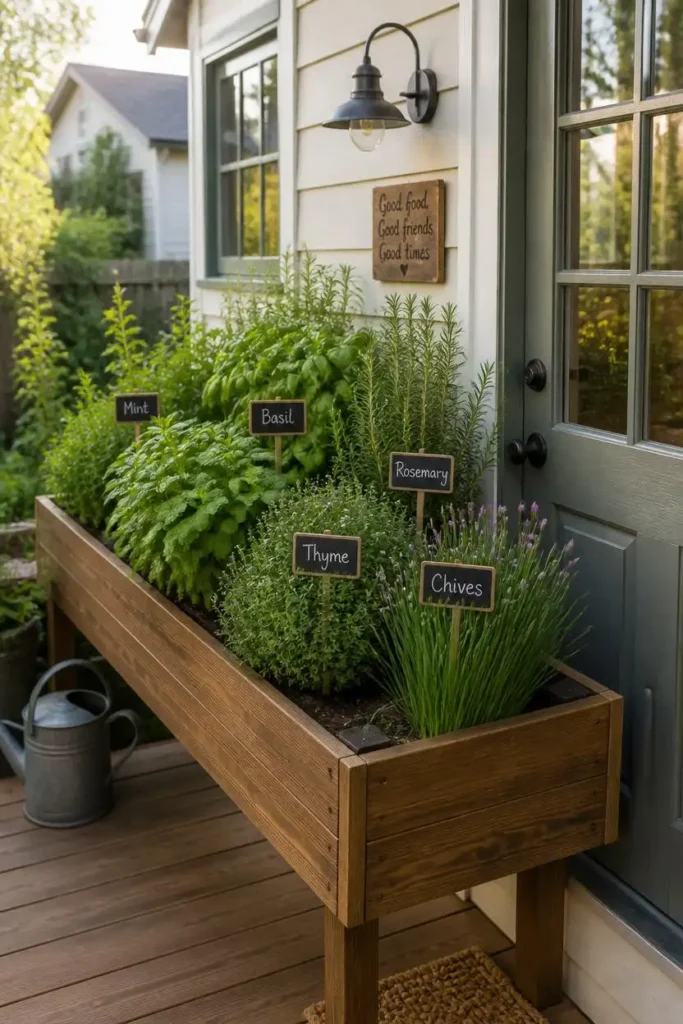
Picture a narrow but beautifully planted raised bed just steps from a kitchen door. It’s only 12 inches wide and 24 inches tall — almost like a planter box on legs — but it’s packed with basil, rosemary, thyme, mint, and chives. A small chalkboard stake labels each plant. The whole thing is built from the same wood as the house’s deck, making it feel integrated rather than added-on.
Design Breakdown
Proximity is everything when it comes to herbs. If your herb garden is inconvenient to reach, you simply won’t use it. Placing a raised herb bed just outside the kitchen door removes that friction entirely.
Taller beds at counter height (28–32 inches) are especially practical — no bending required. These are often called “kitchen garden beds” and they’re one of the most frequently recommended setups by experienced gardeners.
Expert Tip
Keep mint in its own container or section of the bed. Mint spreads aggressively underground and will crowd out everything else if you’re not careful.
Why It Works
Having fresh herbs within arm’s reach changes how you cook. It’s that simple. You’ll use them more, waste less, and your food will taste better. There’s also a strong psychological benefit — tending a small, manageable herb bed feels rewarding without being overwhelming.
Best For
- Apartment dwellers with a small patio or balcony
- Home cooks who want to use fresh herbs daily
- Beginners who want to start small before scaling up
Common Mistake to Avoid
Don’t mix water-loving herbs (like basil and parsley) with drought-tolerant ones (like rosemary and thyme) in the same bed without dividers. Their water needs are very different and one group will always suffer.
Quick Wins
- Place herb beds within 10 steps of your kitchen
- Build at counter height to eliminate bending
- Separate invasive herbs like mint in their own section
- Use chalkboard or metal stakes for a neat, labeled look
5. Raised Beds with Built-In Bench Seating
What You’re Seeing
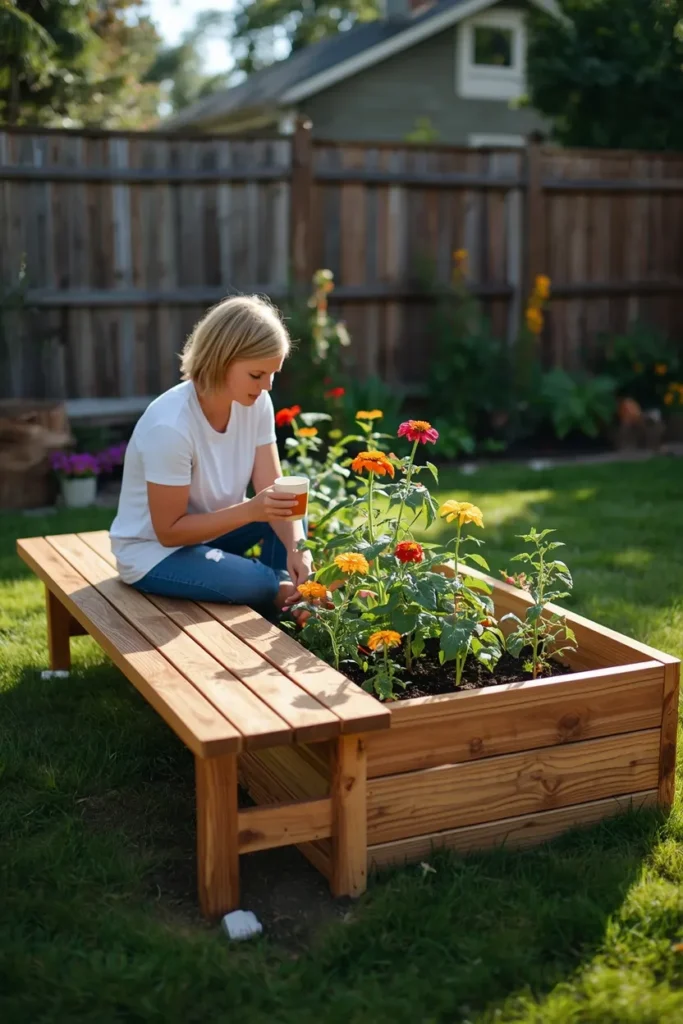
Think of a raised garden bed that doubles as a garden bench — the bed’s wide wooden frame extends on one side to form a comfortable seat at exactly the right height. A homeowner sits at the edge, weeding with one hand and holding a coffee mug with the other. The bed is full of colorful zinnias and sprawling tomato plants. It’s functional, beautiful, and clearly designed with intention.
Design Breakdown
Built-in bench seating is one of those features that sounds like a luxury but is actually incredibly practical. The bench is typically formed by widening one side of the raised bed frame to 12–16 inches and ensuring the total height sits at a comfortable 18–20 inches — standard bench height.
The bench can run along one long side of the bed or wrap around a corner. Some designs include storage underneath for tools, gloves, or seed packets.
Expert Tip
Seal the bench surface with an exterior-grade wood sealant annually. The bench will get more wear than the beds, and untreated wood will splinter and gray faster with regular sitting and weather exposure.
Why It Works
Gardening is more enjoyable when you’re comfortable. A built-in bench makes weeding, planting, and harvesting less physically taxing — especially for older gardeners or anyone with back issues. It also turns the garden into a destination, not just a chore.
Best For
- Families who want the garden to be a gathering space
- Gardeners with back or knee issues
- Homes with a patio or deck nearby
Common Mistake to Avoid
Don’t build the bench on the south-facing side of the bed — you’ll be sitting in full sun in the middle of summer. Position it on the north or east side for comfortable morning gardening.
Quick Wins
- Build bench at 18–20 inches height for comfort
- Use the same wood as the beds for a unified look
- Add tool storage underneath
- Seal bench wood every year to prevent splintering
💡 Expert Insight: One thing I’ve learned…
The biggest mistake new raised bed gardeners make isn’t about plants — it’s about soil volume. People underestimate how much soil their beds need and buy too little. A 4x8x12-inch bed needs roughly 32 cubic feet of soil mix. That’s more than you think. Always calculate your volume before heading to the garden center, because you don’t want to shortchange the roots. A half-filled bed looks bad and underperforms. Fill it to within 2 inches of the top and top it off with mulch to reduce moisture loss.
Have you ever tried a raised bed with a bench? Would you choose the functional combo or stick with a traditional bed? Tell me in the comments.
The Ultimate Raised Bed Garden Planning Guide
Before we get to the next five ideas, let’s talk planning. This is where most people skip ahead and end up frustrated.
Why Most Raised Bed Gardens Underperform
It’s rarely the plants. It’s the planning — or lack of it.
Here’s what to think through before you build or buy anything:
How Many Beds Do You Actually Need?
Start smaller than you think. A single 4×8 raised bed can produce a surprising amount of food and flowers. Most first-time raised bed gardeners go too big, get overwhelmed, and end up with weedy, neglected beds by August.
A good rule of thumb:
- 1 bed: Herbs + one or two vegetable crops
- 2 beds: A full kitchen garden with seasonal rotation
- 3–4 beds: Serious food production for a family of four
What Material Should You Use?
Here’s a quick breakdown of common raised bed materials:
Cedar or Redwood
- Cost: $3–$6 per linear foot
- Lifespan: 10–20 years
- Best for: Natural aesthetic, food gardens
- Pros: No chemicals, rot-resistant, beautiful
- Cons: More expensive than pine
Pine
- Cost: $1–$3 per linear foot
- Lifespan: 3–7 years
- Best for: Budget builds, starter gardens
- Pros: Affordable, easy to find
- Cons: Rots faster, may need replacement in a few years
Composite / Recycled Plastic
- Cost: $5–$10 per linear foot
- Lifespan: 25+ years
- Best for: Long-term investment, low maintenance
- Pros: Extremely durable, no rot
- Cons: Less natural-looking, higher upfront cost
Galvanized Steel
- Cost: $8–$15 per linear foot
- Lifespan: 20–30 years
- Best for: Modern aesthetic, hot climates
- Pros: Stylish, pest-resistant
- Cons: Heats up in summer (can burn roots if sides get very hot), more expensive
Cinder Blocks / Concrete
- Cost: $1–$2 per block
- Lifespan: Indefinite
- Best for: Permanent installations, large beds
- Pros: Free-form shapes, extremely durable
- Cons: Heavy, pH can shift if not lined
Soil: What to Actually Put Inside
Never fill raised beds with straight dirt from your yard. Here’s the mix that works:
- 60% topsoil (screened, not clumpy)
- 30% compost (aged, not fresh)
- 10% perlite, vermiculite, or coarse sand (for drainage)
For deep beds (18+ inches), put a 6-inch layer of wood chips or straw at the bottom — this is called Hugelkultur-light and it improves drainage and soil biology over time.
Location Rules You Should Know
- 6+ hours of direct sun for vegetables
- 4–6 hours for herbs and leafy greens
- Near a water source — dragging a hose across your yard every day gets old fast
- Level ground or build tiered beds for slopes
- Away from large trees whose roots will invade your beds
Cost Breakdown: What Should You Budget?
| Setup | Estimated Cost |
|---|---|
| Single 4×8 cedar bed (DIY) | $80–$150 |
| Single 4×8 cedar bed (kit) | $120–$250 |
| 3-bed garden setup (DIY) | $250–$500 |
| Galvanized steel bed | $150–$350 each |
| Soil fill for 4x8x12″ bed | $50–$100 |
| Drip irrigation kit | $30–$80 |
The cheapest option long-term is almost always a quality cedar or composite bed that you fill well and maintain. Cheap pine beds that rot in 3 years end up costing more than doing it right the first time.
Common Planning Mistakes
- Placing beds in full shade because you wanted them near the house
- Building too many beds before knowing how much time you have
- Skipping irrigation and hoping rainfall will be enough
- Not accounting for walking space between beds (keep paths at least 18–24 inches wide)
- Forgetting to test your water source for chlorine if you’re on city water (let water sit 24 hours or use a filter)
The next idea is one designers secretly love. And once you see it, you’ll understand why.
6. Galvanized Steel Raised Beds for a Modern Look
What You’re Seeing
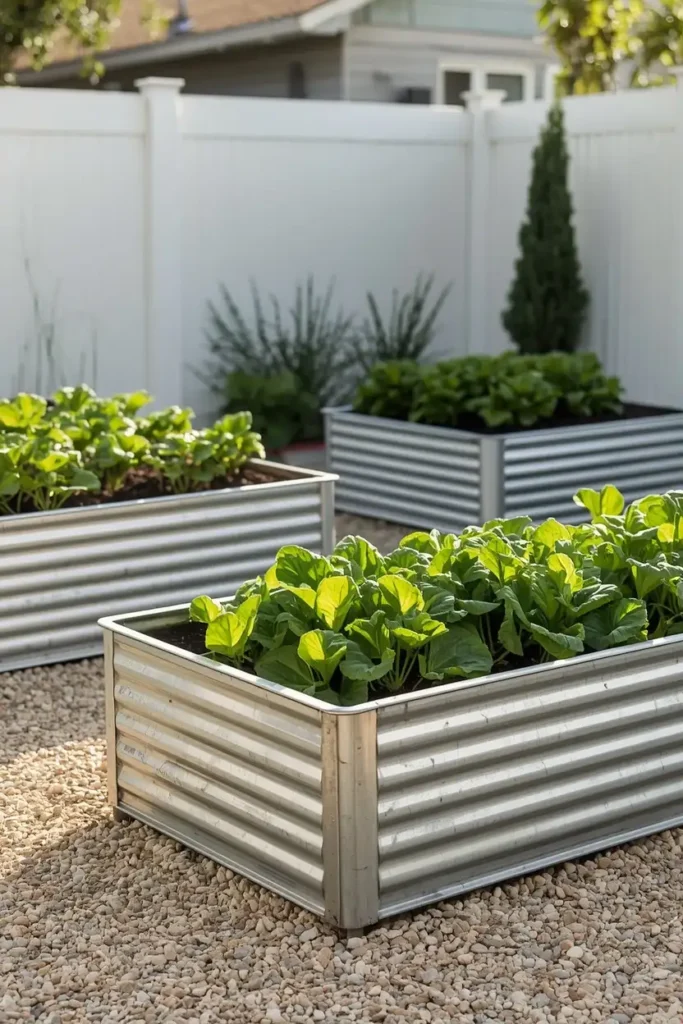
Visualize a sleek, modern backyard with two or three corrugated galvanized steel raised beds arranged on a light-colored gravel patio. The metal reflects the afternoon sun with a cool, industrial shimmer. Inside the beds, lush green plants contrast beautifully against the metallic gray. A minimal drip irrigation system runs along the top edge. The whole setup looks like something from a landscape architecture portfolio.
Design Breakdown
Galvanized steel raised beds have exploded in popularity over the past few years, and it’s easy to see why. They’re incredibly durable, pest-resistant (no slugs climbing up slick metal), and they give any outdoor space an instantly modern, editorial edge.
These beds come in kit form from brands like Birdies, Vego Garden, and others — or you can source corrugated roofing panels and build your own for less. Standard depths run from 17 to 32 inches, which is perfect for most vegetable crops.
Expert Tip
Line the inside of steel beds with food-safe pond liner or landscape fabric before filling with soil. This prevents direct soil-to-metal contact, extends the life of the bed, and prevents any potential trace leaching from older or lower-quality steel.
Why It Works
Steel beds heat up slightly faster than wood in spring, which can give your plants a head start in cooler climates. The modern aesthetic also adds significant curb appeal and visual value to your outdoor space.
Best For
- Modern, contemporary, or industrial-style homes
- Gardeners who want a low-maintenance, long-lasting option
- Hot climates where wood rots faster
Common Mistake to Avoid
Don’t buy cheap, thin-gauge steel beds. They warp and bow outward under the pressure of filled soil. Look for 14-gauge or thicker steel for structural integrity.
Quick Wins
- Line steel beds to extend their lifespan
- Choose 17–24 inch depth for most vegetables
- Use drip irrigation to keep things clean and efficient
- Pair with gravel ground cover for a cohesive modern look
7. Raised Bed Garden with a Built-In Trellis System
What You’re Seeing
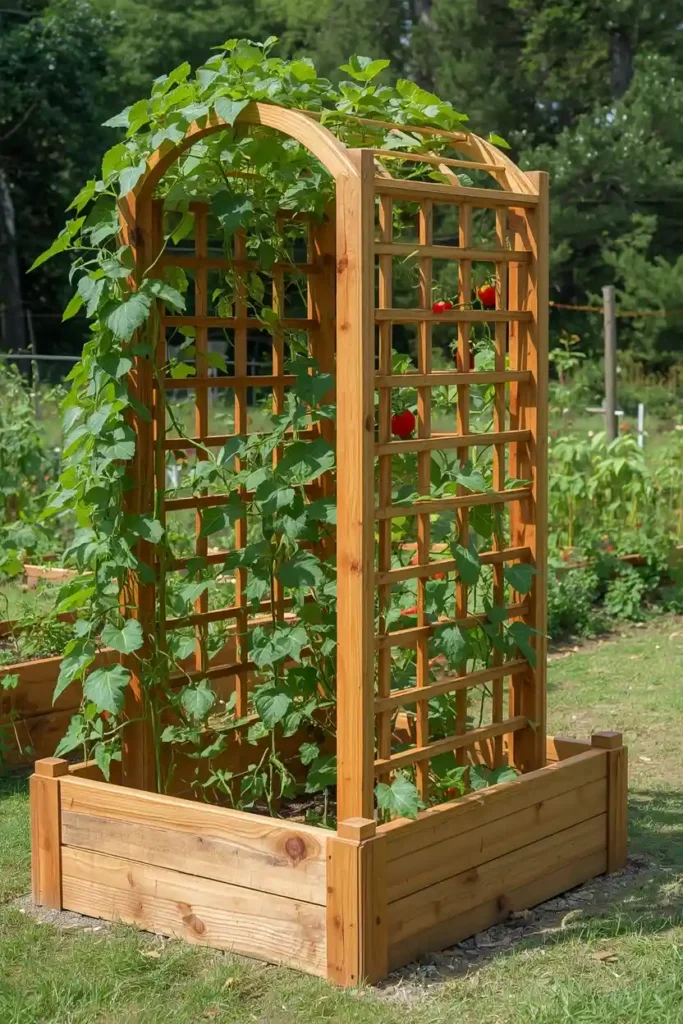
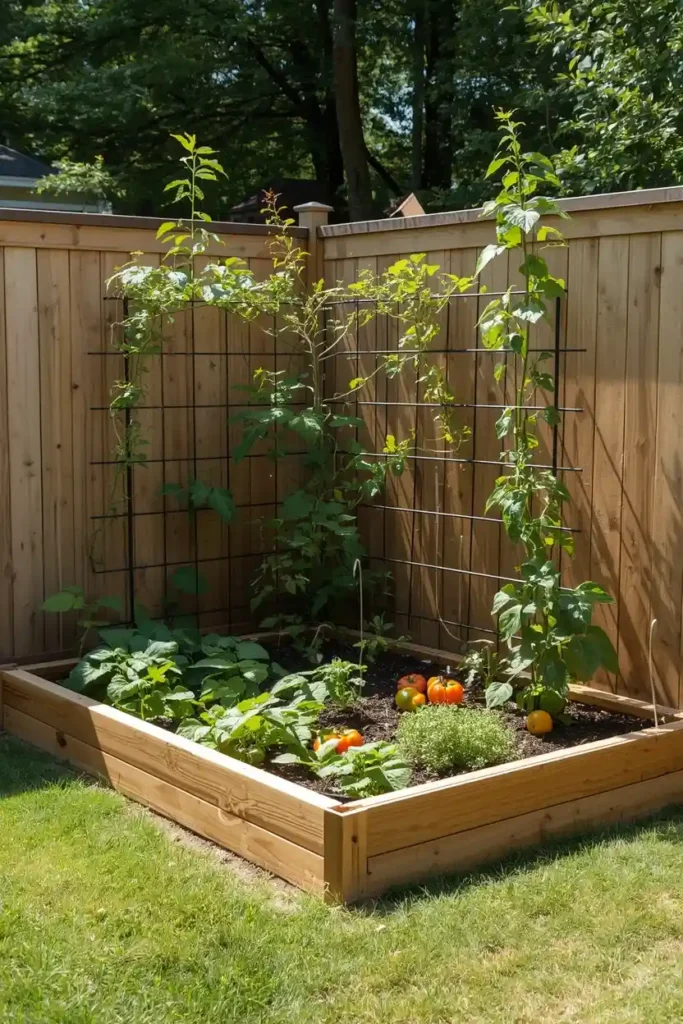
Picture a beautiful wooden raised bed with a tall trellis arching directly over it — like a garden tunnel in miniature. Cucumber vines spiral up one side, cherry tomatoes climb the center posts, and pole beans weave through the lower rungs. The whole structure is unified, sturdy, and deliberately designed. The trellis doesn’t feel like an afterthought — it IS the design.
Design Breakdown
Vertical growing is one of the smartest strategies in raised bed gardening, especially if you’re working with limited square footage. A built-in trellis system allows you to grow upward instead of outward, dramatically increasing your yield per square foot.
The most common designs use corner posts anchored directly into the raised bed frame, with either a flat trellis panel, wire grid, or arching structure overhead. Cedar, bamboo, and powder-coated steel are all popular materials.
Expert Tip
Orient your trellis on the north side of the bed so tall climbing plants don’t shade shorter ones. The north placement puts the trellis in the “back” from a sun perspective and keeps shorter plants in the sun.
Why It Works
Vertical growing improves air circulation around plants, which reduces fungal disease. It also makes harvesting dramatically easier — no crawling around trying to find cucumbers hiding under leaves. And from a visual standpoint, a well-designed trellis turns a simple garden bed into a beautiful garden feature.
Best For
- Small gardens that need maximum yield from minimal space
- Growers of cucumbers, tomatoes, beans, and peas
- Anyone who wants the garden to look as good as it produces
Common Mistake to Avoid
Don’t install a trellis that isn’t anchored into the bed frame itself. A free-standing trellis next to a raised bed will tip over in wind once plants are fully grown and heavy.
Quick Wins
- Anchor trellis posts directly into raised bed frame
- Place trellis on north side to avoid shading lower crops
- Use galvanized wire or jute netting for climbing support
- Train vines weekly to keep growth controlled and productive
You May Also Like:
- DIY Garden Trellis Ideas
- Tomato Trellis Ideas
- Tiny Garden Ideas
- Cut Flower Garden Layout Ideas
- Garden Ideas
8. Raised Beds in a U-Shape or Keyhole Design
What You’re Seeing
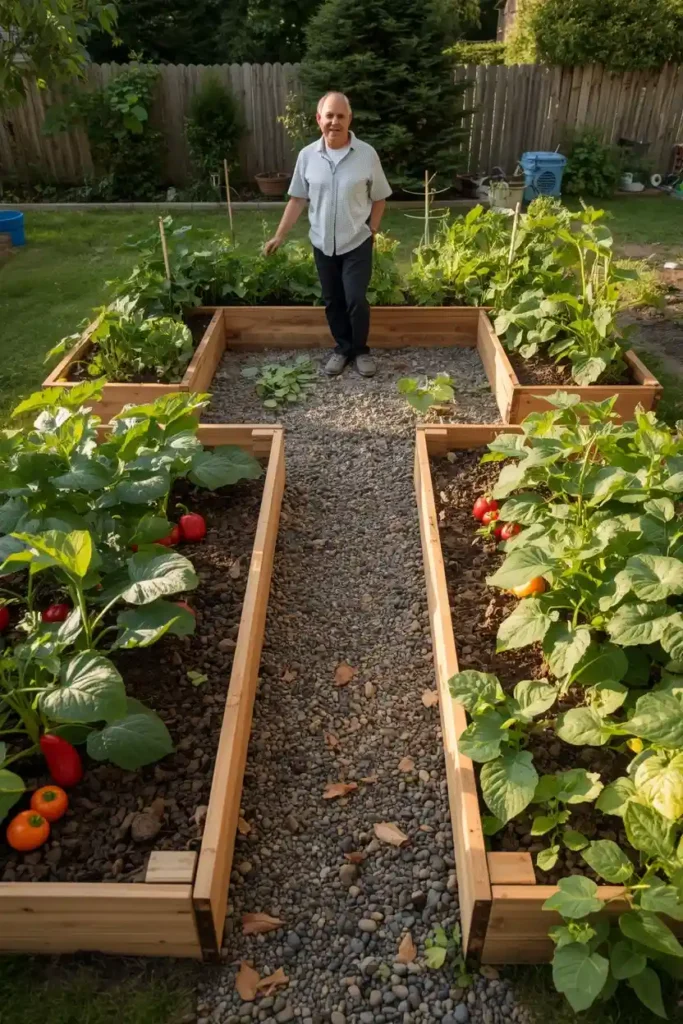
Imagine stepping into a U-shaped garden that wraps around you on three sides. The beds are waist-high, filled with peppers, eggplant, and sprawling squash. A narrow path runs through the center, giving you access to every inch of planting space without reaching over. It feels efficient, intentional, and almost meditative — a quiet corner of the yard that’s completely dedicated to growing.
Design Breakdown
The U-shape is the most ergonomically efficient raised bed configuration in existence. By wrapping the beds around a central standing path, you can reach every part of the bed without stretching. The keyhole design takes this further — a circular bed with a narrow wedge-shaped path cut into it so you can access the center from the inside.
Both designs maximize planting area relative to walking space. A traditional U-shape setup covering a 10×10 area can yield more planting surface than a random assortment of rectangular beds covering the same footprint.
Expert Tip
Keep the central path in a U-shape at least 24 inches wide — 30 inches if you use a wheelbarrow or garden cart. Anything narrower gets frustrating fast, especially when plants are full-grown and spilling over the edges.
Why It Works
The U-shape creates a microclimate. Surrounded by beds on three sides, you’re working in a sheltered space that stays slightly warmer and more sheltered from wind — which plants love. It also creates a genuine sense of being in the garden, not just standing next to it.
Best For
- Serious food growers who want maximum efficiency
- Gardeners with back or mobility concerns
- Large-scale home vegetable production
Common Mistake to Avoid
Don’t close the U entirely into an O (a full square with interior access only). Emergency exit matters — if something heavy falls or you need to maneuver equipment, you need an exit point.
Quick Wins
- Keep center path at least 24 inches wide
- Build beds at waist height (28–32 inches) for U-shape ergonomics
- Orient the open end of the U toward your water source
- Plant tallest crops along the back of the U
💡 Expert Insight: Here’s where it gets interesting…
Most gardeners fertilize their raised beds all wrong. They either do nothing (hoping the initial soil mix lasts forever) or over-fertilize with heavy synthetic feeds that burn roots and disrupt soil biology. The smarter approach is side-dressing with compost mid-season — simply pushing a few inches of aged compost around the base of your plants every 4–6 weeks. This feeds slowly, improves soil structure, and supports the beneficial microbes that actually make nutrients available to plant roots. Combine that with an occasional liquid kelp or fish emulsion foliar spray and your raised beds will outperform any garden that relies on synthetic fertilizers. If you want to go deeper, our guide on top soil mistakes to avoid covers the science behind all of this.
What’s your biggest raised bed challenge right now — building the beds, filling them, or keeping up with the growing? Let me know below.
This simple change can completely transform the space. The last two ideas are ones most gardeners overlook entirely.
9. Raised Beds with Integrated Lighting for Evening Use
What You’re Seeing
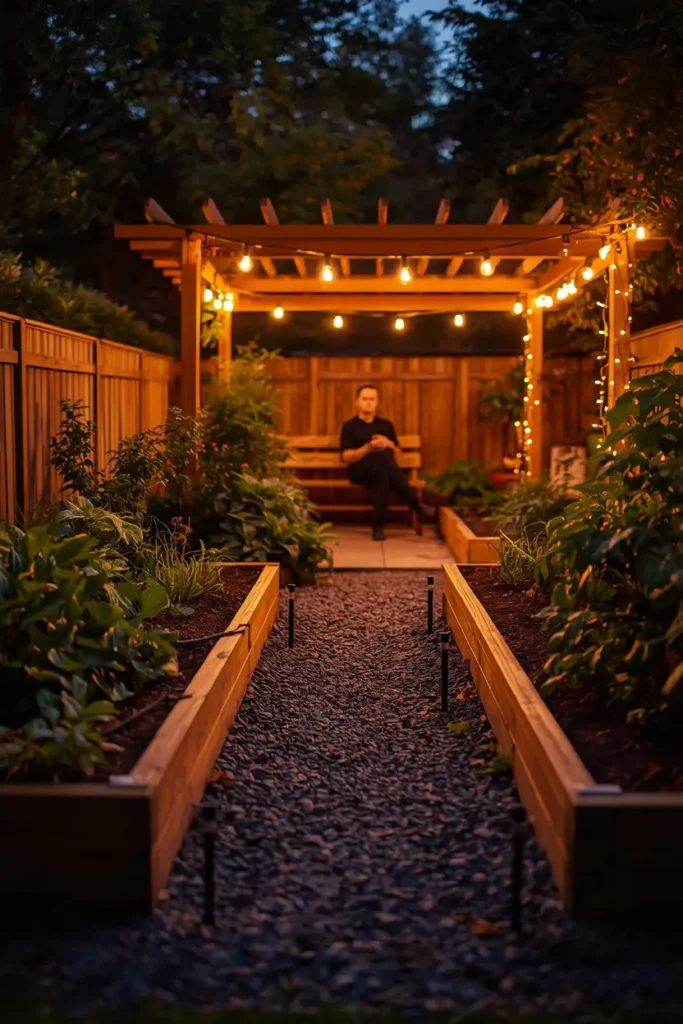
Think about the same raised bed garden you’ve been picturing — but now at dusk. Solar-powered stake lights line the pathway between beds. Low-profile LED strips run along the underside of a pergola overhead. A string of warm Edison bulbs drapes from a nearby fence post. The garden is as beautiful at 9 PM as it is at noon. You’re sitting on that built-in bench from Idea #5, still out there, not ready to go inside.
Design Breakdown
Outdoor lighting extends the usability of your garden space dramatically — both for late-evening harvesting (yes, it happens) and for simply enjoying the space after a long day. Raised beds with intentional lighting become a genuine outdoor living space, not just a utilitarian growing area.
The most common approaches are solar stake lights between beds, low-voltage LED path lights, and overhead string lighting from a pergola or fence. All three can coexist beautifully.
Expert Tip
Use warm white lights (2700K–3000K color temperature) rather than cool white or blue-tinted lights. Warm tones make foliage look lush and inviting, while cooler tones can make the garden look clinical or overly bright.
Why It Works
Gardens that look good at night get used more. Simple as that. Adding lighting turns your raised bed garden from a daytime-only space into a year-round evening destination — especially important during fall and spring when daylight hours are short.
Best For
- Homeowners who entertain outdoors
- Anyone who works long hours and only has evening time to garden
- Gardens adjacent to a patio or outdoor seating area
Common Mistake to Avoid
Don’t aim bright lights directly at the plants. Extended artificial light can disrupt flowering and fruiting cycles for some vegetable varieties. Keep lights at path level or overhead, not pointed at the beds themselves.
Quick Wins
- Use warm white (2700K) lights for a cozy atmosphere
- Solar stake lights are zero-install and budget-friendly
- String lights from a pergola or fence create ambient glow
- Keep lighting at path and overhead levels, not at plant level
10. Raised Bed Cottage Garden with Edible Flowers and Herbs
What You’re Seeing
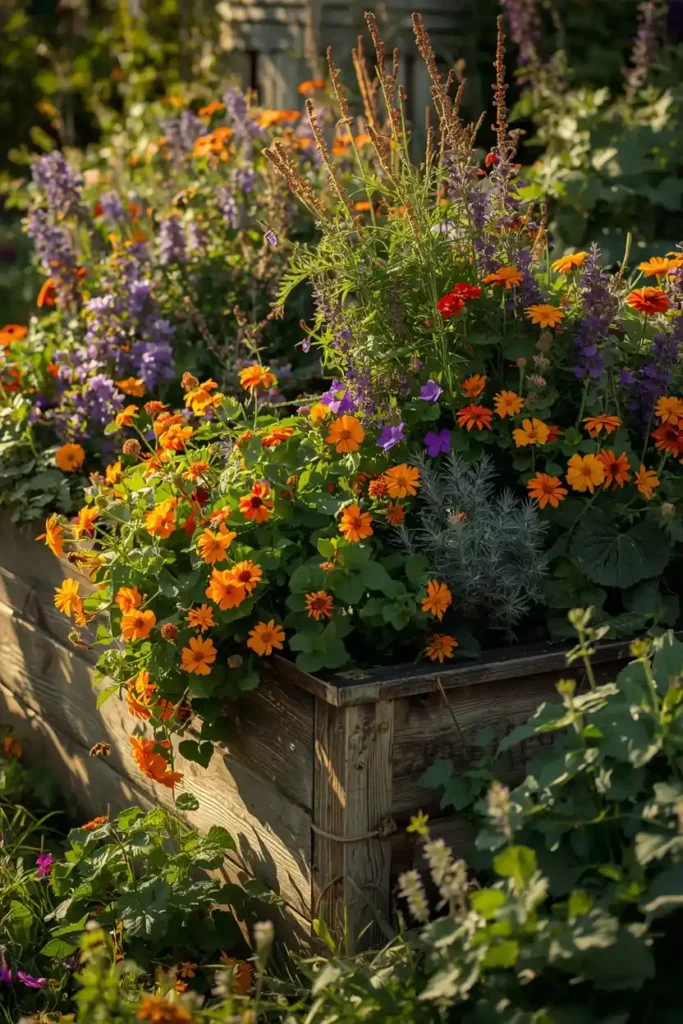
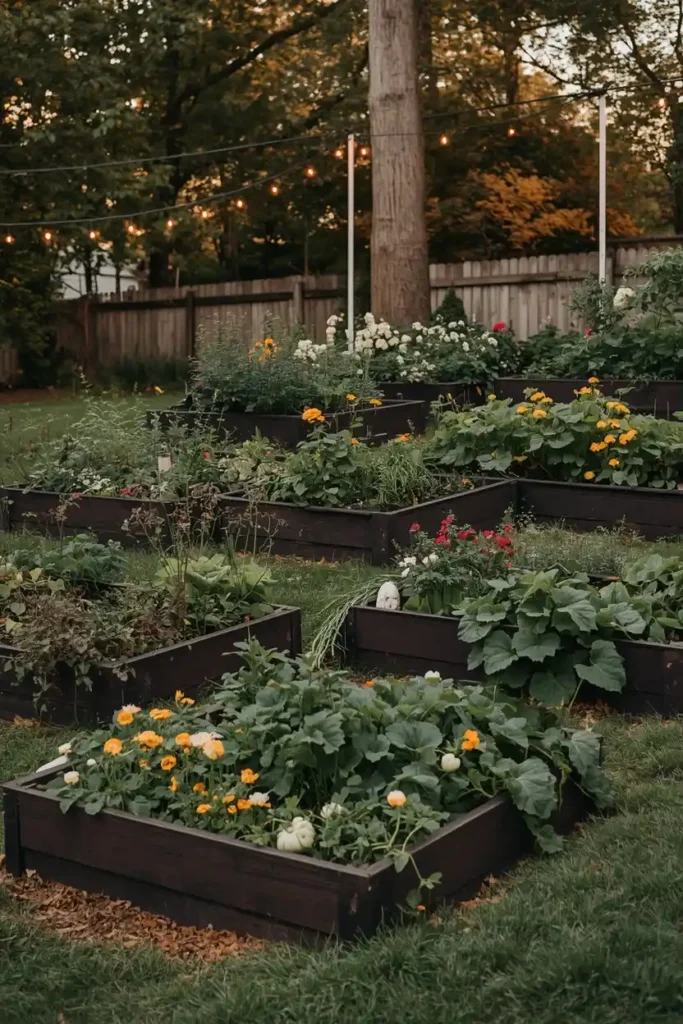
Visualize the most beautiful, abundant raised bed you’ve ever seen. It’s overflowing — not with neat rows of vegetables, but with a glorious mix of edible nasturtiums, lavender, calendula, and borage tumbling over the sides of a weathered wooden bed. Tucked in between are thyme, sage, and a few sturdy kale plants. It looks like a wildflower meadow had a baby with a kitchen garden. It’s chaotic and gorgeous and incredibly alive.
Design Breakdown
The cottage garden raised bed style breaks every rule of tidy, organized gardening — and it works brilliantly. Instead of single-species rows, you plant in loose drifts and combinations that mix edible flowers, herbs, and vegetables together in a way that mimics nature.
This style is also one of the best for pollinators. Edible flowers like nasturtiums, borage, and calendula attract bees and beneficial insects that improve yields in all your other beds. It’s beautiful AND functional.
Expert Tip
Deadhead your edible flowers regularly — removing spent blooms encourages more flowers rather than seed production. More blooms mean more pollinators and more beauty through the whole season.
Why It Works
The cottage garden aesthetic is the most Pinterest-friendly of all raised bed styles, which makes it a great option if you care about how your garden photographs. But it also delivers real function — companion planting in this style naturally deters pests and supports beneficial insects.
Best For
- Gardeners who prioritize beauty as much as production
- Anyone who wants to attract pollinators to all nearby garden beds
- Homeowners whose garden is visible from the street or main outdoor living area
Common Mistake to Avoid
Don’t let the “wild” look fool you into not editing. A cottage raised bed still needs occasional intervention — removing plants that are crowding others, deadheading flowers, and pulling true weeds. The goal is controlled abundance, not actual chaos.
Quick Wins
- Mix edible flowers (nasturtiums, calendula, borage) with herbs and vegetables
- Deadhead regularly for continuous blooming
- Allow plants to spill gently over the edges for a lush, overflowing look
- Include lavender for fragrance and powerful pollinator attraction
Related Garden Ideas to Explore Next
Love these raised bed garden ideas? Here are more posts you’ll want to bookmark:
- Vegetable Garden Ideas
- Small Garden Design Ideas
- Indoor Hydroponic Gardening Ideas
- DIY Elevated Garden Bed Plans
- Small Balcony Garden Ideas
- DIY Cedar Planter Box Under $5
- Garden Shed Landscaping Ideas
- Modern Garden Shed Ideas
Which Raised Bed Garden Idea Will You Try First?
There you have it — 10 raised bed garden ideas that range from simple beginner-friendly setups to bold design statements.
If I had to pick the three most impactful ideas from this list, I’d go with:
The built-in trellis system for maximum food yield in minimal space. The classic cedar rectangle with proper soil mix for beginners who want to start right. And the cottage garden style for anyone who wants a garden that’s as beautiful as it is productive.
Here’s my challenge to you: pick one idea from this list and commit to implementing it this weekend. Not next month. This weekend. Even if it’s just measuring out the space, ordering the lumber, or sketching your layout on paper — take one concrete step.
Which raised bed garden idea are you most excited to try? Is it the sleek galvanized steel look, the cozy cottage garden overflow, or something in between? Tell me in the comments below — I’d love to see what you’re planning.
And if you’re still building out your outdoor space, you’ll definitely want to check out our outdoor patio ideas next — the right patio design can make your raised bed garden feel like a complete, designed outdoor room rather than just a patch of plants.
There’s one more thing you might not have considered yet: how to store all those garden tools, seeds, and supplies once your raised beds are built. Stay tuned — we have something coming on that topic that will make your whole setup feel even more finished.