

This article was created in line with Trends Oraa’s research and content standards.
You’ve been staring at your floors for months.
Something feels off, but you can’t quite name it.
Here’s the truth: your floors are setting the tone for your entire space — and most people underestimate just how much the right concrete floor idea can change everything.
If you’ve ever scrolled through Pinterest wondering how some homes look so effortlessly polished while others just feel… flat, the floor is usually the answer. Concrete floors have gone from industrial afterthought to one of the most sought-after design choices in modern homes — and for very good reason.
Whether you’re renovating a basement, upgrading your living room, or starting from scratch, these 10 concrete floor ideas will give you the inspiration and the roadmap to pull it off beautifully.
You might also love our guide on gray flooring ideas — a natural companion to everything we’re covering today.
Let’s get into it.
Why Concrete Floors Are Having a Major Moment
Concrete floors used to be reserved for warehouses and garages. Not anymore.
Today, they show up in luxury penthouses, cozy farmhouses, minimalist lofts, and even family-friendly living rooms. The material is versatile, durable, and — when done right — genuinely stunning.
What makes concrete so compelling right now is the tension between raw and refined. It’s a floor that can look both industrial-cool and warm-organic depending on how you finish it. That duality is rare in any material.
So before we dive into the ideas themselves: which aesthetic speaks to you? Industrial edge, warm minimalism, or full-on luxury polish? Keep that in mind as you scroll — and you’ll walk away with a crystal-clear vision for your own space.
10 Concrete Floor Ideas Worth Stealing
1. Polished Concrete With a High-Gloss Finish
What You’re Seeing
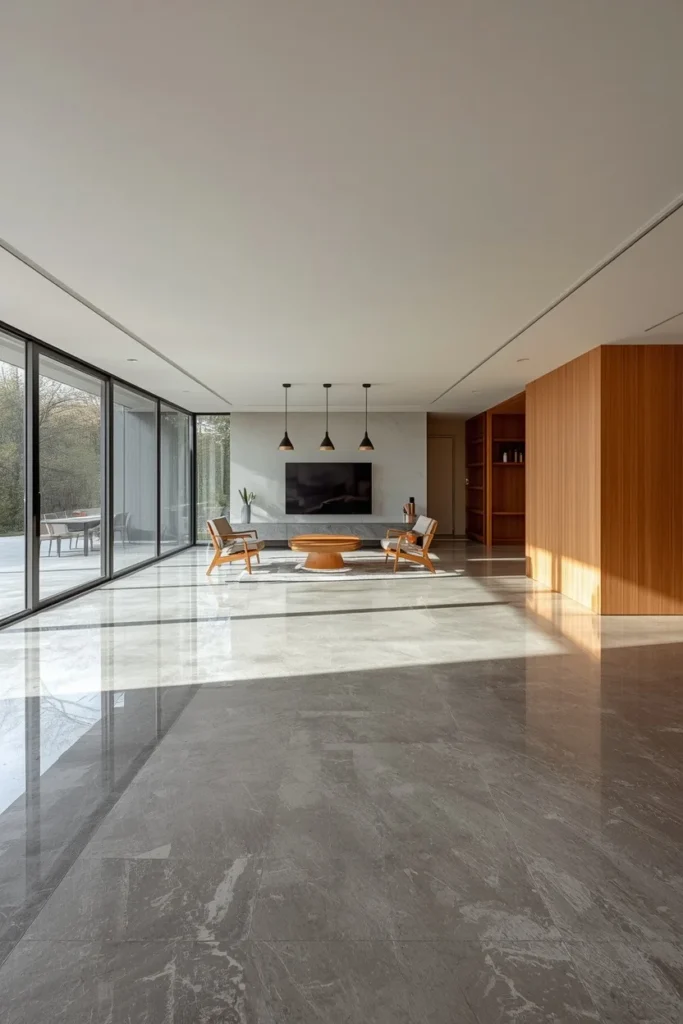
Picture a wide-open living room bathed in natural light. The floor beneath your feet is smooth as glass — a pale dove-gray surface reflecting the sunlight like a still lake at dawn. There’s not a seam in sight. The whole space feels expensive, intentional, and impossibly clean.
Design Breakdown
Polished concrete is created by grinding down a concrete slab with progressively finer diamond-tipped tools, then sealing with a high-gloss topcoat. The result is a mirror-like surface that reads as almost liquid.
This finish works beautifully in open-plan spaces where you want the floor to quietly amplify the architecture rather than compete with it. Pair it with matte-finish walls, warm wood furniture, and pendant lighting to keep things grounded.
Expert Tip
Choose a cream or warm-gray tone rather than a stark cold gray. Warm undertones photograph better for Pinterest and feel more livable day-to-day.
Why It Works
The reflective quality of polished concrete bounces light around the room, making spaces feel larger and brighter. It’s also incredibly low maintenance — no grout lines, no warping, no scratches from high heels.
Best For
- Large open-plan spaces
- Luxury homes
- Modern minimalist aesthetics
- High-traffic entryways
Common Mistake to Avoid
Skipping the anti-slip additive in the sealer. A high-gloss floor can become dangerously slippery when wet, especially in kitchens or entryways. Always request a non-slip finish for wet-prone areas.
Quick Wins
- Add an oversized area rug to warm up the space visually
- Use warm lighting (2700K-3000K) to complement the cool floor tone
- Keep furniture legs off the bare floor where possible to prevent scratching
- Seal annually to maintain the glass-like shine
2. Acid-Stained Concrete for Organic Depth
What You’re Seeing
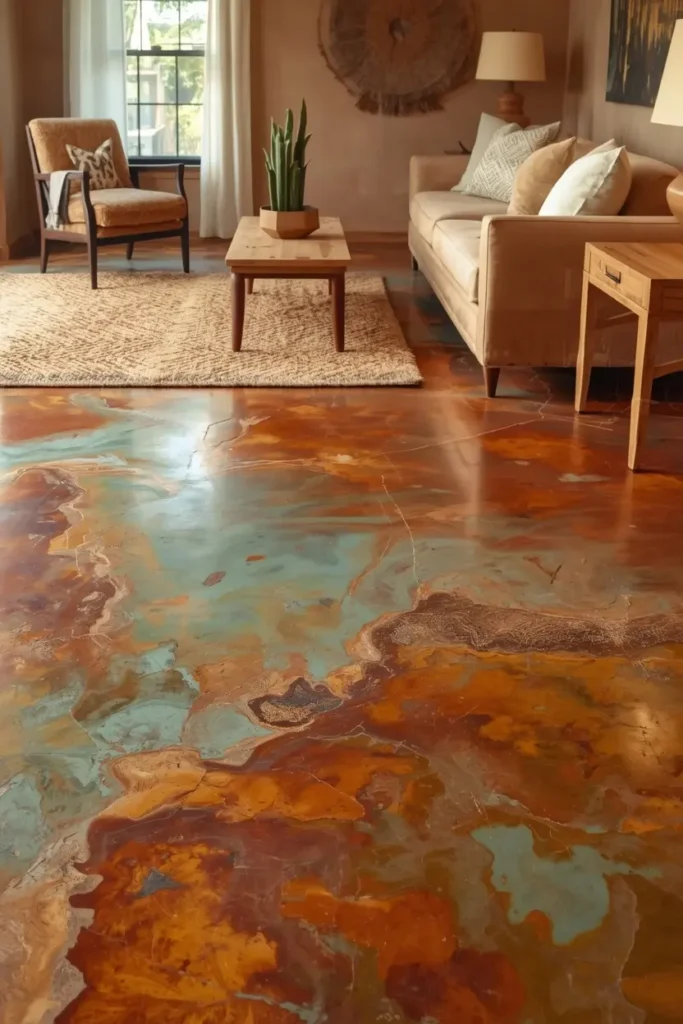
Imagine stepping into a Southwestern-inspired living room where the floor looks like natural stone — all moody browns, burnt sienna, and flashes of deep teal. No two sections look the same. The floor tells a story.
Design Breakdown
Acid staining is a chemical reaction, not a paint. When an acid-based solution is applied to concrete, it reacts with the minerals in the slab to create unpredictable, one-of-a-kind patterns that no two floors share.
The result looks organic and ancient — like the floor has always been there. Colors range from earthy ambers and rusts to cool jade greens depending on the minerals present in your specific slab.
Expert Tip
Get a sample patch done on an inconspicuous corner before committing to the whole floor. Because the reaction depends on your slab’s unique chemistry, the final color can surprise even experienced installers.
Why It Works
Acid staining adds character and depth that smooth, uniform floors simply can’t replicate. For anyone who loves nature-inspired design or wants their floor to feel genuinely unique, this finish delivers. It also hides imperfections better than a polished finish.
Best For
- Rustic and farmhouse interiors
- Families (hides wear and tear beautifully)
- Budget makeovers (staining existing concrete is far cheaper than replacement)
- Artistic and eclectic homes
Common Mistake to Avoid
Using acid stain on very new concrete (less than 28 days old). Fresh slabs haven’t fully cured, and the reaction will be uneven and unpredictable.
Quick Wins
- Seal with a matte or satin finish to preserve the organic look
- Pair with warm, textured textiles like jute rugs and linen curtains
- Combine multiple acid stain colors for a marbled effect
- Consider professional application — DIY acid staining has a high failure rate
Most people don’t know this… Acid staining and concrete dye are often confused, but they’re completely different processes. Acid stain chemically bonds with the concrete and can’t be stripped off. Concrete dye sits on the surface and can fade over time. For longevity and depth, acid staining almost always wins. The choice matters enormously for how your floor holds up 10 years from now.
3. Concrete Overlay on Existing Floors
What You’re Seeing
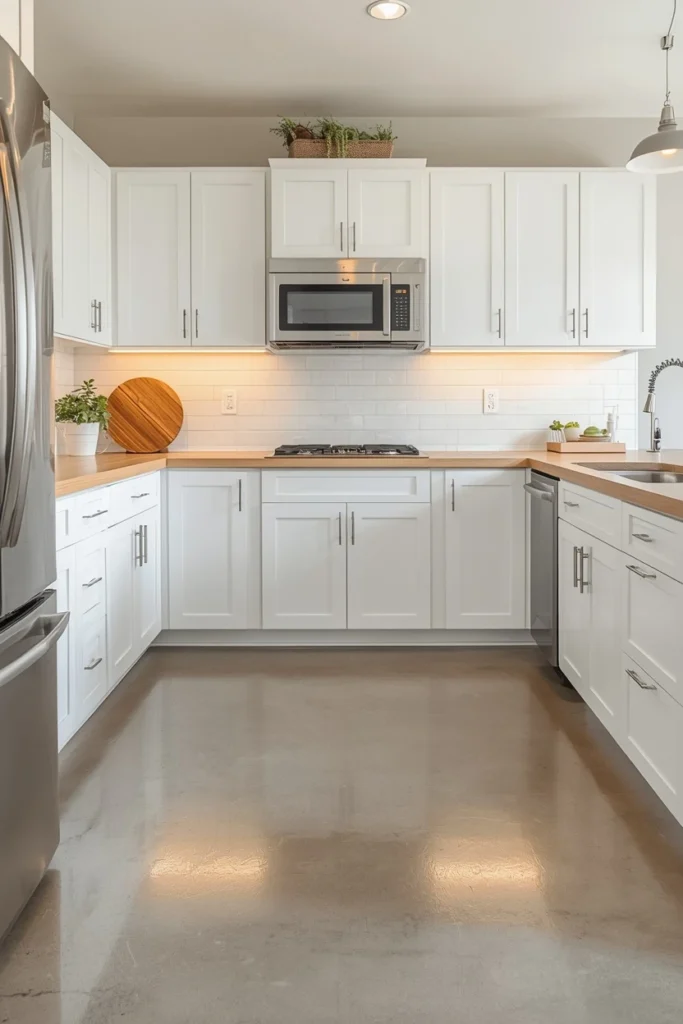
A dated tile kitchen floor, completely transformed. The grout lines are gone. In their place: a seamless, soft warm-gray surface with the subtle texture of brushed concrete. The kitchen looks ten years newer — and no one demolished a thing.
Design Breakdown
A concrete overlay is a thin layer of cement-based resurfacer applied directly over your existing floor. It’s typically 1/4 to 1/2 inch thick and can be applied over tile, vinyl, or even old concrete.
This is the renovation secret that designers use when clients have a tight budget but want a dramatic result. The material cost is a fraction of a full demo-and-replace, and the look is nearly identical to poured concrete.
Expert Tip
Use a microtopping — an ultra-thin, feather-finish overlay — for the smoothest, most professional result. Standard overlays can look slightly grainy if not applied with care.
Why It Works
Overlays solve the single biggest objection to concrete floors: the mess and cost of removing existing flooring. You skip the dumpster, the subfloor exposure, and the weeks of downtime. Many homeowners report completing an overlay project over a weekend.
Best For
- Budget makeovers
- Renters (removable in some applications)
- Existing tile or vinyl that’s in good structural condition
- Kitchen and bathroom refreshes
Common Mistake to Avoid
Ignoring cracks in the existing floor. Overlays are thin. Any cracks in the substrate will eventually telegraph through to the surface. Fill and repair cracks before applying.
Quick Wins
- Clean and degrease the existing surface thoroughly before application
- Apply a bonding primer for better adhesion
- Use a trowel rather than a roller for a smoother finish
- Seal with at least two coats of penetrating sealer
You May Also Like:
- Living Room Floor Tile Ideas
- Gray Flooring Ideas
- Bathroom Tile Design Ideas
- Sunroom Tile Floor Ideas
- Patio Floor Ideas
Most people waste more money on their floors than they need to. Before you tear anything out, read idea #3 again carefully — an overlay could save you thousands.
4. Stamped Concrete With Custom Patterns
What You’re Seeing
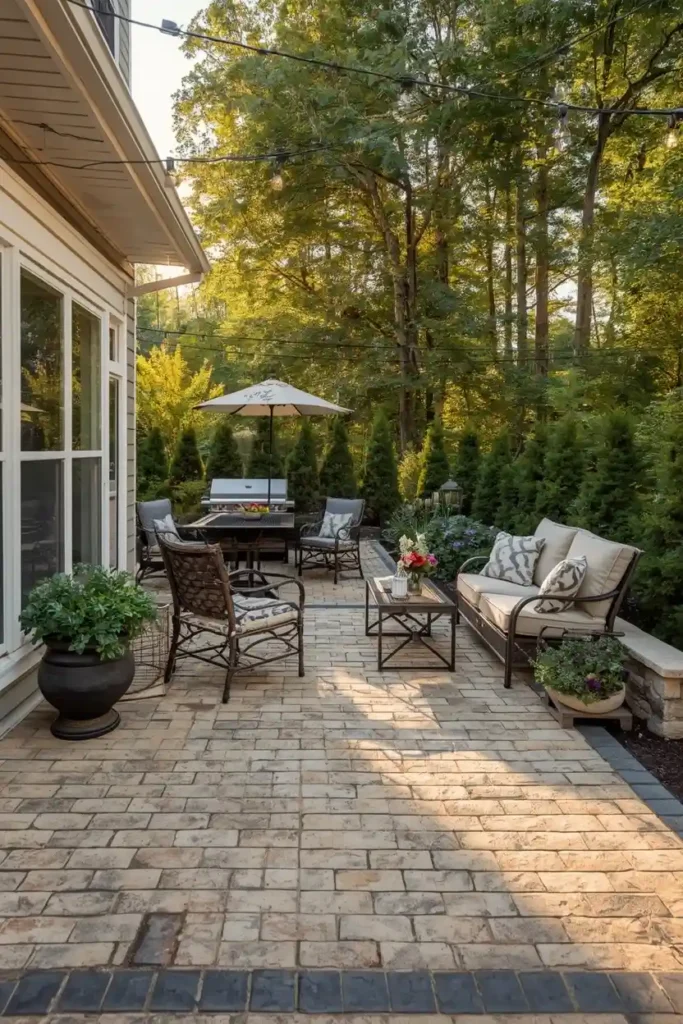
Visualize a sun-drenched patio where the floor looks exactly like hand-laid cobblestone. Mortar lines, texture, irregular edges — all of it perfectly convincing. But when you knock on it, you hear solid concrete.
Design Breakdown
Stamped concrete uses rubber or polyurethane stamps pressed into wet concrete to create the appearance of stone, brick, wood planks, slate, or even tile. The stamps are incredibly detailed, and when combined with color hardeners and release agents, the results can be genuinely indistinguishable from the real thing at a glance.
This technique is wildly popular for patios, driveways, and pool surrounds — but it’s increasingly showing up indoors as a way to get the warmth of wood or stone without the maintenance burden.
Expert Tip
Choose a 2-color combination: a base color mixed into the concrete and a contrasting release agent on the surface. The dual-tone look adds depth that single-color stamping simply can’t achieve.
Why It Works
Stamped concrete gives you the aesthetic of premium materials (slate, travertine, hardwood) at a significantly lower price point — typically 30-50% less than the real thing. And unlike stone or wood, it doesn’t crack, warp, or absorb stains the same way.
Best For
- Outdoor patios and pool areas
- Families with kids and pets
- Budget-conscious homeowners who want a luxury look
- Driveways and walkways
Common Mistake to Avoid
Attempting large stamped areas without a professional. Concrete sets fast. If you’re not experienced, sections will cure before stamping is complete, leaving mismatched texture.
Quick Wins
- Use an antiquing release for a natural, aged appearance
- Seal every 2-3 years to protect the color
- Choose stamps that complement your home’s existing architecture
- Add a non-slip aggregate to the sealer for outdoor applications
Which of these ideas would you try first in your outdoor space? The stamped cobblestone look or the classic slate finish?
5. Concrete Floors With Radiant Heat
What You’re Seeing
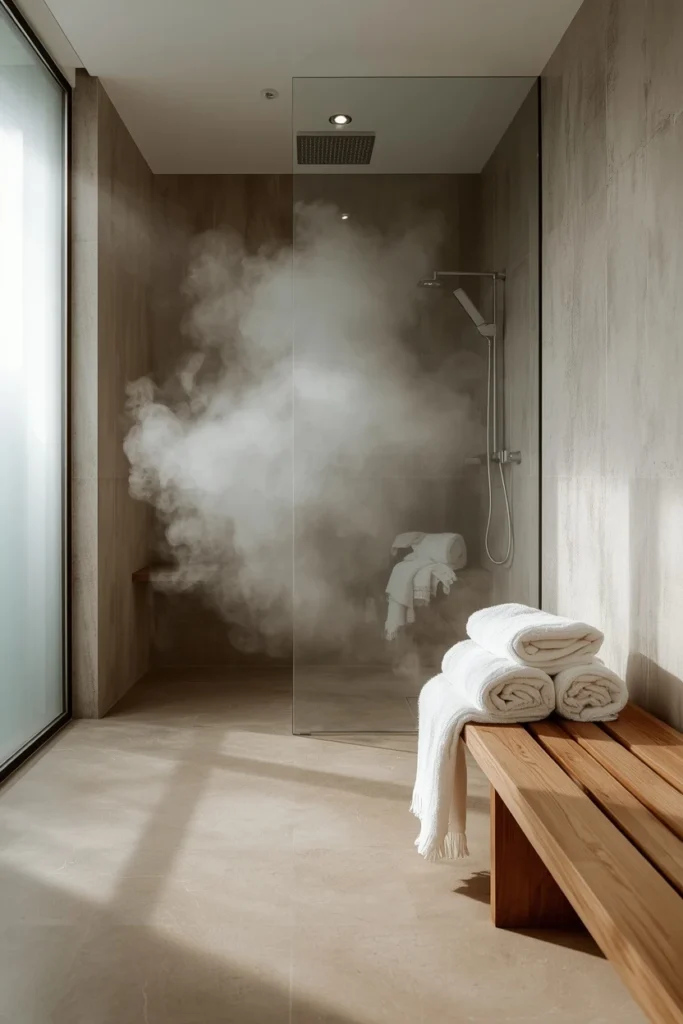
Picture a Nordic-inspired bathroom in the dead of winter. The concrete floor is warm — genuinely, luxuriously warm — under bare feet. Steam rises from the walk-in shower. The space feels like a spa.
Design Breakdown
Radiant floor heating involves installing either electric heating mats or water-fed tubing (hydronic) beneath a concrete slab. Concrete is an ideal conductor for this system because it absorbs heat slowly and releases it evenly and consistently.
The result is a floor that heats from below, eliminating cold spots and drafts entirely. Unlike forced-air systems, radiant heat distributes warmth uniformly across the whole room.
Expert Tip
If you’re pouring new concrete, this is the time to install radiant heat — doing it retrofitted is significantly more expensive. Discuss this with your contractor before the pour, not after.
Why It Works
Concrete plus radiant heat solves the only real objection most people have to concrete floors: the cold. With radiant heat underneath, you get all the aesthetic and practical benefits of concrete without ever stepping onto a cold surface in the morning.
Best For
- Bathrooms and kitchens
- Cold climates
- Luxury home builds and renovations
- Homeowners prioritizing energy efficiency
Common Mistake to Avoid
Using area rugs over radiant heated floors. Thick rugs act as insulation and prevent the heat from rising, reducing efficiency significantly and potentially damaging the heating system over time.
Quick Wins
- Install a programmable thermostat to manage energy costs
- Use thin, low-pile rugs if you want textiles in the space
- Allow 30-45 minutes for the floor to reach temperature
- Pair with concrete floors in medium to dark tones to visually warm the space
Here’s where it gets interesting… Radiant heated concrete floors can actually lower your overall heating bill compared to forced-air systems. Because the heat radiates from the floor up, rooms feel warmer at lower thermostat settings. Some homeowners report 15-25% reductions in heating costs after installation. The upfront investment pays itself back faster than most people expect.
6. Decorative Concrete With Embedded Aggregates
What You’re Seeing
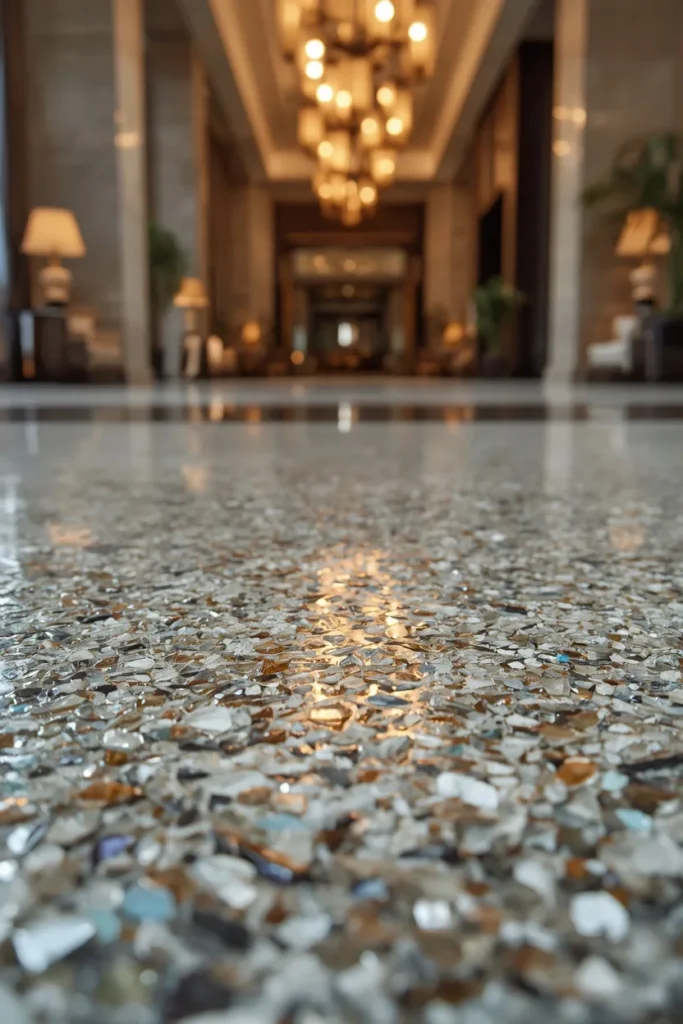
You walk into a boutique hotel lobby and the floor stops you in your tracks. What looks like terrazzo reveals itself as something else entirely: a polished concrete surface with glass chips, river stones, and even sea glass embedded throughout, catching the light like scattered treasure.
Design Breakdown
Seeded or exposed aggregate concrete involves adding decorative materials — glass, stones, shells, metal filings, even fossils — to a concrete surface before it cures. Once the top layer is washed away or ground down, the embedded materials are revealed.
This technique bridges the gap between flooring and artwork. You’re not just choosing a color or texture — you’re curating exactly what lives inside your floor.
Expert Tip
For interior spaces, opt for glass chips or smooth river pebbles rather than sharp aggregate. They’re gentler underfoot, easier to seal, and photograph beautifully.
Why It Works
Embedded aggregate adds a level of custom uniqueness that no showroom floor can replicate. It’s a conversation piece, a focal point, and a practical floor all at once. The texture also adds natural grip, making it safer than ultra-smooth polished concrete.
Best For
- Luxury homes and high-end renovations
- Entryways and foyers
- Commercial and hospitality spaces
- Homeowners who want truly one-of-a-kind floors
Common Mistake to Avoid
Using overly varied aggregate sizes. A mix that’s too random looks chaotic rather than curated. Choose 2-3 complementary materials in similar sizes for a cohesive, intentional result.
Quick Wins
- Sketch your aggregate pattern before pouring
- Consider color-matching the aggregate to your decor palette
- Use a penetrating sealer to lock in the stones without clouding the finish
- Test the embedded look on a sample board before committing to the full floor
The next idea is one designers secretly love — and it’s far more achievable than it looks.
7. Microcement: The Concrete Look Without the Concrete
What You’re Seeing
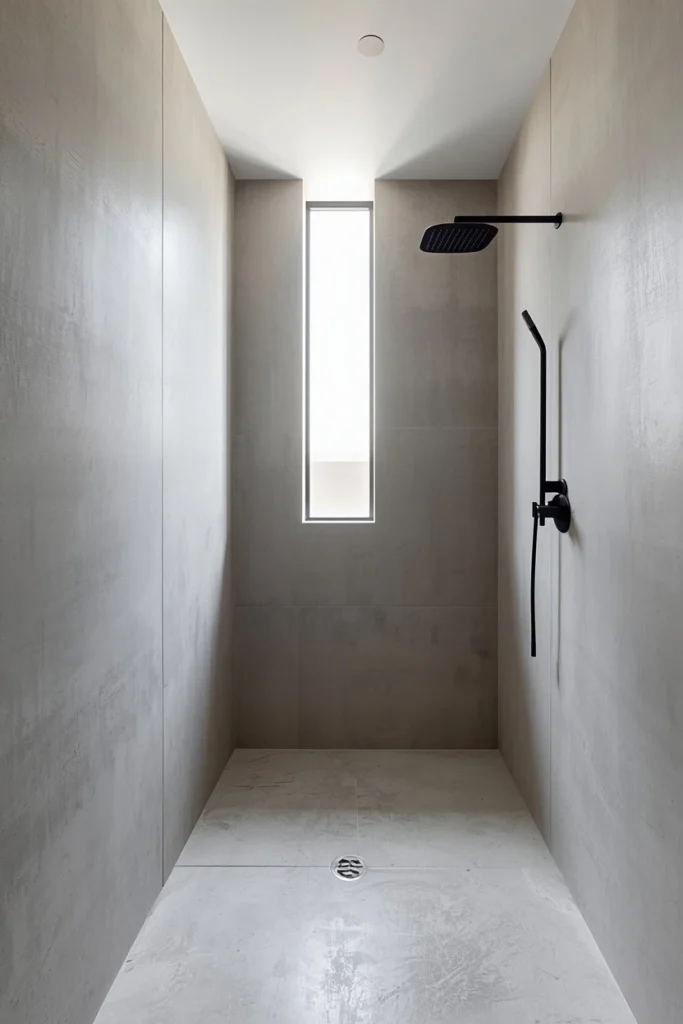
A seamless bathroom where the floor flows directly up the walls and into the shower without a single visible joint. The texture is silky, slightly matte, with the warmth of raw concrete — but it was applied like paint.
Design Breakdown
Microcement (also called microconcrete or microtopping) is a polymer-modified cement coating applied in ultra-thin layers — typically 2-3mm total — directly over almost any existing surface. It requires no substrate preparation beyond cleaning, no demolition, and no curing time for the substrate.
The magic of microcement is versatility. It can go on floors, walls, ceilings, and furniture. It’s fully waterproof when properly sealed. And it creates that seamless, architect-approved aesthetic that defines contemporary bathrooms and kitchens.
Expert Tip
Temperature control during application is critical. Apply microcement only when the ambient temperature is between 50-85°F. Too cold and it won’t bond; too hot and it dries too fast, causing cracking.
Why It Works
Microcement solves the installation challenges that make traditional concrete intimidating. No mixer, no structural concerns, no weeks of curing. A skilled applicator can complete a bathroom floor in 2-3 days, and the results are often indistinguishable from poured concrete.
Best For
- Bathrooms and wet rooms
- Kitchen floors and backsplashes
- Renters in owned properties
- Contemporary and minimalist interiors
Common Mistake to Avoid
Using microcement in high-UV areas without UV-stable sealer. Standard sealers yellow over time when exposed to direct sunlight. Always specify a UV-resistant topcoat for sunrooms, sunlit kitchens, and south-facing spaces.
Quick Wins
- Always apply at least 2 coats of sealer (3 in wet areas)
- Avoid harsh chemical cleaners — they strip the sealer
- Use pH-neutral soap for daily cleaning
- Reseal once a year in bathrooms and high-traffic areas
You May Also Like:
- Modern Bathroom Ideas
- Bathroom Interior Ideas
- Spa Bathroom Ideas
- Small Bathroom Ideas
- Bathroom Renovation Ideas
Your Complete Concrete Floor Buying and Planning Guide
Before you make any decisions, there’s one thing most homeowners skip entirely — and it almost always costs them money and regret.
They don’t plan the finish before the pour.
Here’s everything you need to know to choose and install the right concrete floor for your space.
Understanding the Different Finish Types
Not all concrete finishes are created equal, and the right choice depends on your lifestyle, aesthetic, and budget.
- Polished concrete: $3-$12 per square foot. Best for modern, open-plan spaces. Requires annual resealing.
- Acid stained: $2-$4 per square foot (materials). Labor-intensive but budget-friendly. Permanent once applied.
- Concrete overlay: $3-$7 per square foot installed. Best for existing floors you don’t want to demolish.
- Stamped concrete: $8-$18 per square foot installed. Best outdoors or for decorative interior areas.
- Microcement: $10-$20 per square foot installed. Premium finish, premium price. Worth it for bathrooms and kitchens.
- Exposed aggregate: $6-$15 per square foot. Highly decorative, unique to each pour.
The 5 Questions to Ask Before You Choose
1. What’s your traffic level? High-traffic areas (entryways, kitchens, hallways) need a harder finish and more durable sealer. Polished concrete and microcement both perform well here. Stamped concrete can chip in very high-traffic interior spaces.
2. Do you have kids or pets? Choose matte or satin finishes over high-gloss. Scratches from pet nails are less visible, and matte finishes are inherently less slippery. Acid-stained concrete is particularly forgiving because its organic variations camouflage wear.
3. Is the space wet or dry? Wet areas (bathrooms, kitchens, laundry rooms) require a non-slip additive in the sealer and at minimum 2 coats of waterproof sealer. Microcement is purpose-built for wet applications. Standard polished concrete needs more sealer maintenance in wet zones.
4. What’s your existing substrate? New build? Poured slab? You have every option. Working over existing tile or vinyl? Overlay and microcement are your best friends. Cracked or uneven subfloor? Address structural issues first before any surface finish.
5. What’s your realistic maintenance commitment? All concrete floors need resealing periodically. But the frequency varies:
- Polished concrete: every 1-2 years in high-traffic areas
- Microcement: annually in wet areas
- Acid stain: every 2-3 years
- Stamped outdoor concrete: every 2-3 years, more frequently in harsh climates
Common Planning Mistakes
- Forgetting floor height changes. Overlays and microcement add height. In doorways, this can cause clearance issues. Measure door clearances before starting.
- Skipping the test patch. Every concrete floor is different. What looks one way in a showroom looks different under your specific lighting and adjacent to your specific materials.
- Underestimating cure time. New concrete must cure for at least 28 days before sealing. Rushing this process causes sealer failure within months.
- Ignoring expansion joints. Large concrete pours need control joints to manage natural expansion and contraction. Filled and sealed, these can be nearly invisible — but ignoring them leads to cracks in the worst places.
- Choosing the wrong sheen level. Matte hides dust and footprints. Gloss shows everything. This matters more than most people realize in daily life.
Budget Reality Check
| Project Type | DIY Cost | Professional Cost |
|---|---|---|
| Concrete overlay (per sqft) | $1-$3 | $3-$7 |
| Polished concrete (per sqft) | Not recommended | $3-$12 |
| Microcement (per sqft) | Not recommended | $10-$20 |
| Acid stain (per sqft) | $0.50-$1.50 | $2-$4 |
| Stamped concrete (per sqft) | $5-$10 | $8-$18 |
One honest note: most concrete floor finishes are not beginner-friendly DIY projects. The margin for error is small, and mistakes are expensive to correct. If your budget is tight, acid staining an existing slab is the most forgiving DIY option. Everything else is worth the professional investment.
What’s your biggest concern right now — budget, installation difficulty, or finding the right look for your space?
8. Warm-Toned Concrete With Wood Accents
What You’re Seeing
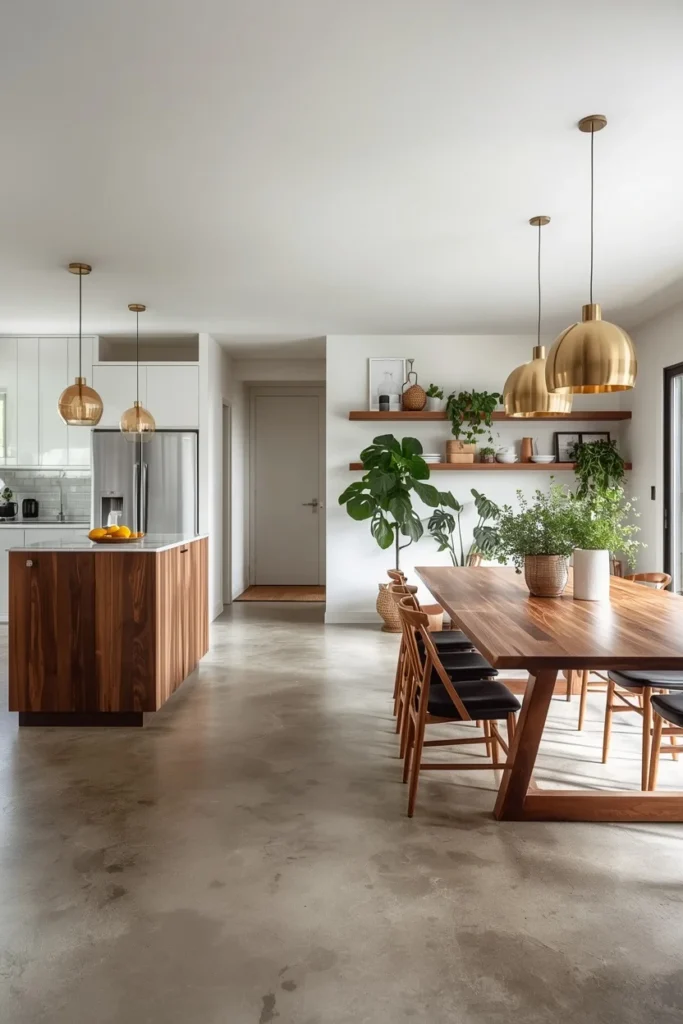
Think about a Scandinavian-meets-California kitchen. The floor is a warm taupe concrete — not stark gray, not beige, but somewhere perfectly in between. Thick walnut floorboards transition into the adjacent dining room. The two materials speak to each other in the same warm register.
Design Breakdown
Warm-toned concrete floors are achieved by adding iron oxide pigments to the concrete mix before pouring, or by applying warm-toned stains after curing. Shades like greige, warm sand, and tawny brown create floors that feel far more approachable and livable than cool gray.
Pairing these floors with natural wood accents — furniture, ceiling beams, floating shelves — grounds the space and adds the organic warmth that concrete alone can sometimes lack.
Expert Tip
Choose your wood finishes before finalizing the concrete color. Warm concrete under cool-toned wood creates an uncomfortable visual tension. The undertones of your floor and your wood pieces need to agree with each other.
Why It Works
Warm-toned concrete floors photograph beautifully and feel welcoming in a way that cool grays don’t always achieve. For family rooms, kitchens, and bedrooms, they strike the ideal balance between contemporary edge and comfortable livability.
Best For
- Family rooms and kitchens
- Scandinavian and organic modern interiors
- Homes with warm-toned furniture or wood accents
- Anyone hesitant about the “cold” look of traditional gray concrete
Common Mistake to Avoid
Going too warm. A floor that reads as golden or yellow can overwhelm a space, especially in strong natural light. Request samples in your actual space under your actual lighting before committing.
Quick Wins
- Layer in jute rugs and linen textiles to amplify the warm, organic feel
- Use warm-toned LED lighting (2700K) to enhance the floor’s undertones
- Introduce plants and natural materials throughout the space
- Keep wall colors neutral to let the floor remain the focal point
One thing I’ve learned from studying well-designed concrete spaces… The most beautiful rooms never let the floor fight with the walls or the furniture. They let it breathe. Warm-toned concrete floors work best when the rest of the room gives them room to exist quietly — neutral walls, natural materials, and restrained decor. The moment you overload the space with competing visual elements, the floor disappears. Keep it simple, and the concrete does everything.
This simple change can completely transform the room. Don’t scroll past idea #9 — it’s the one most people overlook entirely.
9. Concrete Floors in Bedrooms
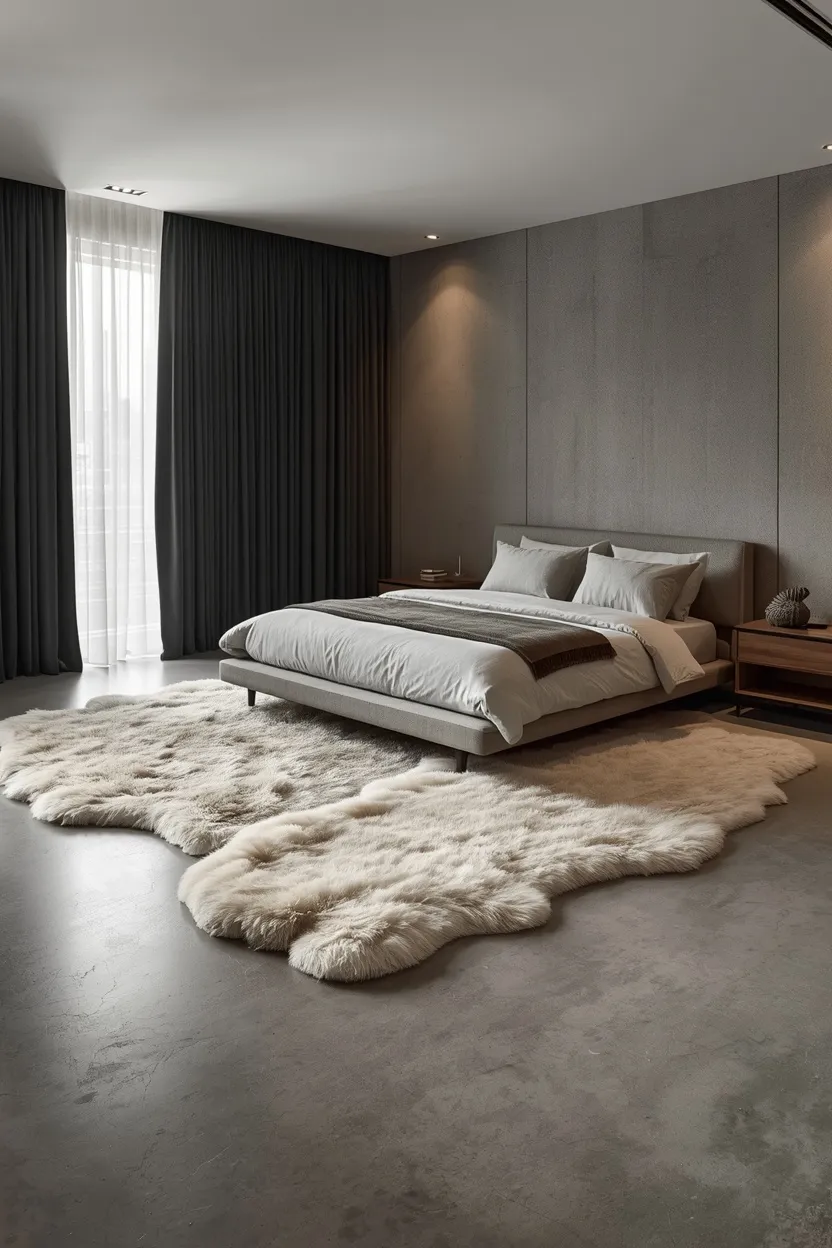
What You’re Seeing

Imagine a bedroom that feels like a luxury hotel suite. The floor is a soft mid-gray concrete — smooth, matte, and cool. An oversized sheepskin rug anchors the bed. The contrast between the hard floor and soft textiles creates a tension that feels intentional and deeply comfortable.
Design Breakdown
Most people assume concrete floors belong in kitchens, bathrooms, and garages. The bedroom feels like off-limits territory. That assumption is costing homeowners one of the most striking interior design moves available to them.
Concrete in a bedroom works by playing the contrast game. The hardness and coolness of the floor sets the stage for all the softness layered above it — the bedding, the rugs, the curtains. Without that contrast, everything blends into the same register of soft and warm.
Expert Tip
In bedrooms, always choose a honed or matte finish rather than polished. A polished floor feels clinical in a space meant for rest. Matte concrete feels grounded, calm, and quiet — exactly what a bedroom should be.
Why It Works
Concrete flooring in bedrooms is easier to keep clean than carpet (no allergens, no staining), more interesting than hardwood in contemporary spaces, and creates an architectural quality that most flooring materials simply don’t achieve. With the right textile layering, it’s genuinely warm and welcoming.
Best For
- Adults’ bedrooms and master suites
- Minimalist and contemporary interiors
- Allergy sufferers (no carpet to trap dust and dander)
- Homes in warm climates
Common Mistake to Avoid
Skipping rugs entirely. Without area rugs, a concrete bedroom floor reads as cold, clinical, and unfinished. Rugs aren’t optional in a concrete bedroom — they’re structural design elements that complete the space.
Quick Wins
- Layer two rugs (a large neutral base, a smaller textured accent) for depth
- Choose a soft matte sealer with a slight warm tint
- Install blackout curtains to create contrast with the floor’s openness
- Keep the furniture palette warm to balance the floor’s coolness
Would you try concrete floors in your bedroom, or does that feel like a step too far? Let me know your honest reaction.
10. Outdoor Concrete Floors: Patios, Pools, and Beyond
What You’re Seeing
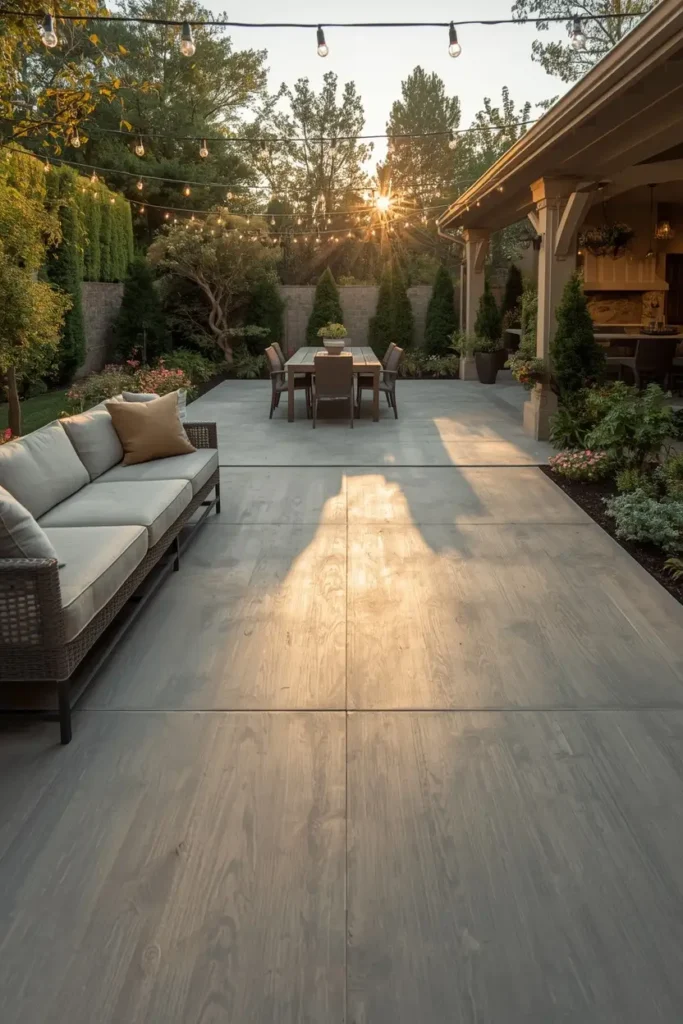
Picture yourself stepping out onto a backyard patio on a warm evening. The floor beneath your feet is a textured brushed concrete — not slippery, not plain, but alive with a subtle broom-swept pattern. String lights overhead reflect off the pale surface. The space feels like a destination.
Design Breakdown
Outdoor concrete floors are among the most practical and versatile hardscaping choices available. Beyond simple broom-finished slabs, modern outdoor concrete options include exposed aggregate, stamped patterns, colored concrete, and even decorative saw-cut designs.
The key to outdoor concrete is choosing the right finish for your climate. Smooth polished finishes can become dangerous when wet. Textured finishes — broomed, exposed aggregate, or rock-salt finishes — provide natural grip and visual interest simultaneously.
Expert Tip
In freeze-thaw climates, use an air-entraining admixture in the concrete mix. This creates microscopic air bubbles that give water space to expand as it freezes, dramatically reducing the risk of spalling and cracking over time.
Why It Works
Outdoor concrete is virtually maintenance-free compared to wood decking, which requires annual sealing, staining, and eventual board replacement. It’s resistant to rot, insects, and UV degradation. For families with kids and pets, a textured concrete patio is both safer and easier to clean than almost any alternative.
Best For
- Patios and outdoor living spaces
- Pool surrounds and splash zones
- Driveways and walkways
- Outdoor kitchens and entertainment areas
Common Mistake to Avoid
Pouring in direct summer heat. High temperatures cause concrete to cure too quickly, leading to cracking and a weakened slab. Pour in the early morning, shade the slab if possible, and keep it misted for 7 days after pouring.
Quick Wins
- Add a fiber-reinforced mix for crack resistance in outdoor slabs
- Slope the surface slightly (1/8 inch per foot) for water drainage
- Apply a penetrating sealer annually to prevent staining and water damage
- Consider decorative saw cuts to divide large slabs and control cracking
Related Flooring and Interior Ideas
Love what you’re seeing? Keep the inspiration going with these carefully chosen reads:
- Living Room Floor Tile Ideas
- Gray Flooring Ideas
- Bathroom Tile Design Ideas
- Sunroom Tile Floor Ideas
- Patio Floor Ideas
- Living Room Remodel Ideas
- Modern Bathroom Ideas
- Garage Organization Ideas
Each of these posts is packed with the same level of detail and actionable ideas you’ve been reading here. Pick the one that matches your next project and dive in.
Which Concrete Floor Idea Is Right for You?
You’ve just walked through 10 of the most compelling concrete floor ideas available right now. Let’s bring it home.
If you want instant impact with maximum polish, polished concrete is your answer. It transforms any space into something that looks like it cost twice as much.
If you’re working with an existing floor and a tighter budget, acid staining or a concrete overlay will deliver dramatic results without the demolition drama.
For the most versatile, contemporary option — especially in bathrooms or kitchens — microcement is what designers are recommending right now. It goes everywhere, looks stunning, and performs brilliantly.
And if you’re thinking outdoors — patio, pool surround, walkway — stamped or textured concrete is the clear choice for a floor that looks beautiful and handles everything weather and foot traffic can throw at it.
Here’s my challenge to you: pick just one of these concrete floor ideas and commit to taking one concrete step (pun absolutely intended) toward making it real this week. That might mean calling a contractor for a quote, ordering a sample kit, or mapping out which room gets the makeover first.
Don’t try to do everything at once. One room, one finish, done beautifully — that’s how the homes you save on Pinterest actually happen.
Which concrete floor idea surprised you most today? I’d love to know which one you’re already mentally installing in your home.
Before you go — if you loved exploring floors and surfaces, you won’t want to miss our deep dive into living room remodel ideas. There’s a section in there about how the floor choice affects every other design decision in the room — and it just might change the way you approach your next project entirely.
The best rooms don’t happen by accident. They happen because someone decided the floor was worth getting right.
Now you know how.