12 Inexpensive Patio Floor Ideas That Actually Look Expensive
This article was created in line with Trends Oraa’s research and content standards.
Your patio floor is cracked. Ugly. Embarrassing. You scroll Pinterest dreaming of those gorgeous outdoor spaces and then you look down at your sad concrete slab and sigh.
Here’s the truth: you do not need a big budget to get a beautiful patio floor. I’ve rounded up 12 genuinely inexpensive patio floor ideas that real homeowners have used to completely transform their outdoor spaces — many for under $200. Whether you’re working with raw dirt, broken concrete, or a blank slate, one of these ideas is about to change everything for you.
You might also love our viral guide on Patio Ideas for Florida Homes packed with budget-friendly outdoor transformations!
Outdoor makeovers don’t have to stop at the floor, either. If you’re dreaming of a complete backyard refresh, don’t miss our roundup of outdoor patio ideas that cover everything from seating to shade.
Why Your Patio Floor Matters More Than You Think
The floor is the foundation of your entire outdoor space — literally and visually. It sets the tone for everything you place on top of it: your furniture, your lighting, your plants. A beautiful floor makes a $50 thrift store chair look intentional. An ugly floor makes even expensive furniture look out of place.
The good news? Most of these ideas are DIY-friendly, weekend-ready, and budget-conscious. Let’s get into it.
12 Inexpensive Patio Floor Ideas
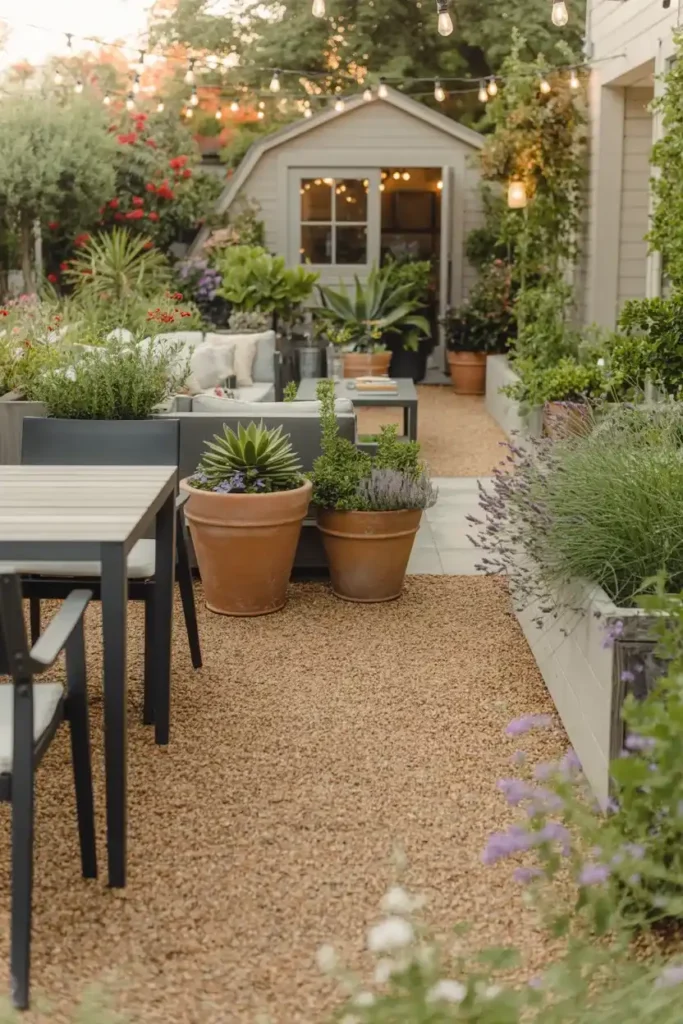
1. Gravel or Pea Gravel — The Ultimate Low-Maintenance Base
What you’re looking at: A relaxed, natural-looking patio surface made from small rounded pea gravel, often paired with stepping stones or edging to define the space. The neutral gray-beige tones blend beautifully with greenery and wooden furniture.
Gravel is one of the most budget-friendly patio floor options available — you’re often looking at $1–$3 per square foot depending on your region and gravel type. Installation is genuinely DIY-friendly: lay down landscape fabric to suppress weeds, add a 2–3 inch layer of gravel on top, and use metal or plastic edging to keep everything contained. The result feels intentional and curated rather than lazy.
Expert Tip: Choose pea gravel (small and smooth) over sharp crushed gravel if you’ll be walking barefoot or have kids and pets. It’s much more comfortable underfoot and still looks polished.
Why it works: Gravel is permeable, meaning rainwater drains naturally instead of pooling — a huge practical advantage over solid surfaces. It also pairs beautifully with nearly every design style, from cottage gardens to modern minimalism. You can always add stepping stones later to elevate the look further.
2. Concrete Pavers — Budget Bricks With Big Visual Impact
What you’re looking at: Classic rectangular or square concrete pavers arranged in a patterned layout. The slight variation in tone between individual pavers adds visual texture and keeps the space from looking sterile or flat.
Concrete pavers are the workhorse of inexpensive patio floor ideas. You can find them at any big-box hardware store for as little as $0.50–$2 per paver, depending on size and style. A basic 10×10 patio can be fully covered for well under $150 in materials. The installation process is very manageable as a weekend DIY project — excavate a few inches of soil, add a sand or gravel base, lay the pavers, and sweep sand into the joints to lock everything in place.
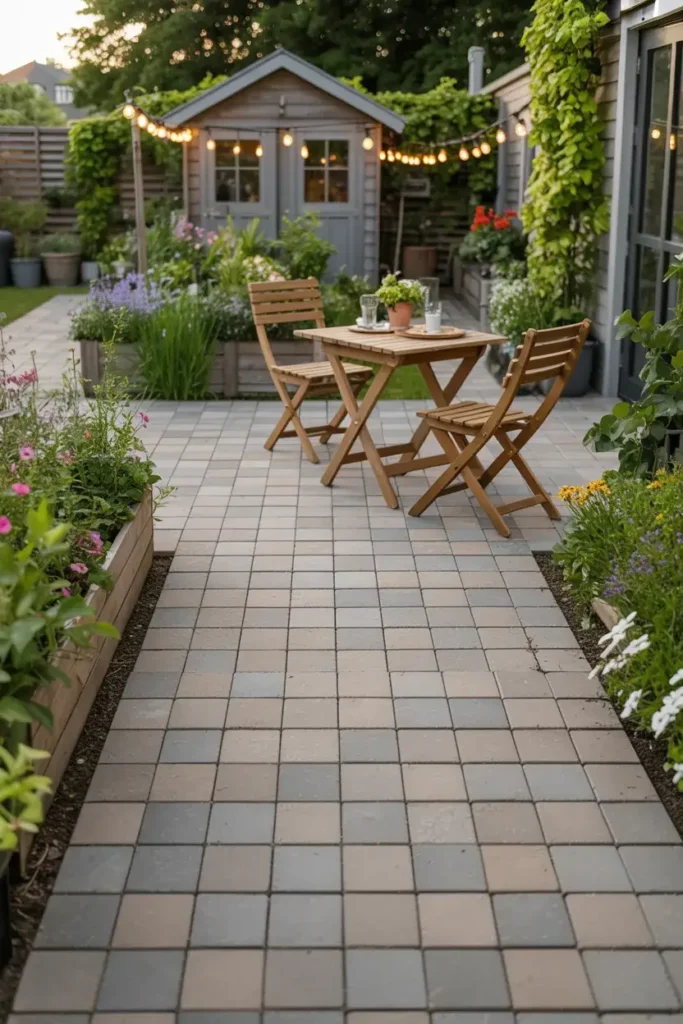
Expert Tip: The pattern you choose dramatically changes the look. Herringbone feels traditional and charming; running bond (offset rows) looks clean and modern; a simple grid reads as contemporary. Pick your pattern before you buy so you can calculate materials accurately.
Why it works: Concrete pavers are durable, replaceable (if one cracks, swap it out — no need to redo the whole patio), and extremely versatile. They also hold up well in both hot and cold climates, making them one of the most universally practical options on this list.
💬 Which of these first two styles speaks to you most — the relaxed natural vibe of gravel, or the structured look of pavers? Drop your pick in the comments — I’d love to know!
3. Outdoor Rubber Tiles — The Underrated MVP
What you’re looking at: Interlocking rubber tiles laid directly over an existing concrete or hard surface. These are often seen in gym flooring but have become increasingly popular as stylish, practical patio flooring — especially for families with kids.
Outdoor rubber tiles typically run $1–$3 per square foot and can be installed in an afternoon with zero tools — they simply click together like puzzle pieces. No adhesive, no cutting equipment needed (though a utility knife handles edges easily). They’re available in a range of colors including charcoal, slate, and even terracotta tones that look surprisingly chic outdoors.
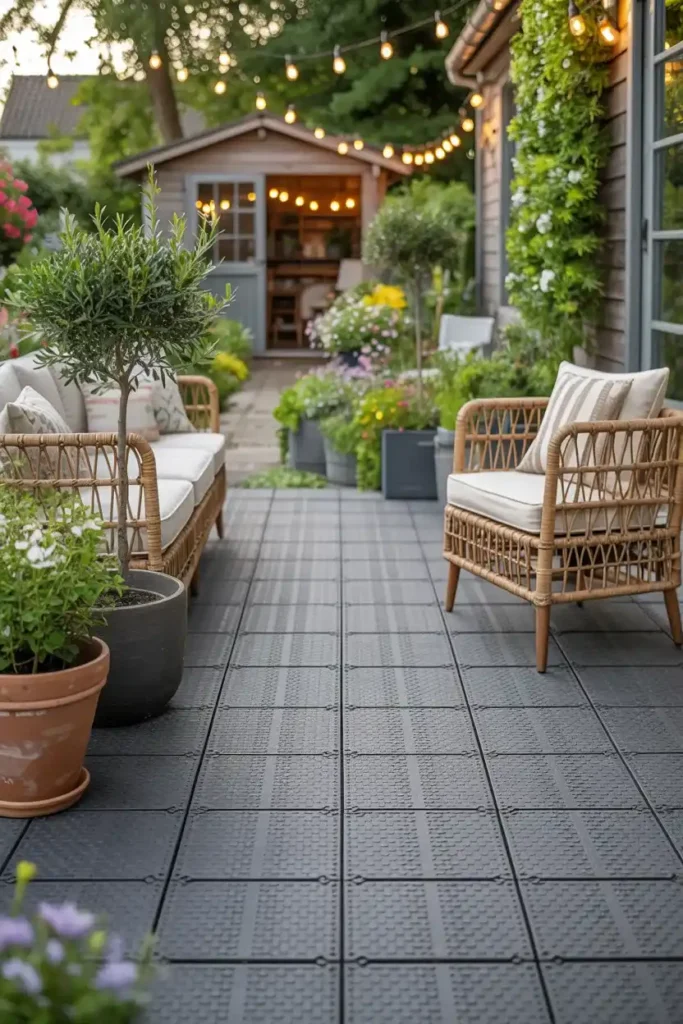
Expert Tip: Look for rubber tiles that are UV-stabilized and specifically labeled for outdoor use. Indoor-only rubber tiles can fade, warp, or degrade quickly in direct sunlight. The outdoor-rated versions are built to last.
Why it works: Rubber tiles are slip-resistant, cushioned underfoot, and protect the surface beneath them. They’re also fully removable — perfect if you’re renting, or just not ready to commit to a permanent floor. For families with young children, the cushion factor alone makes these worth every penny.
4. Decomposed Granite — Rustic Elegance on a Shoestring
What you’re looking at: A smooth, compacted surface made from finely crushed granite. It looks like a premium, intentional material — almost like a poured stone floor — but costs a fraction of the price. When paired with black metal furniture and terracotta pots, the effect is genuinely stunning.
Decomposed granite (often called DG) typically costs $1–$3 per square foot installed. It compacts down when watered and rolled, creating a firm, walkable surface that doesn’t scatter underfoot like loose gravel. It’s especially popular in drought-tolerant, desert-style, and Mediterranean garden designs — but it works in any setting where you want that warm, earthy, organic feel.
Expert Tip: Mix a stabilizer into your DG if you want a firmer, more permanent surface. A stabilized DG patio holds up significantly better in wet climates and high-traffic areas while still looking completely natural.
Why it works: Decomposed granite looks expensive without being expensive. The warm sand-and-gold tones work with almost every furniture color — wood, white, black, and rattan all pop beautifully against a DG base. It’s also excellent for drainage and maintains a cool-ish surface temperature even in full sun.
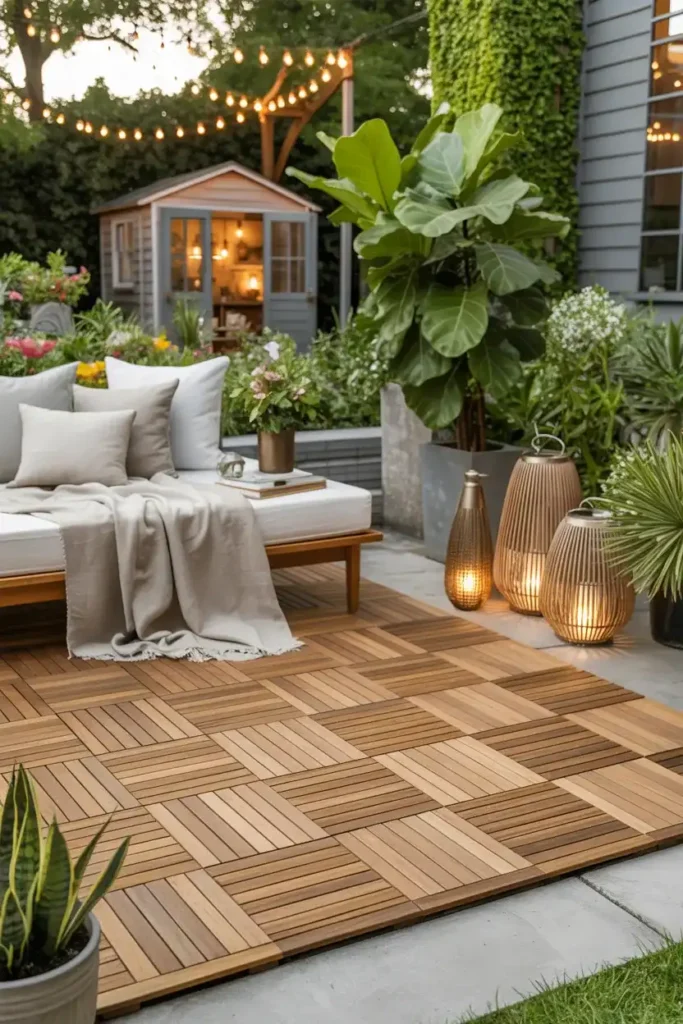
5. Outdoor Patio Tiles (Snap-Together) — Instant Transformation
What you’re looking at: Modular snap-together tiles that sit directly on top of your existing patio surface. The style shown here mimics the look of natural wood decking but is made from composite or treated plastic — no rot, no splinters, no staining required.
Snap-together tiles are one of the fastest ways to upgrade an ugly concrete patio. They cost between $2–$5 per square foot and can completely cover a 10×10 space in under two hours. No tools, no adhesive, no professional help needed. You simply start in one corner and click the tiles together until you reach the opposite wall. Edge trim pieces give the perimeter a finished look.
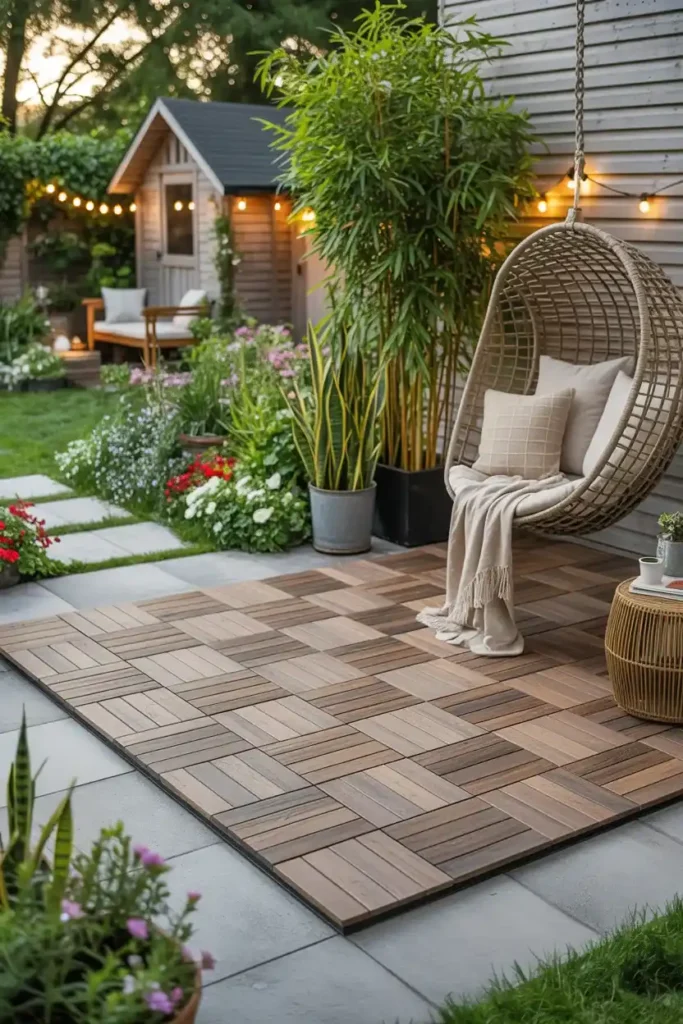
Expert Tip: Lift and rinse your snap-together tiles a couple of times per year to prevent mold and mildew from building up on the surface beneath. A quick hose-down and 20 minutes of air drying is all it takes.
Why it works: These tiles are especially life-changing for ugly apartment balconies and renters who can’t make permanent changes. They transform a sad, raw concrete slab into a space that looks and feels like a designer outdoor room — and they pack up and move with you when you leave.
💰 Budget Breakdown: What Does It Actually Cost?
Here’s the honest breakdown on what you can expect to spend for a typical 10×10 patio (100 sq ft):
| Material | Cost Per Sq Ft | Total for 100 Sq Ft | DIY-Friendly? |
|---|---|---|---|
| Pea Gravel | $1–$3 | $100–$300 | ✅ Yes |
| Concrete Pavers | $0.50–$2 | $50–$200 | ✅ Yes |
| Outdoor Rubber Tiles | $1–$3 | $100–$300 | ✅ Yes |
| Decomposed Granite | $1–$3 | $100–$300 | ✅ Yes |
| Snap-Together Tiles | $2–$5 | $200–$500 | ✅ Yes |
| Outdoor Rugs | $30–$150 | $30–$150 (one piece) | ✅ Yes |
| Painted Concrete | $0.10–$0.50 | $10–$50 | ✅ Yes |
| Poured Concrete | $4–$8 | $400–$800 | ⚠️ Pro recommended |
| Natural Stone | $5–$15 | $500–$1500 | ⚠️ Pro recommended |
Key Takeaway: For most budget-conscious homeowners, gravel, pavers, rubber tiles, and snap-together tiles offer the best combination of affordability, durability, and visual impact. You can realistically achieve a stunning 100 sq ft patio floor for $100–$300 if you’re willing to DIY the install.
Hidden Costs to Watch For:
- Landscape fabric (weed barrier) for gravel installs: $15–$30
- Edging materials to contain gravel or DG: $20–$60
- Sand or gravel base layer for pavers: $20–$50
- Concrete prep/cleaning spray before painting: $10–$20
Even accounting for these extras, every option on this list is dramatically cheaper than hiring a contractor for full tile or stone installation. And the payoff — a patio that genuinely looks like you spent a fortune — is absolutely worth the weekend of effort.
6. Painted or Stenciled Concrete — Zero-Cost Upgrade (If You Already Have a Slab)
What you’re looking at: An existing concrete patio transformed with outdoor floor paint and a repeating stencil pattern. The Moroccan-inspired design shown here looks like it came from a boutique tile shop — but the whole project cost under $60 in supplies.
If you already have a concrete slab, you’re sitting on the best possible canvas for a nearly free patio makeover. Concrete floor paint costs $15–$40 per gallon and covers about 200–400 square feet. Patio stencils run $15–$30 on Etsy or Amazon. Clean the slab, apply a base coat, tape your stencil, roll on your accent color, seal it, and you’re done.
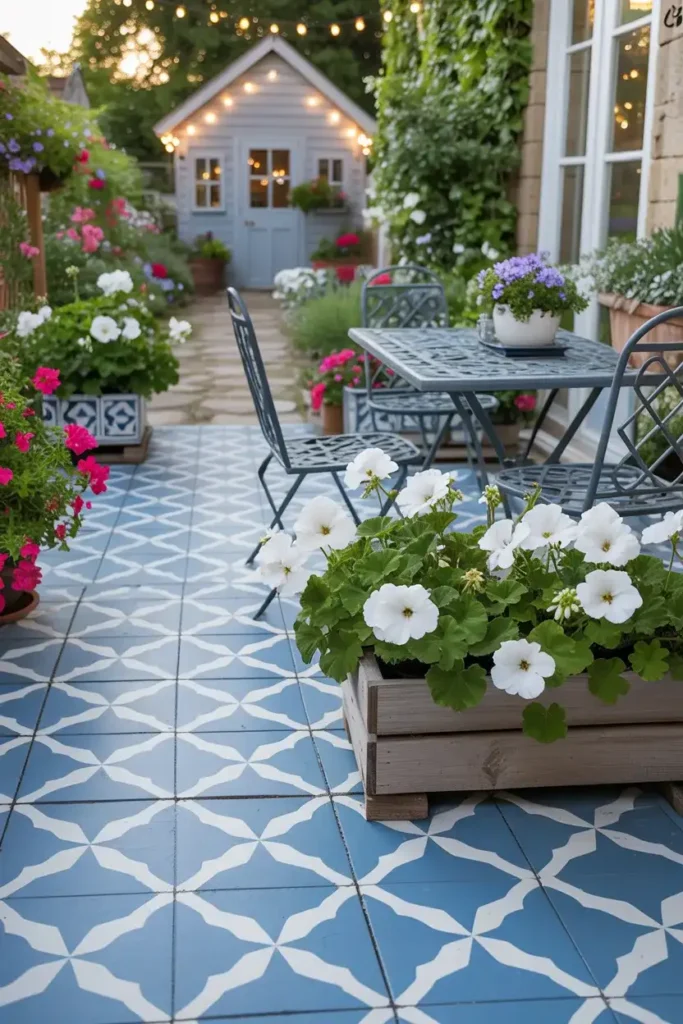
Expert Tip: Always use a concrete-specific sealer after painting (not just regular sealant). Look for one rated for outdoor use with UV protection. This step is what separates a floor that lasts 5+ years from one that peels by next spring.
Why it works: Painted concrete lets you bring personality and pattern to an outdoor space for almost nothing. You can go bold with geometric patterns, keep it simple with a solid color, or get creative with faux stone or wood grain effects. The limit is your imagination — and your sealer quality.
7. Mulch or Wood Chips — The Organic, Garden-Lover’s Choice
What you’re looking at: A defined patio area filled with cedar or hardwood mulch, bordered by wooden sleepers or stone edging. The result has a relaxed, cottage-garden feeling that’s completely at home in naturalistic or cottage-style landscapes.
Mulch and wood chips are genuinely some of the cheapest patio floor materials you’ll find — often $2–$5 per bag, and many municipalities offer free wood chip delivery from their tree trimming programs. A generous 4-inch layer suppresses weeds, cushions your feet, and smells incredible after rain.
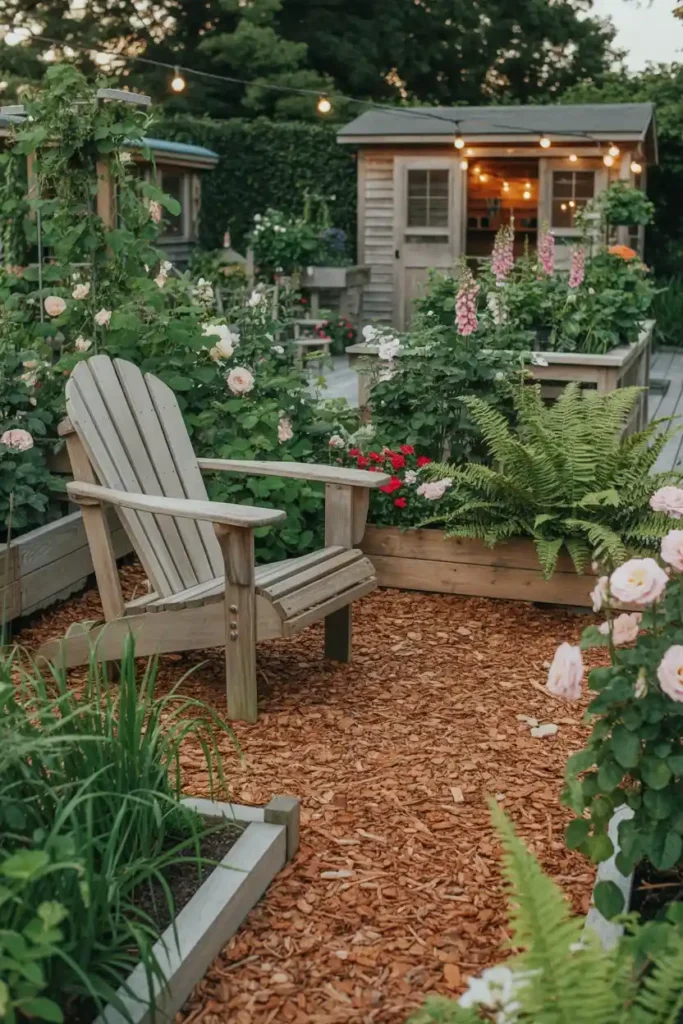
Expert Tip: Avoid dyed mulch (those bright red or black colors) for a patio setting — they tend to fade unevenly and can stain furniture and shoes. Natural cedar or hardwood mulch looks more polished and lasts longer.
Why it works: Mulch integrates your patio seamlessly into the surrounding garden beds, creating the feeling that your outdoor space grew organically rather than being imposed on the landscape. It’s also one of the most comfortable barefoot surfaces and stays naturally cool in summer.
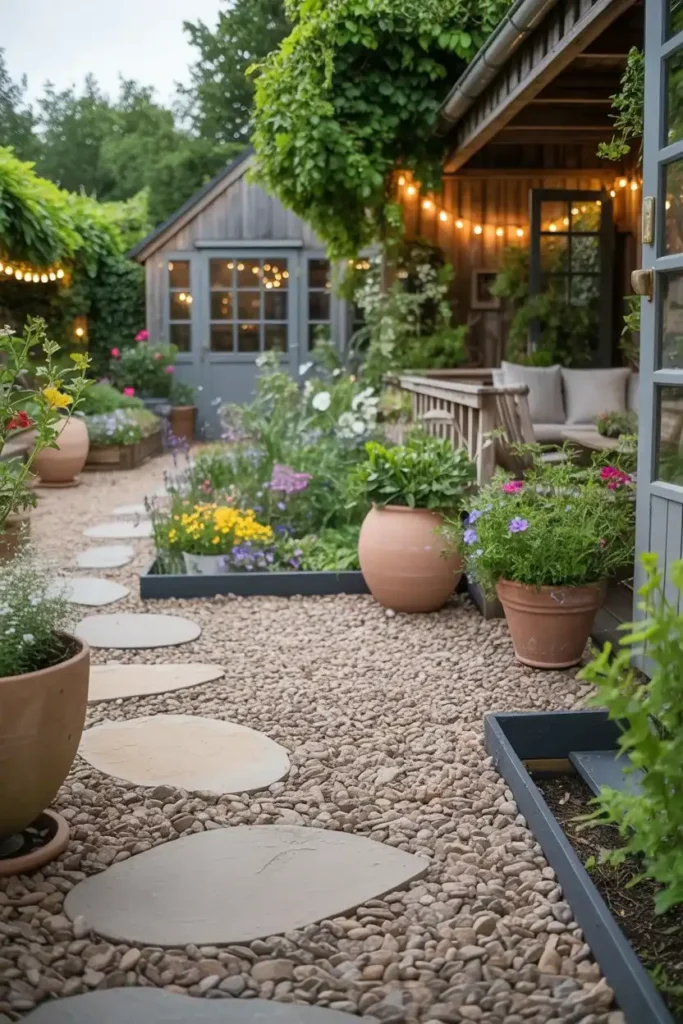
8. Stepping Stone Paths Within Gravel — Layered and Luxe-Looking
What you’re looking at: Oversize irregular flagstones or concrete stepping stones laid directly into a gravel bed. The combination of textures — smooth stone against loose gravel — creates visual depth that makes the space look professionally designed.
This is one of my absolute favorite inexpensive patio floor ideas because it looks infinitely more expensive than it costs. Large concrete step stones run $3–$8 each at hardware stores. Set them 18–24 inches apart (or closer for a denser look) and fill the rest of the area with gravel. The gravel handles drainage while the stones give you a firm, clean walking surface.
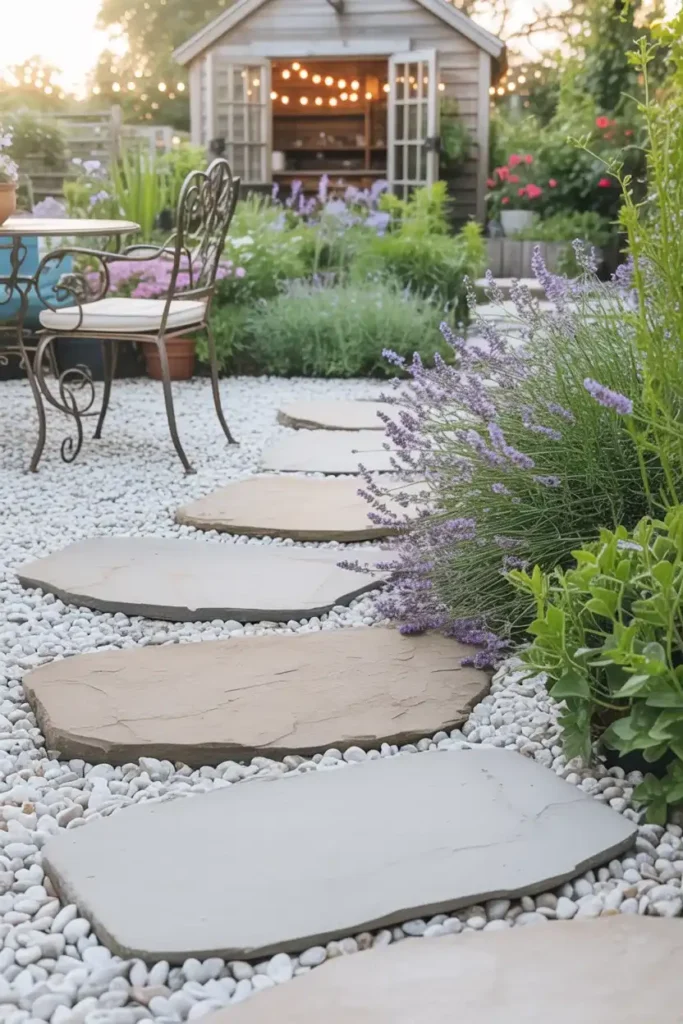
Expert Tip: Space your stepping stones to match your natural stride — typically 18–24 inches center-to-center. Stones spaced too far apart feel awkward to walk on; stones spaced too close lose their visual impact.
Why it works: This combination approach solves the two biggest complaints about pure gravel patios (stones scatter; nowhere to put furniture without it sinking) while keeping costs extremely low. Set your furniture legs on the flat stones and you’re golden.
💬 Are you more of a natural materials person (gravel, mulch, stone) or do you prefer a clean, solid surface like pavers or tiles? Tell me in the comments — it helps me create content you’ll actually use!
9. Outdoor Area Rugs Over Concrete — The Fastest Fix
What you’re looking at: A polypropylene outdoor area rug laid over a plain concrete patio. The rug ties the furniture together, adds color and pattern, and completely transforms the visual feel of the space — in about 30 seconds.
An outdoor rug is technically the laziest item on this list — and sometimes lazy is exactly right. Outdoor area rugs range from $30 for a small accent rug to $150 for a large 9×12. They’re made from weather-resistant polypropylene that resists mold, mildew, and UV fading. They roll up for storage in winter and can be hosed clean in minutes.

Expert Tip: Size up on your outdoor rug. The most common decorating mistake is choosing a rug that’s too small — it makes the space feel disjointed. Go for a rug large enough that all four legs of your main furniture pieces sit on it.
Why it works: An outdoor rug is the fastest, cheapest, most commitment-free way to upgrade a patio floor. It works especially well if your concrete is structurally fine but visually boring — the rug covers it completely without you needing to do any prep work at all. It’s also perfect for renters.
10. Brick Pavers (Reclaimed or New) — Timeless and Charming
What you’re looking at: A patio surface made from classic clay brick pavers arranged in a basket-weave pattern. The warm red tones and slight imperfections of the bricks give the space an instant charm that feels established and lived-in — like it’s always been there.
New clay brick pavers run $0.50–$1.50 each, but reclaimed bricks (from salvage yards, Craigslist, or Facebook Marketplace) often sell for pennies — sometimes you can find them free from demolition sites. Install them just like concrete pavers: excavate, add sand base, lay bricks, sweep sand into joints. The look you get for the effort is extraordinary.
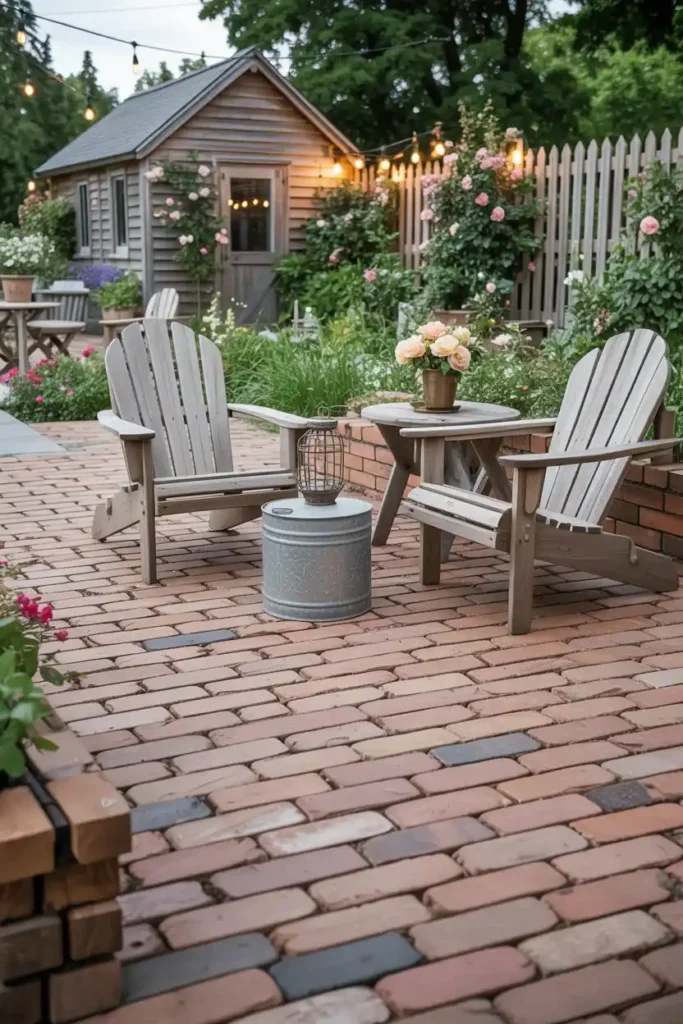
Expert Tip: Seal your brick pavers after installation to prevent staining and slow down weathering. A penetrating brick sealer ($15–$30) protects the surface without changing the natural look of the brick.
Why it works: Brick has a warmth and character that no manufactured material can fully replicate. It ages beautifully, gaining patina and charm over time rather than looking worn out. And because every brick is slightly different, the finished surface has an organic complexity that always reads as high-end.
11. Flagstone (Budget Cuts) — Natural Stone Without the Price Tag
What you’re looking at: Irregular cuts of natural flagstone — typically limestone, bluestone, or sandstone — laid in a random pattern with ground cover plants growing in the gaps. The result is a Pinterest-perfect patio that looks like something from a countryside estate.
Here’s the secret the landscaping industry doesn’t advertise: flagstone seconds and irregular cuts are dramatically cheaper than select stone. Many stone yards sell oddly-shaped pieces, thin cuts, or surplus inventory for $1–$3 per square foot — a fraction of the $8–$15 per square foot you’d pay for premium select stone. You just have to be willing to work with what’s available.
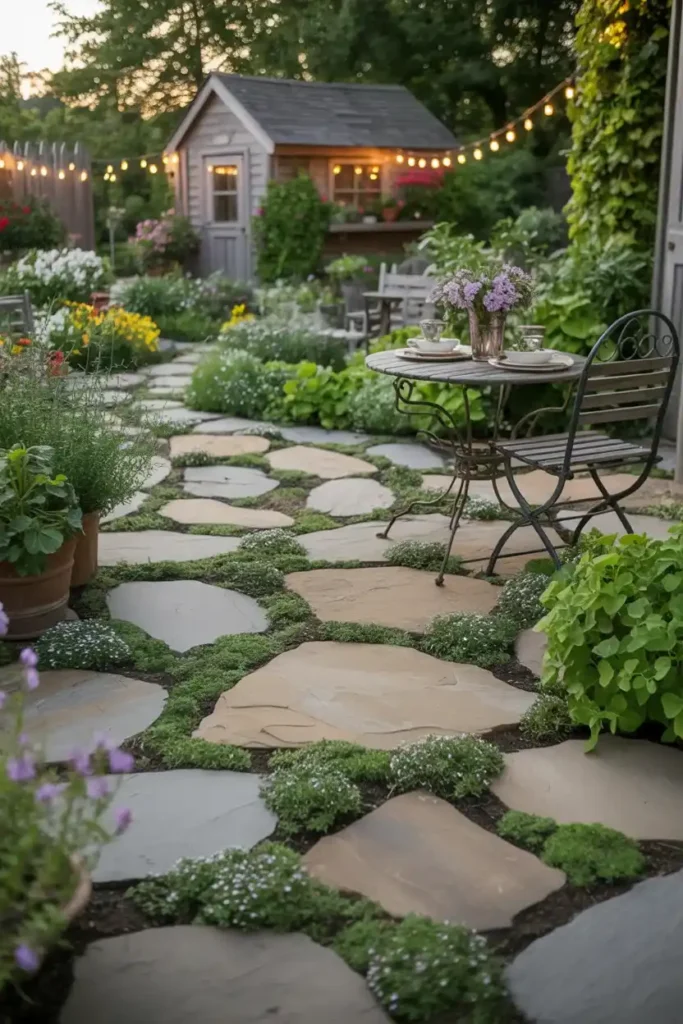
Expert Tip: Plant creeping thyme, Irish moss, or corsican mint in the gaps between flagstones. These ground covers suppress weeds naturally, release a wonderful fragrance when stepped on, and make the entire patio look like it was designed by a professional landscape architect.
Why it works: Natural stone carries a prestige factor that no manufactured material achieves. Even budget flagstone in irregular shapes creates a patio that looks genuinely luxurious. The planting-in-the-cracks technique disguises any less-than-perfect cuts and ties the whole surface into the surrounding garden.
12. Wooden Deck Tiles (Real Wood) — Warmth and Texture on a Budget
What you’re looking at: Interlocking wooden deck tiles made from real hardwood — most commonly teak, ipe, or acacia. Laid directly over concrete, they create the look and feel of a full wooden deck in a fraction of the time and cost of a built deck.
Hardwood deck tiles run $3–$7 per square foot and install even faster than composite snap-together tiles. Because they’re made from real wood, they have that genuine warmth and character that makes an outdoor space feel truly inviting. They weather naturally to a beautiful silvery gray if left unsealed, or maintain their warm tones with occasional oil treatment.
Expert Tip: Teak and ipe are the most durable hardwood choices for outdoor tiles — both are naturally resistant to rot, insects, and moisture. Acacia is a lower-cost option that still looks beautiful but benefits from annual oiling to maintain its appearance.
Why it works: There is genuinely no substitute for the feel of real wood underfoot on a summer evening. Hardwood deck tiles deliver that experience without the structural complexity (or cost) of building a raised deck from scratch. They’re removable, moveable, and can be reconfigured as your space evolves.
💬 Of all 12 options, which one surprised you most? I love seeing what catches people’s eyes — share in the comments!
Pros and Cons at a Glance
| Option | Best For | Watch Out For |
|---|---|---|
| Gravel | Easy install, great drainage | Scatters, difficult for heels |
| Concrete Pavers | Durability, versatility | Requires level base |
| Rubber Tiles | Families, renters | Can look gym-ish if wrong style |
| Decomposed Granite | Desert/natural aesthetic | Needs stabilizer in wet climates |
| Snap-Together Tiles | Renters, quick installs | Can harbor mold underneath |
| Painted Concrete | Zero extra cost | Needs resealing every few years |
| Mulch | Garden integration | Needs annual replenishment |
| Stepping Stones + Gravel | Visual depth, budget elegance | Takes more planning |
| Outdoor Rug | Immediate impact, zero install | Not a permanent floor solution |
| Brick Pavers | Timeless charm, ages beautifully | Heavy to transport |
| Flagstone | Natural luxury look | Irregular pieces require patience |
| Hardwood Deck Tiles | Warmth, real wood feel | Needs occasional oiling |
Final Thoughts
Here’s what I want you to walk away knowing: a beautiful patio floor is genuinely within reach for almost any budget. You don’t need to spend thousands or hire a contractor. Some of the most stunning patios I’ve come across were built on $150 budgets — it’s all about choosing the right material for your space and style, and putting in a weekend of work.
Whether you go for the timeless charm of brick pavers, the instant gratification of an outdoor rug, or the luxe-on-a-budget look of flagstone seconds, your outdoor space is about to level up in a serious way.
Start with the idea that excites you most. Do one small test area if you’re nervous. And then build from there. Your future self — sitting outside on a gorgeous, transformed patio — will thank you.
Ready to keep the inspiration going? Check out our guides on Small Front Porch Ideas and Vintage Porch Decor Ideas to transform every corner of your outdoor space. And if you’re thinking about the full backyard picture, our Outdoor Fire Pit Design Ideas will give you even more to dream about.
Pin this post for later — you’ll want to come back to it when it’s time to shop! 📌