10 Homemade Squishy Ideas That Are Shockingly Easy (And Totally Addictive)
This article was created in line with Trends Oraa’s research and content standards.
Your kids just discovered squishies. Now they want ALL of them. And you’re staring at a $40 price tag for a foam strawberry.
Yeah. Same.
Here’s the good news — you don’t need to spend a dime at the toy store. These homemade squishy ideas are so satisfying to make that your kids (and honestly, you) will be hooked from the very first squeeze. Whether it’s a rainy afternoon project or a sleepover activity, each one on this list is beginner-friendly, budget-smart, and genuinely fun.
You might also love our viral guide on → 10 Homemade DIY Tent Ideas for Kids to Play
Stick around because idea #7 is the one nobody talks about — and it might be the squishiest thing you’ve ever held in your life.
What You’ll Need Before You Start
Before we dive into the ideas, let me save you a trip back to the store.
Most of these projects use supplies you already have. Keep these on hand:
- Memory foam scraps or craft foam sheets
- Slow-rise foam (can be ordered cheaply online)
- Fabric paint or acrylic paint
- Sealant or Mod Podge
- Scissors, markers, and patience (okay, optional on the last one)
The beauty of making squishies at home is that there’s no right or wrong. Lumpy? That’s rustic charm. Uneven? That’s handmade character. Let’s get into it.
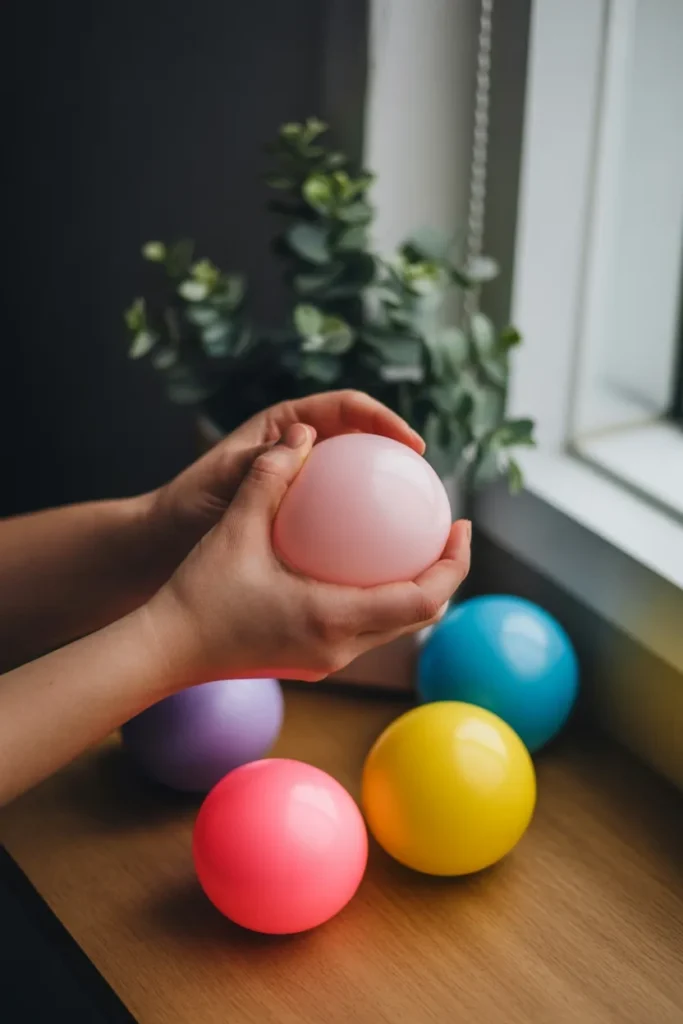
1. Classic Memory Foam Fruit Squishies
Picture a chubby little strawberry sitting in your palm, slow-rising back to shape after every squeeze. That’s exactly what this idea delivers — and it’s made from something you probably have lying around: memory foam.
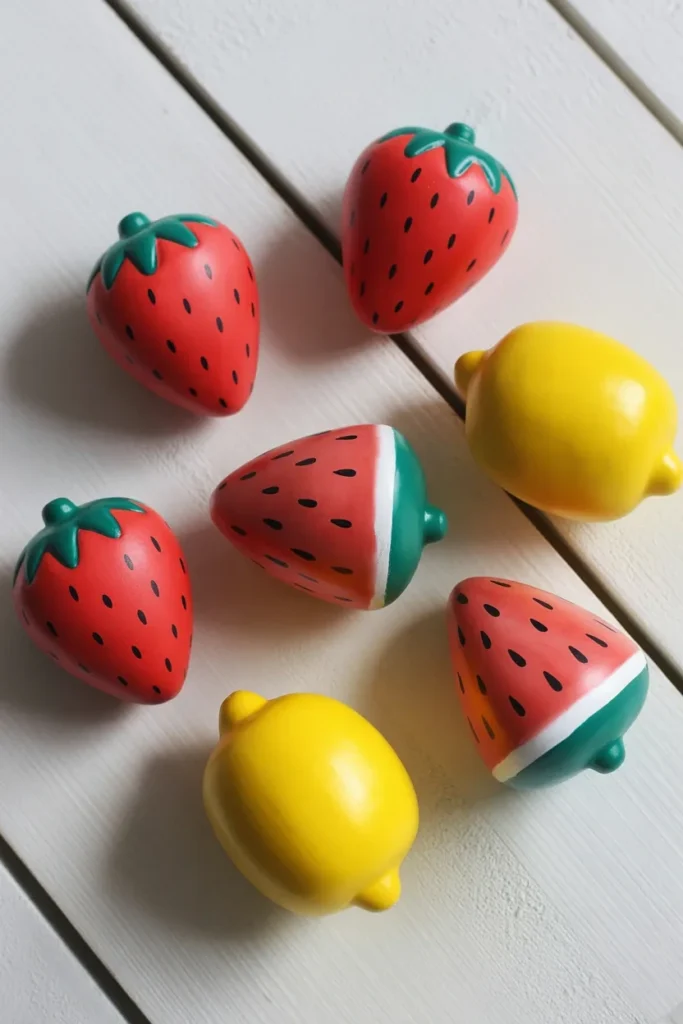
Cut your memory foam into fruit shapes (strawberries, watermelons, and lemons are the easiest to start with). Use acrylic paint to add color, let it dry completely, then seal it with Mod Podge for that glossy, satisfying finish.
Expert Tip: Layer your paint colors while the foam is slightly compressed. When it expands back, the color naturally blends at the edges for a more realistic, gradient look — just like the store-bought versions.
Why it works: Memory foam has the perfect slow-rise quality that makes squishies so addictive. The tactile feedback of pressing something and watching it slowly return to shape is genuinely calming — it’s sensory play at its best. Kids and adults both find this deeply satisfying, which is why this remains one of the most searched homemade squishy ideas on the entire internet.
Which fruit shape would your kids make first? Drop it in the comments — I’m genuinely curious!
2. Marshmallow-Scented Foam Squishies
The Idea
What’s better than a squishy? A squishy that SMELLS amazing. These marshmallow-scented cloud squishies are a total sensory experience — soft, slow-rise, and they smell like a candy store.
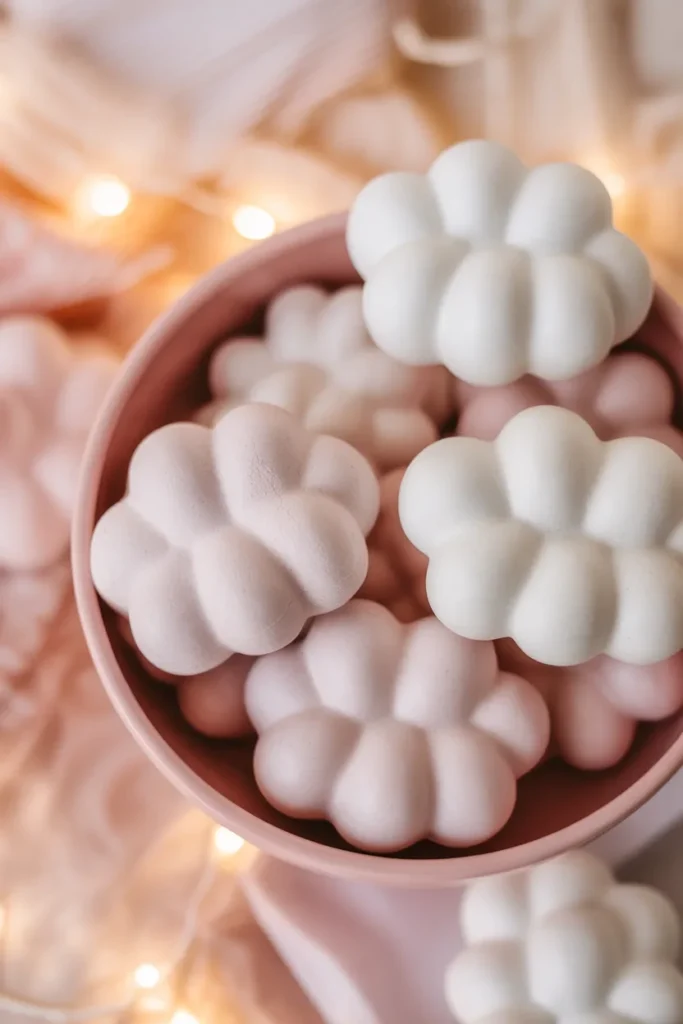
Use craft foam or slow-rise foam sheets. Cut them into cloud or marshmallow shapes. Mix a tiny drop of vanilla or marshmallow fragrance oil into your white paint before coating the foam. Seal with a matte finish for that powdery, real marshmallow look.
Expert Tip: Add a thin layer of white fabric paint as your base coat before adding scent. Fabric paint stays flexible when it dries, which means your squishy won’t crack or peel no matter how many times it gets squeezed.
Why it works: Scent is one of the strongest memory triggers we have. When kids play with scented squishies, they’re not just squeezing foam — they’re creating a multi-sensory experience that holds their attention longer and makes the toy feel far more premium. Scented homemade squishies also make incredible party favors or stocking stuffers because they feel thoughtful and handcrafted.
But here’s the important part — always use skin-safe fragrance oils, not essential oils or perfumes, especially for young children.
3. DIY Iridescent Galaxy Squishies
The Idea
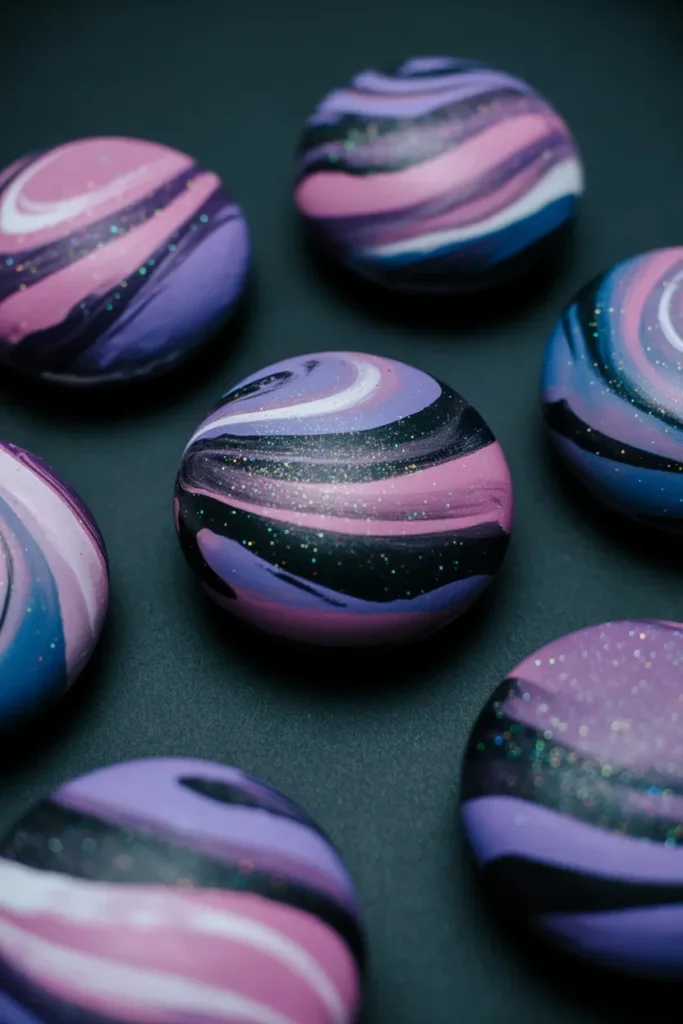
These are the ones that go absolutely viral on Pinterest every single time. Iridescent galaxy squishies look like someone bottled a nebula and made it squeezable. They shimmer, they shift color in different lighting, and they photograph beautifully.
Start with a slow-rise foam base cut into a rounded oval or irregular “space rock” shape. Layer purple, blue, black, and pink acrylic paints, letting each layer partially dry before adding the next. While the final coat is still slightly tacky, dust on iridescent craft glitter or holographic powder.
Expert Tip: Use a dry sponge (not a brush) to dab on each color layer. This creates a mottled, galaxy-like texture that looks far more complex than it actually is. Seal with glossy Mod Podge to lock in the glitter and give it that glassy, cosmic finish.
Why it works: The combination of visual complexity and tactile satisfaction makes this one impossible to put down. The shifting colors reward curiosity — you want to keep turning it in your hands to see it change. For older kids and teens especially, these feel sophisticated enough that they actually want to display them, which means they’ll spend more time with them.
Here’s where it gets interesting — you can make a matched set using the same color palette for a truly stunning collection that looks like it came from a specialty toy boutique.
4. Bread Loaf and Toast Squishies (The Cutest Things Ever)
The Idea
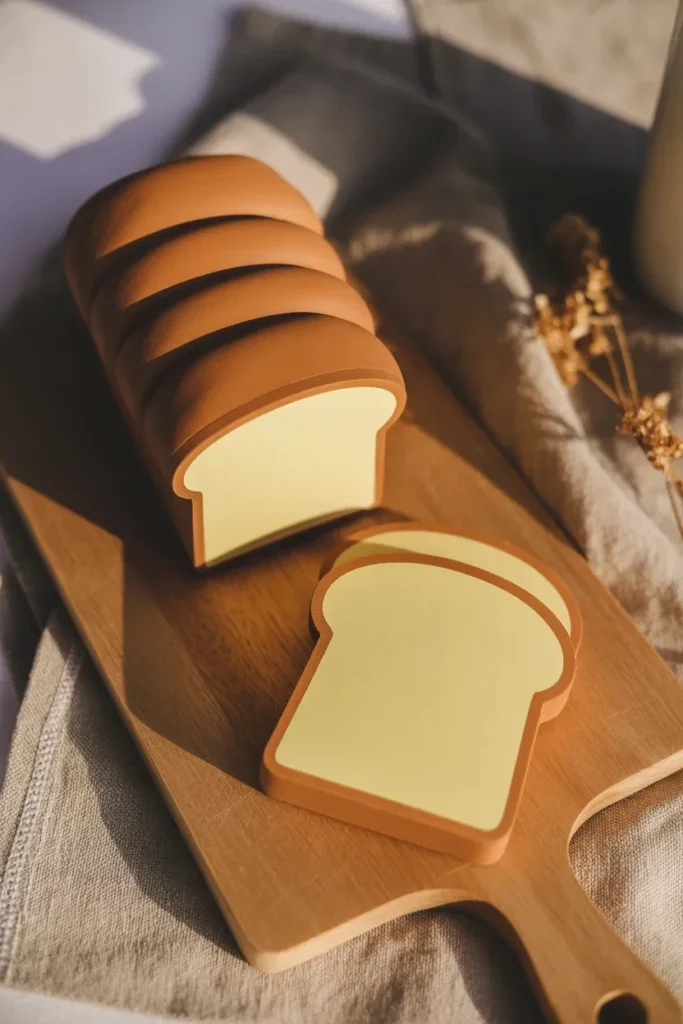
If you’ve spent any time in the squishy world, you know bread squishies are iconic. There’s something about a perfectly soft, squeezable little toast that is almost unbearably cute. The good news is they’re also one of the easiest homemade squishy ideas to pull off.
Cut your slow-rise foam into a rectangle for the bread loaf. Round the top edges slightly with scissors for that authentic baked-bread silhouette. Paint the sides a pale cream-yellow, and blend a warm golden-brown across the top crust. Add tiny “pores” with a toothpick while the paint is wet.
Expert Tip: For individual toast slices, score the top of your foam rectangle with a craft knife before painting to create that authentic “sliced bread” groove. Then paint each slice’s “cut face” in a slightly lighter, creamier color to mimic the inside of real bread. The detail takes two minutes and makes a massive difference.
Why it works: Bread squishies tap into something universally comforting — bread is a feel-good food, and making it miniature and squeezable amplifies that cozy factor. These are especially popular for desk toys and stress relief because they’re cute enough to leave out on display but satisfying enough to reach for whenever you need a moment to decompress.
The Ultimate Homemade Squishy Budget Breakdown
Let’s talk money for a second, because this is where making squishies at home gets really exciting.
Store-bought squishies typically run $5–$20 each for decent quality. A set of 10? That’s potentially $100–$200.
Here’s what a full homemade squishy supply kit actually costs:
- Slow-rise foam sheet pack (makes 20–30 squishies): $8–$12
- Acrylic paint set (30 colors): $10–$15
- Mod Podge glossy sealant (16 oz): $8
- Craft glitter variety pack: $5
- Fragrance oils (set of 6): $10
- Total investment: Roughly $41–$50
That $41–$50 can make 30+ squishies compared to maybe 2–4 store-bought ones for the same money. The math is undeniable.
Pros of Homemade Squishies:
- Fraction of the cost
- Fully customizable colors, scents, and shapes
- Creative activity that kids can participate in making
- Great for gifts, party favors, and classroom treats
- No “sold out” frustration — make them whenever you want
Cons to Consider:
- Requires drying time (plan for 24–48 hours)
- Results vary until you get the hang of it
- Foam quality matters — cheap foam won’t slow-rise properly
- Paint can crack if you don’t use the right type or seal properly
Most people don’t know this — the single biggest factor in a great homemade squishy isn’t the paint or the shape. It’s the foam. Spending an extra $3–$5 on quality slow-rise foam versus bargain craft foam is the difference between a satisfying, slow-rising toy and a stiff lump that bounces back instantly.
5. Animal Face Squishies (Pandas, Cats, and Bunnies)
The Idea
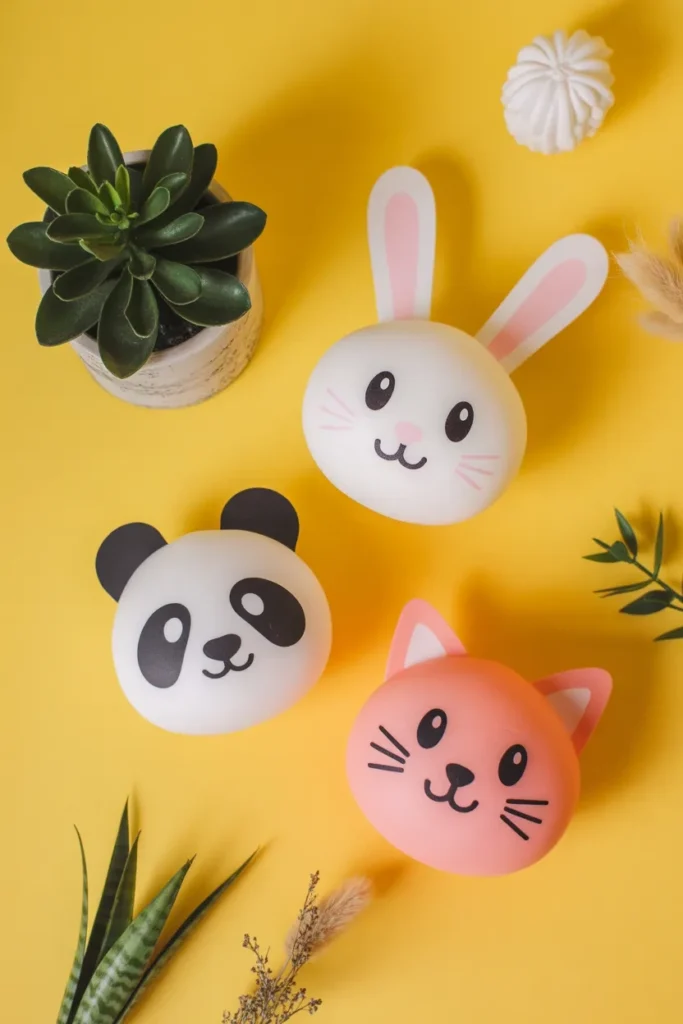
Round. Soft. Adorable. Animal face squishies are perfect for younger kids because the shapes are simple — circles and ovals — but the finished result looks incredibly cute and professional with just a little bit of painted detail.
Cut your foam into a perfect circle or slightly oval shape. For a panda: paint the whole thing white, add black oval eye patches, a small black nose, and round ears on top. For a bunny: pale pink base with inner-ear details and a tiny nose. For a cat: any color with triangular ears cut separately and attached with fabric glue.
Expert Tip: The secret to clean, crisp animal features is to let your base coat dry COMPLETELY before adding detail colors. Use a thin detail brush (or even a toothpick for tiny dots) and keep your paint just slightly thicker than usual so it doesn’t bleed into the foam.
Why it works: Animal face squishies hit the intersection of two things kids are obsessed with: cute animals and satisfying textures. They’re also the perfect size for little hands, making them ideal for ages 4 and up. As a bonus, making them together — letting kids choose their animal and “paint” the face — turns a toy into a memory.
6. Donut and Sweet Treat Squishies
The Idea
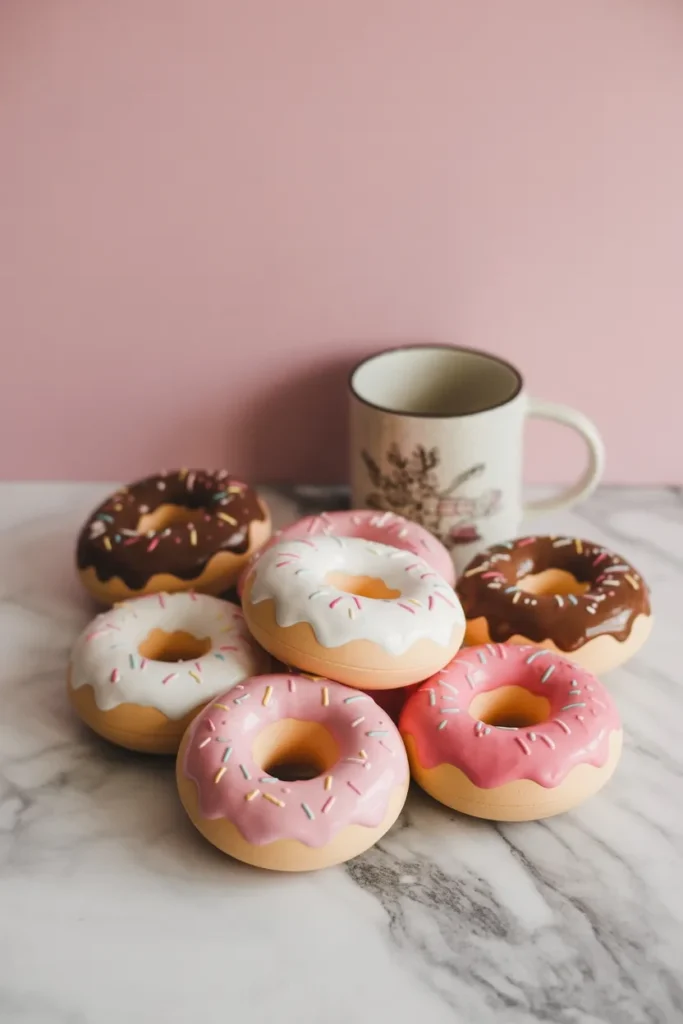
Pink frosting. Rainbow sprinkles. A soft, perfect donut you can squeeze a hundred times and it never gets any less satisfying. Donut squishies are a staple of the squishy world for good reason, and the homemade version is honestly more charming than the mass-produced ones.
Use slow-rise foam to cut out your donut ring shape (trace a large circle, then cut a smaller circle from the center). Sand the edges slightly with fine sandpaper for a smoother finish. Paint the base in a warm caramel tone, then add a thick “drip” of pink, white, or chocolate-colored paint across the top for the glaze. While that’s wet, add tiny paint dots for sprinkles.
Expert Tip: To get that glossy, just-glazed look, apply two coats of glossy Mod Podge over your frosting area only, leaving the “dough” area with a matte finish. The contrast between shiny frosting and matte dough makes the whole thing look remarkably realistic and incredibly satisfying.
Why it works: Sweet treat squishies work on a psychological level — they look delicious, which creates an almost irresistible urge to pick them up and squish them. The realistic detail rewards close inspection, which means kids (and adults) spend more time with them rather than tossing them aside after 30 seconds.
Now, avoid this mistake — don’t rush the paint layers. Painting over wet layers causes cracking and peeling. Each coat needs at least 20–30 minutes of dry time before you add the next one. It feels slow, but the end result is worth every minute.
7. Slow-Rise Emoji Face Squishies
The Idea

Here’s the one I promised you — and it genuinely might be the squishiest thing you ever hold. Emoji squishies made from foam are ultra-satisfying because they’re perfectly round, medium-sized for a great hand feel, and the bold, simple designs are easy enough for total beginners.
Cut or shape your slow-rise foam into a perfect sphere or round disc. Paint it a solid, bright yellow — the color is everything here. Once dry, use a thin brush or permanent marker to add your emoji face of choice. The laughing face, the heart-eyes, and the smiling face are the most popular and easiest to draw.
Expert Tip: Can’t draw a perfect circle for eyes? Use the flat end of a pencil eraser dipped in black paint. It makes a perfect round dot every single time, no skill required. For heart eyes, use a bobby pin bent slightly open — dip it in paint and it stamps a perfect small heart.
Why it works: Emoji squishies are relatable for kids of all ages because they already have a built-in language around emoji faces. The expression on the squishy connects emotionally in a way a plain shape doesn’t. When a kid squeezes the laughing emoji and it slowly bounces back, there’s a tiny moment of delight that makes them want to do it again. And again. That’s the magic.
Which emoji squishy would YOU make? Tell me in the comments — let’s see which one is the most popular!
8. DIY Squishy Stress Balls (Beginner-Friendly)
The Idea
Okay, this one is slightly different from foam squishies but equally addictive — and it takes literally 10 minutes to make. Balloon stress ball squishies have a completely different texture: instead of slow-rise, they’re dense and moldable, like a stress ball you can reshape in your hands.
Fill a balloon with cornstarch, flour, or fine kinetic sand using a funnel. Tie it off, then slip it inside a second balloon for extra durability and a smoother exterior. You can use colored balloons or paint the outside with fabric paint once filled. These are soft, satisfying, and almost impossible to put down.
Expert Tip: For the most satisfying texture, use a 50/50 mix of cornstarch and fine sand. The cornstarch gives it that silky, smooth feel while the sand adds just enough resistance to make squeezing genuinely stress-relieving. If you want a softer result, use all cornstarch. If you want more firmness, go heavier on the sand.
Why it works: The tactile experience of a moldable squishy stress ball is fundamentally different from a foam squishy and appeals to a slightly different sensory preference. Some people prefer the slow-rise bounce; others love the dense, moldable quality of a stress ball. Having both types in a homemade collection gives you options — and it makes this a perfect project to make in batches as gifts.
If you love hands-on crafts for kids, you’ll definitely want to check out → 10 Easy Bath Bomb Recipes You’ll Love
9. Mini Food Squishies (Sushi, Pizza, and Tacos)
The Idea
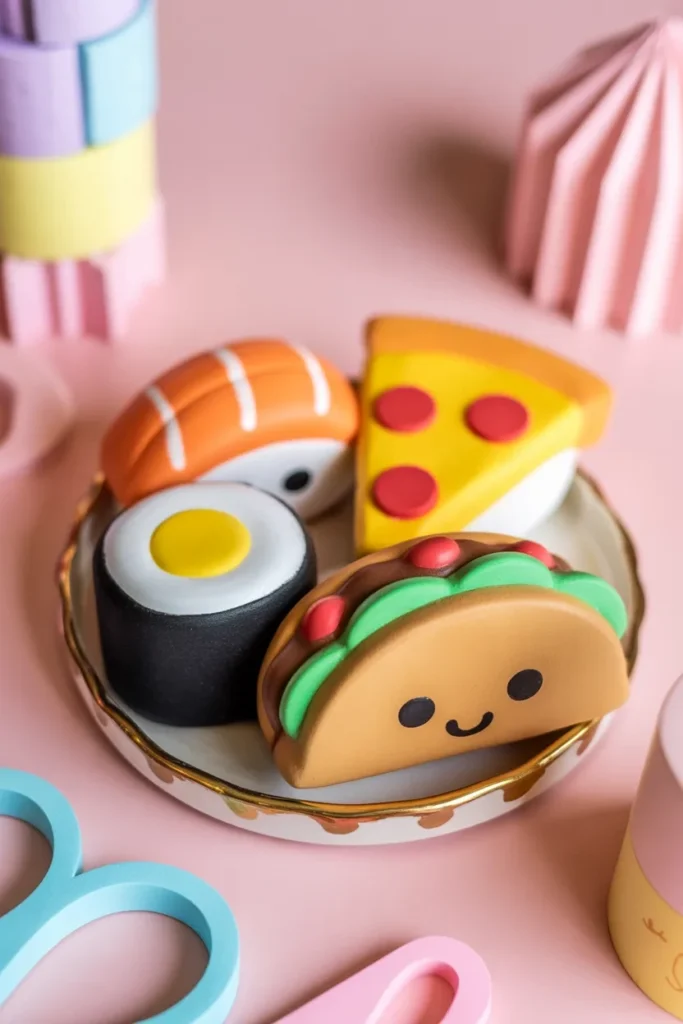
Mini food squishies are the crown jewel of the homemade squishy world. A tiny squeezable taco. A little foam sushi roll. A palm-sized pizza slice. These are the ones that get photographed, displayed, collected, and obsessed over — and making them at home means you can customize every single detail.
For sushi: roll a small piece of white foam into a cylinder, wrap the outside edge with a strip of dark green foam (nori!), and top with a small oval of “salmon” colored foam. For pizza: cut a triangle, paint it red for sauce, add white paint spots for mozzarella, and tiny circles of any color for toppings.
Expert Tip: Cut each component of your food squishy from separate pieces of foam and glue them together with foam-safe adhesive before painting. This creates visible dimension and texture between layers — like actual sushi or pizza — rather than a flat, painted version. The 3D quality is what makes these look truly impressive and worth collecting.
Why it works: Food squishies specifically tap into the “kawaii” (cute small things) aesthetic that has massive appeal across age groups. The miniaturization of everyday food makes it whimsical and collectible. When you make them at home, you can create “sets” — a full sushi platter, a pizza party, a taco Tuesday collection — which encourages display and increases how long kids engage with them.
10. Personalized Name or Initial Squishies
The Idea
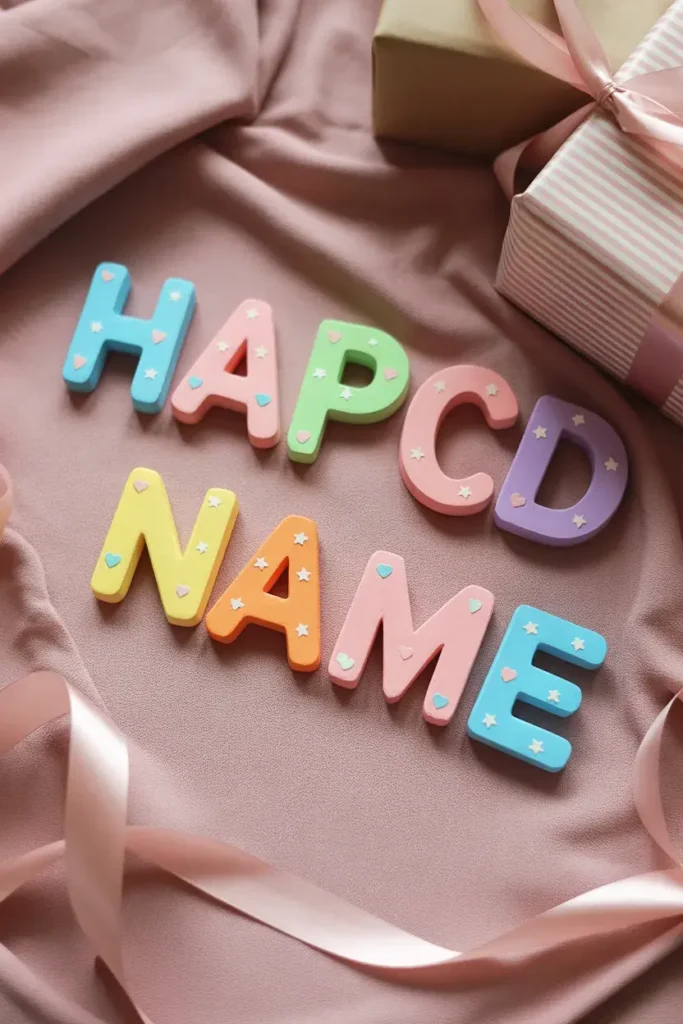
The most personal homemade squishy idea on this entire list — and possibly the most meaningful. Letter and initial squishies let you make a child’s name, initial, or favorite word into a squeezable, slow-rise toy that feels genuinely one-of-a-kind.
Trace block letters onto slow-rise foam and cut them out carefully. Paint each letter in a color scheme that matches the child’s personality or room decor — pastels for a soft aesthetic, brights for a bold one, metallic for something glam. You can also add small details: tiny stars, hearts, or polka dots on each letter.
Expert Tip: If freehand cutting letters feels intimidating, use alphabet cookie cutters as templates. Press them lightly into the foam surface to leave a faint outline, then cut along that line. The result is clean, uniform letters that look intentional and professional. For a set of all the letters in a name, cut them all at once in an assembly line so the sizing stays consistent.
Why it works: Personalization transforms a toy into something genuinely special. A child who has their name in squeezable foam letters has something no one else in the world has — and that matters deeply to kids. These also make extraordinary birthday or holiday gifts because the effort and thoughtfulness are obvious. A set of personalized squishies for a classroom Valentine’s Day exchange? You will be the most popular parent at that school. Guaranteed.
Before You Go — A Few Final Tips
Making homemade squishies is one of those rare crafts that gets better every time you do it. Your first batch might be a little rough around the edges. Your third batch will be impressive. By your fifth, you’ll be the person other people come to for advice.
A few things to remember as you get started:
- Always seal your paint — unsealed paint will crack and peel with repeated squishing
- Let everything dry fully before the first squeeze test
- Use quality foam — it makes a bigger difference than anything else
- Make extras — they disappear fast as gifts and party favors
- Have fun with the imperfections — handmade character is part of the charm
Most people don’t know this, but squishies aren’t just toys. Research into sensory play consistently shows that tactile activities like squeezing, molding, and shaping help reduce anxiety, improve focus, and provide a healthy outlet for restless hands at any age. Making them adds the creative benefit on top of that. It’s genuinely one of the most valuable craft projects you can do with kids.
Which of these 10 homemade squishy ideas are you starting with? Let me know in the comments — I read every single one!
If you loved this post, you are going to be obsessed with what’s next. Head over to our guide on 10 Easy Handmade Birthday Card Ideas for Friends — it pairs perfectly with a homemade squishy as a gift set that will genuinely blow someone away.
And if you’re in full craft-project mode right now, don’t miss our 20 Homemade DIY Tent Ideas for Kids — the perfect complement to an afternoon of squishy-making.
Happy crafting. You’ve got this.