10 Container Gardening Ideas That Will Transform Any Outdoor Space
This article was created in line with Trends Oraa’s research and content standards.
You don’t need a yard. You don’t even need a lot of money. What you do need is the right idea — and most people are missing it.
That’s why their balcony sits bare, their porch feels uninspired, and their outdoor space never quite lives up to the vision in their head.
The good news? Container gardening ideas are some of the easiest, most flexible ways to bring life, color, and even fresh food into any space — no landscaping required. Whether you’ve got a tiny apartment balcony, a sprawling backyard, or something in between, there’s a container setup that was made for you.
You might also love our guide on Indoor House Plants Aesthetic Ideas — it pairs beautifully with everything you’re about to read.
Let’s dig in (pun fully intended).
10 Container Gardening Ideas to Inspire Your Space
1. The Classic Tiered Planter Display
What You’re Seeing
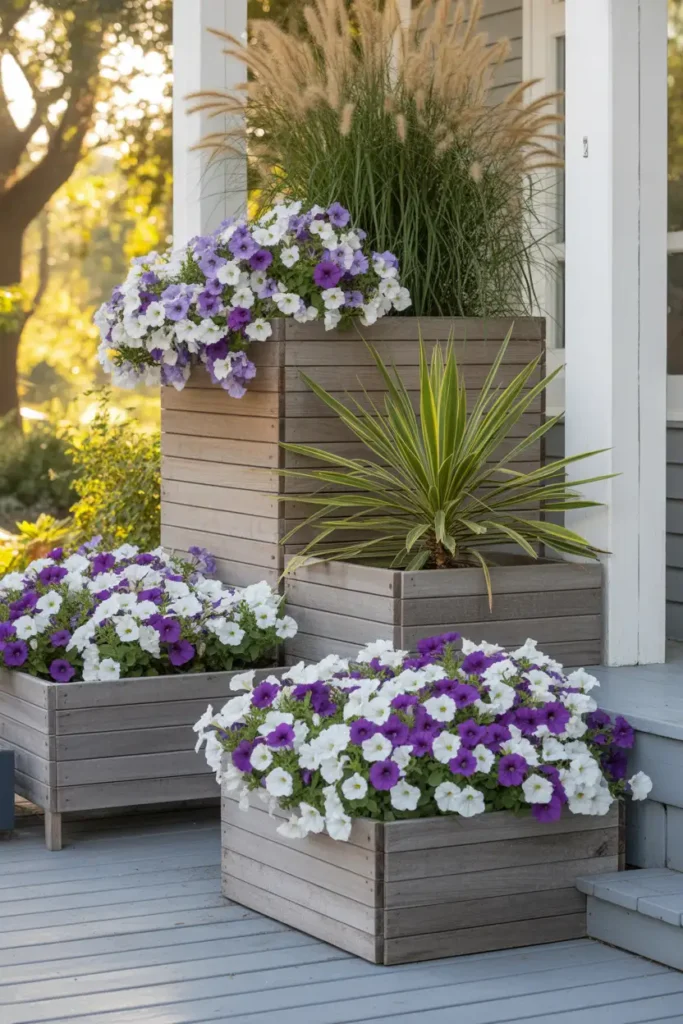
Picture a sun-drenched front porch with three staggered wooden planters — each a different height — overflowing with cascading petunias in purple and white, tall ornamental grasses anchoring the back, and spiky cordyline adding drama in the middle. The layered heights create movement and depth, and the whole thing looks like it belongs in a garden magazine.
Design Breakdown
Tiered planter displays are the bread and butter of container gardening for a reason. By arranging containers at varying heights — whether through actual tiered plant stands, stacked crates, or simply different-sized pots — you create visual interest that a flat row of planters can’t replicate.
The key is the “thriller, filler, spiller” design rule:
- Thriller — tall, dramatic plant in the center or back (think ornamental grasses, tall zinnias, or a small shrub)
- Filler — medium plants that round out the arrangement (geraniums, begonias, impatiens)
- Spiller — trailing plants that cascade over the edges (sweet potato vine, bacopa, nasturtiums)
Use pots in similar tones — terracotta, navy, matte black — to create a cohesive look even when the plants are wildly different.
Expert Tip
Don’t place all pots at the same spacing. Cluster them in odd numbers (three or five) and overlap the visual lines. It looks deliberate and designed rather than accidental.
Why It Works
The eye naturally follows layered heights upward, making the space feel taller and more lush. It’s the same principle used in interior design — varying levels create richness.
Best For
- Front porches and entryways
- Small patios with limited floor space
- Renters who can’t modify the landscape
Common Mistake to Avoid
Using containers that are all the same size. This creates a flat, repetitive display that lacks visual energy.
Quick Wins
- Start with one statement pot and build outward
- Repeat one plant variety across all three tiers for cohesion
- Match pot colors to your home’s trim for a polished look
- Use a plant stand to instantly add a second “level” without buying a new pot
2. The Herb Garden Window Box
What You’re Seeing
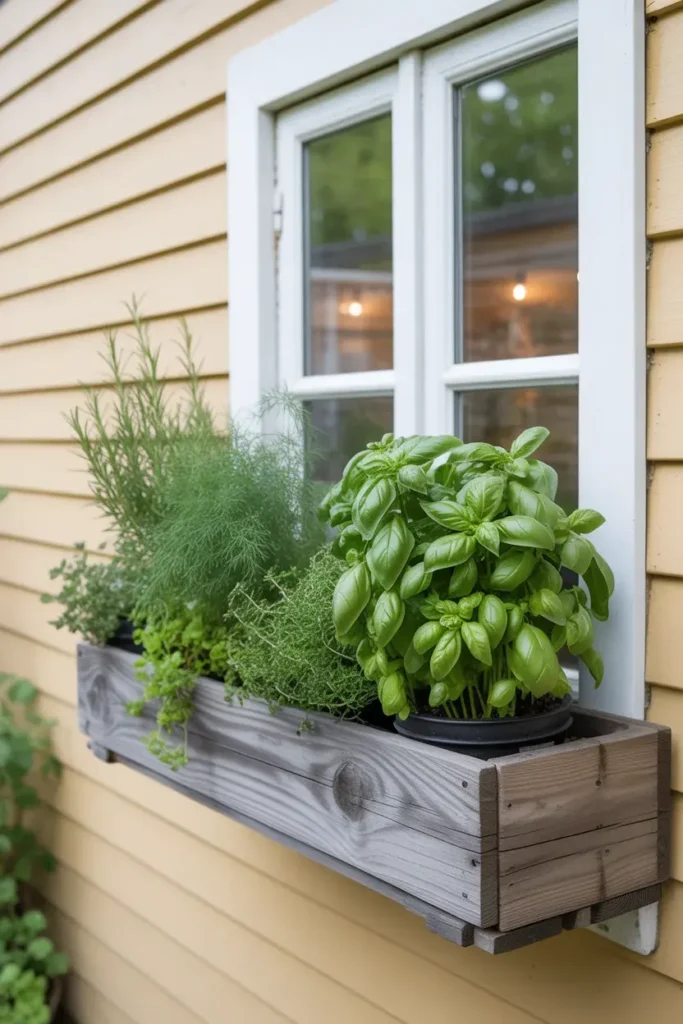
Imagine a cheerful kitchen window with a long wooden box mounted just below the sill. Inside: lush basil crowding the left side, feathery dill waving in the center breeze, a compact rosemary shrub anchoring the right, and a sprig of thyme tucking in at the edges. The whole thing smells like an Italian kitchen and looks like something from a Tuscan farmhouse.
Design Breakdown
Window box herb gardens are one of the most practical container gardening ideas out there — and one of the most visually rewarding. You get fresh herbs steps from your cutting board, and your exterior gets a lush, lived-in look.
Great herb combos for a window box:
- Italian kitchen box: basil, oregano, rosemary, thyme
- Tea garden box: mint, chamomile, lemon balm, lavender
- Bold & savory box: sage, chives, flat-leaf parsley, tarragon
One thing to keep in mind: mint will take over everything if given the chance. Plant it in a separate small pot and nestle that pot inside the window box — the box sides keep it contained.
Expert Tip
Window boxes dry out faster than ground-level pots because they’re exposed on three sides. Use a moisture-retaining potting mix and water-absorbing crystals mixed into the soil. Your herbs will thank you.
Why It Works
It satisfies two things at once — practicality and aesthetics. When something in your home is both beautiful and useful, you actually use it. That’s the magic of an herb window box.
Best For
- Apartment dwellers and renters
- Cooks who want fresh herbs year-round
- Budget gardeners (herbs are inexpensive to grow from seed)
Common Mistake to Avoid
Planting herbs with wildly different water needs together. Mint loves moisture; rosemary wants to dry out. Grouping incompatible herbs leads to one thriving and one dying.
Quick Wins
- Label each herb with a small chalkboard stake for a charming touch
- Harvest from the top, never the sides, to encourage bushier growth
- Replace summer herbs with cold-hardy kale or parsley as temps drop
- Mount the box with a drip tray to protect your window sill
One thing I’ve learned after years of container gardening: the soil matters more than the container. Most beginners reach for the cheapest bag of potting soil at the hardware store — and then wonder why their plants stall after a few weeks. A quality potting mix with perlite for drainage and slow-release fertilizer granules mixed in will outperform basic dirt in a fancy pot every single time. Think of the soil as the foundation of the whole setup. Get that right and everything else becomes easier.
Most people waste more space than they realize. The next three ideas are designed specifically for tight spots.
3. The Vertical Wall Garden
What You’re Seeing
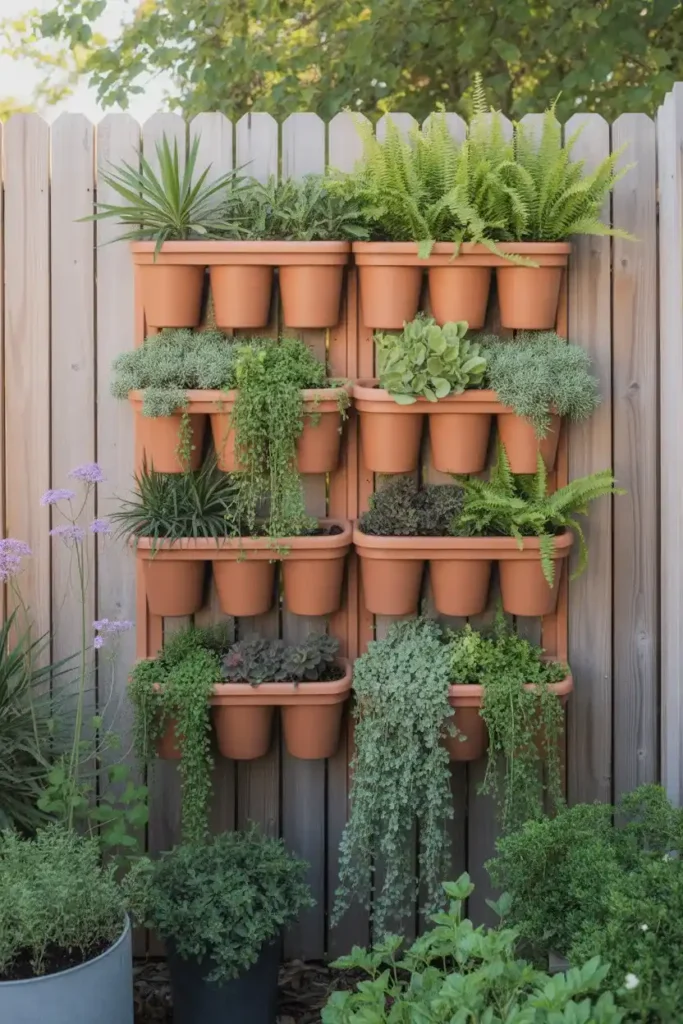
Visualize a blank cedar fence transformed into a living tapestry. Pocket planters in a warm terracotta hue are mounted in a 4×4 grid, each holding a single plant — trailing string of pearls, a compact fern, a spiky sedum, a pop of purple verbena. The fence went from forgotten to the focal point of the entire yard.
Design Breakdown
When floor space is scarce, go vertical. Wall gardens take the garden off the ground entirely, using mounted pocket planters, repurposed wooden pallets, or purpose-built vertical garden systems to create a stunning display on any fence, wall, or railing.
What works best in vertical planters:
- Succulents and sedums (drought-tolerant, shallow roots)
- Herbs (basil, cilantro, mint in individual pockets)
- Ferns and ivy (for shadier walls)
- Annual flowers (petunias, calibrachoa, bacopa for color)
For a pallet garden, line the back with landscape fabric, fill with a lightweight potting mix, and plant through the slats. Lay it flat for two weeks while roots establish, then mount vertically.
Expert Tip
Top-pocket plants get the most sun; bottom pockets stay damper and shadier. Plan your plant placement accordingly — sun-lovers go high, shade-tolerant plants go low.
Why It Works
Vertical gardens maximize every square inch of available space and draw the eye upward, making even a tiny patio feel expansive. They also act as a privacy screen and can muffle street noise.
Best For
- Apartment balconies and small patios
- Renters who can’t dig
- Anyone with a blank, boring fence they want to reinvent
Common Mistake to Avoid
Overloading the pockets with too many plants. Each pocket needs space for root growth. One plant per pocket is the rule.
Quick Wins
- Use self-watering pocket planters to reduce maintenance
- Group plants by water needs in the same row
- Paint the pallet or backing board a contrasting color before planting
- Pair with a string of outdoor lights for evening ambiance
You May Also Like:
- Small Balcony Garden Ideas
- Small Garden Design Ideas
- Tiny Garden Ideas
- Balcony Garden Ideas
- Garden Ideas
4. The Statement Urn Planter
What You’re Seeing
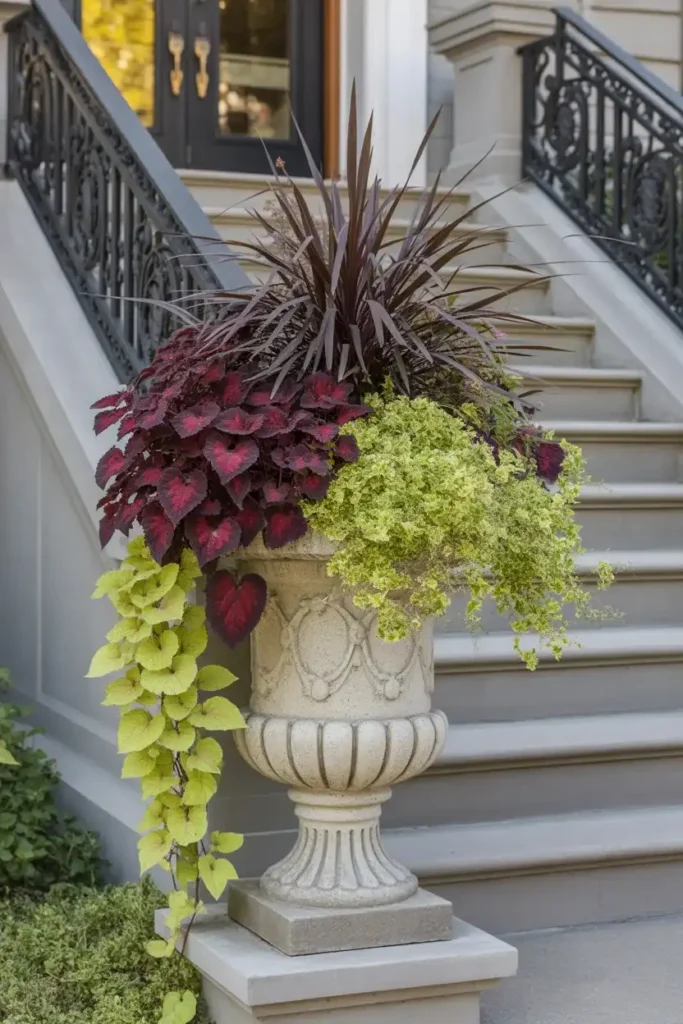
Picture a wide, ornate stone urn at the base of a front door staircase — overflowing with deep burgundy coleus, trailing chartreuse sweet potato vine, and upright purple fountain grass. The container itself is practically sculpture. Together, the urn and the planting create a grand entrance that stops people in their tracks.
Design Breakdown
Not every container has to blend in. Statement urns and oversized decorative pots are containers that earn attention entirely on their own — the plants inside become the gorgeous finishing touch to a piece that’s already striking.
Materials that make the best statement containers:
- Cast stone or concrete — heavy, weathered, architectural
- Glazed ceramic — bold colors, glossy finish, incredible presence
- Aged terracotta — warm, classic, pairs with almost everything
- Fiberglass — lightweight versions of stone or concrete; great for porches
When choosing plants for a statement urn, think drama. Bold foliage, rich colors, and cascading textures all emphasize the container’s sculptural quality.
Expert Tip
Big containers dry out slowly but they’re heavy when full. Use a lightweight potting mix (look for “professional mix” or perlite-blended options) and fill the bottom third with empty plastic bottles to reduce weight without sacrificing drainage.
Why It Works
A statement urn does double duty — it’s a garden element and a piece of outdoor decor. This is the container gardening equivalent of an anchor piece in interior design.
Best For
- Luxury homes and curated front entrances
- Large patios with open floor space
- Anyone wanting a high-impact, low-effort focal point
Common Mistake to Avoid
Choosing a container so ornate it competes with the plants. Either let the urn shine with simple greenery, or let the planting shine with a simpler container. Both compete = neither wins.
Quick Wins
- Place statement urns in pairs flanking a door for symmetry
- Match the urn color to your home’s stone or brick
- Refresh the planting seasonally while keeping the urn year-round
- Consider evergreen plants like boxwood for a year-round presence
Which of these ideas would work best at your front door? Drop a comment — I’d love to hear your vision.
5. The Raised Vegetable Container Garden
What You’re Seeing
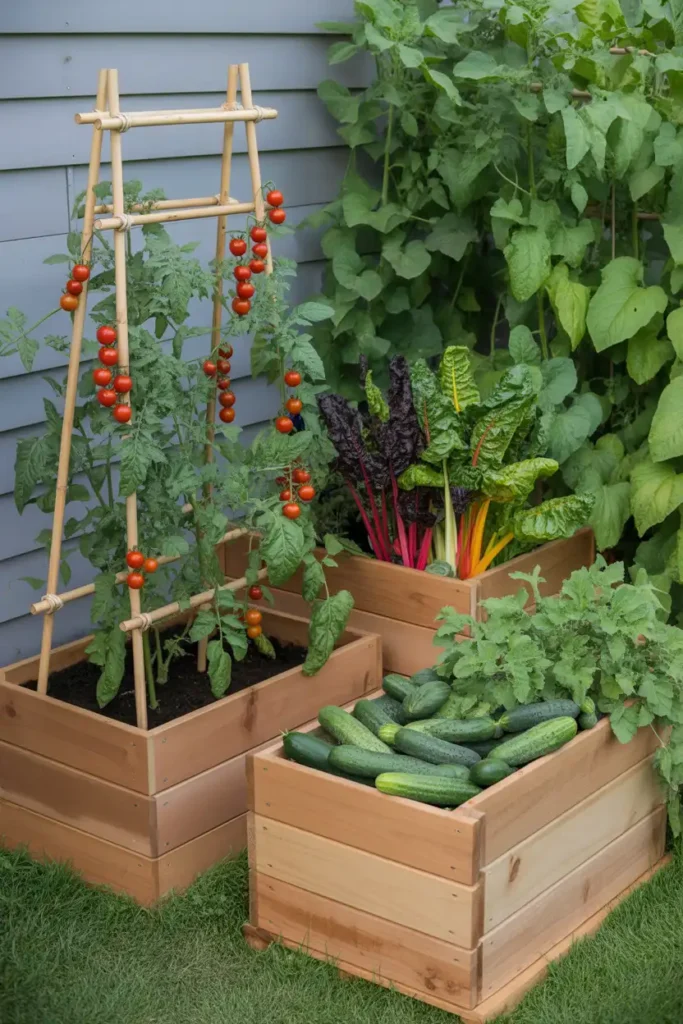
Think of a sunny backyard corner with three large cedar planter boxes in a tidy row, each bursting with life. One holds cherry tomatoes climbing a bamboo trellis, another is packed with rainbow chard and leaf lettuce, and the third offers a tangle of cucumber vines spilling over the edge. It’s practical, productive, and genuinely beautiful.
Design Breakdown
Growing vegetables in containers is one of the most satisfying container gardening ideas — and it’s more accessible than most people think. The key is choosing containers deep enough for root development and varieties bred for compact growing.
Best vegetables for container growing:
- Tomatoes — cherry varieties like ‘Sun Gold’ or ‘Sweet Million’ (need 5-gallon minimum per plant)
- Peppers — compact and container-friendly
- Lettuce and greens — shallow roots, perfect for wide, shallow boxes
- Cucumbers — bush varieties with a small trellis
- Herbs — almost all of them
- Radishes and carrots — short varieties work great in deep containers
Use a nutrient-rich potting mix, water consistently, and feed with a liquid fertilizer every two weeks once plants start flowering.
Expert Tip
Vegetables are hungry plants. Don’t skip fertilizing. A slow-release granular fertilizer mixed in at planting, followed by liquid feeding during the growing season, is the difference between a scraggly plant and a productive one.
Why It Works
Container vegetable gardens eliminate weeding, improve drainage, and give you complete control over soil quality. They’re also moveable — rotate them to follow the sun throughout the season.
Best For
- Families wanting homegrown food without a full garden
- Small yards and urban spaces
- Gardeners dealing with poor native soil
Common Mistake to Avoid
Under-sizing the containers. A tomato plant in a 1-gallon pot will be stunted and unproductive. Go bigger than you think you need — especially for fruiting plants.
Quick Wins
- Use dark containers to absorb heat and extend the growing season
- Install a simple drip irrigation system for consistent watering
- Companion plant basil next to tomatoes to repel aphids
- Choose disease-resistant varieties for lower maintenance
Here’s where it gets interesting: Most people think vegetable container gardens require constant watering and high maintenance. But with the right self-watering containers — the kind with a reservoir at the bottom — you can cut watering frequency in half. The plant draws moisture up through capillary action, keeping the root zone consistently moist without waterlogging. It’s a game-changer for busy gardeners, travelers, or anyone who tends to forget to water. Self-watering containers run from $20 for basic plastic versions to $150+ for premium cedar or powder-coated metal options. For a vegetable garden, it’s absolutely worth the investment.
The next idea is one designers secretly love — and it’s wildly underused.
Your Ultimate Container Gardening Planning Guide
Before you buy a single pot, spend five minutes with this guide. It’ll save you money, dead plants, and a lot of frustration.
Step 1: Know Your Space
Every container gardening success story starts with an honest assessment of the space.
Ask yourself:
- How much sun does this area get? Count the hours of direct sunlight — less than 3 is shade, 3-6 is partial sun, 6+ is full sun. This determines everything about which plants will thrive.
- Is there wind exposure? Rooftops and high balconies create wind tunnel effects that dry out soil fast and damage tall or fragile plants.
- What’s the surface? Wood decks, concrete, and tile all absorb and reflect heat differently. Dark concrete can superheat containers sitting on it.
- Is there a water source nearby? Lugging watering cans gets old fast. Plan for a nearby hose or drip line.
Step 2: Choose the Right Container
The container is more than just a vessel — it affects drainage, root temperature, watering frequency, and aesthetics.
Material Guide:
| Material | Pros | Cons | Best For |
|---|---|---|---|
| Terracotta | Breathable, classic look | Heavy, dries out fast | Herbs, Mediterranean plants |
| Plastic | Lightweight, affordable | Less attractive, less breathable | Vegetables, large plantings |
| Fiberglass | Lightweight, durable | Can be pricey | Large statement planters |
| Wood/Cedar | Beautiful, insulating | Rots over time without treatment | Raised beds, rustic look |
| Glazed Ceramic | Stunning, retains moisture | Very heavy, can crack in frost | Focal point arrangements |
| Metal | Trendy, modern | Heats up fast, can rust | Cold-hardy plants, modern aesthetics |
Size Matters — A lot:
- Herbs: 6-8 inch minimum depth
- Annuals and flowers: 8-12 inch depth
- Perennials: 12-18 inch depth
- Vegetables (tomatoes, peppers): 5-gallon or larger
- Trees or large shrubs: 15+ gallon
Always. Have. Drainage Holes.
No drainage holes = root rot. It’s that simple. If you fall in love with a container that doesn’t have holes, either drill some or use it as a decorative outer sleeve for a plastic nursery pot inside.
Step 3: Get the Soil Right
This is where most beginners go wrong. Never use garden soil in containers — it compacts, drains poorly, and harbors pests.
Use a quality potting mix (not “potting soil” — they’re different). Look for:
- Perlite or pumice already mixed in (drainage)
- Slow-release fertilizer granules (feeding)
- Coir fiber (moisture retention without waterlogging)
Budget breakdown for soil:
- Basic potting mix: $8-12 for 2 cubic feet
- Premium potting mix with fertilizer: $15-25 for 2 cubic feet
- Specialty mix (cactus, orchid, seed-starting): $10-20
For very large containers, use the “filler trick”: place empty plastic bottles, packing peanuts, or a layer of landscape fabric over large rocks at the bottom to reduce how much potting mix you need. This also keeps the container lighter.
Step 4: Match Plants to Conditions
Here’s a quick cheat sheet:
Full Sun (6+ hours):
- Petunias, geraniums, lavender, salvia, marigolds
- Tomatoes, peppers, basil, zucchini
- Succulents, sedum
Partial Sun (3-6 hours):
- Impatiens, begonias, fuchsia
- Lettuce, spinach, herbs
- Caladiums, coleus
Shade (under 3 hours):
- Hostas, ferns, astilbe
- Mint, cilantro
- Browallia, torenia
Common Mistakes in Plant Selection:
- Mixing drought-lovers with water-lovers in the same pot
- Choosing plants that will outgrow the container within weeks
- Ignoring the hardiness zone for perennials
- Buying what looks prettiest without checking sun requirements
Step 5: Plan for the Season
Container gardens can be seasonal or year-round, depending on your climate. Planning ahead means you won’t have an empty, ugly pot staring at you in November.
Seasonal rotation ideas:
- Spring: Pansies, violas, snapdragons, cool-season greens
- Summer: Petunias, geraniums, marigolds, tomatoes, basil
- Fall: Ornamental kale, chrysanthemums, ornamental peppers, asters
- Winter (mild climates): Evergreen shrubs, hellebores, winter jasmine
Step 6: Budget Realistically
You can start a beautiful container garden for under $100 — or spend $1,000+ on premium containers and plants. Here’s a realistic budget breakdown:
Starter setup (1-2 containers):
- Containers: $15-40
- Potting mix: $12-20
- Plants: $20-40
- Accessories (stakes, saucers): $10-15
- Total: $57-115
Mid-range patio setup (4-6 containers):
- Containers: $80-200
- Potting mix: $30-50
- Plants (including statement plants): $60-120
- Fertilizer and supplies: $20-40
- Total: $190-410
Premium setup with large urns or custom planters:
- Containers: $200-800+
- Plants: $100-300
- Soil and amendments: $60-100
- Drip irrigation system: $50-150
- Total: $410-1,350+
The sweet spot for most homeowners is the mid-range. You get beautiful results without breaking the bank, and quality containers last years.
6. The Monochromatic Color Theme Container
What You’re Seeing
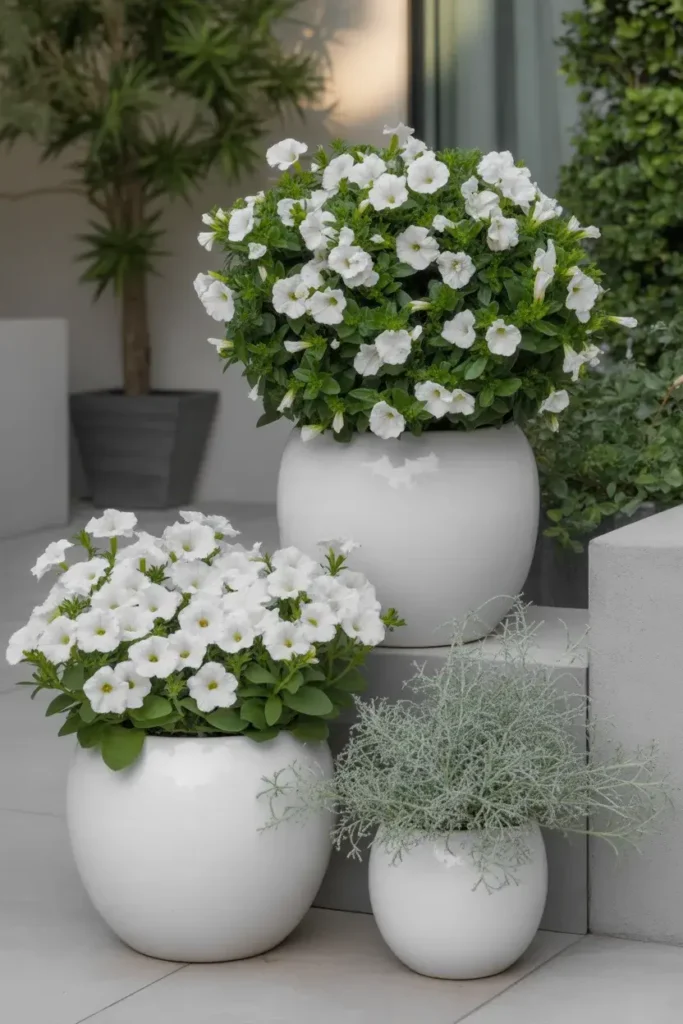
Imagine a sleek modern patio with an all-white container display: white ceramic pots holding white petunias, white bacopa spilling over the edges, silvery dusty miller providing texture, and a white-blooming gardenia as the centerpiece. The whole arrangement glows in the evening light like something from a luxury hotel garden.
Design Breakdown
Monochromatic container gardens — all blooms in one color family — are a designer’s secret weapon for creating instant sophistication. Instead of competing colors fighting for attention, a single color theme creates a sense of calm, intentionality, and high-end polish.
Great monochromatic combinations:
- All white: petunias, bacopa, dusty miller, white salvia, white vinca
- All purple: lavender, verbena, catmint, purple calibrachoa, heliotrope
- All yellow: marigolds, rudbeckia, yellow zinnias, black-eyed susan vine
- All coral/peach: coral begonias, peach calibrachoa, copper ornamental grass
The trick is varying the texture within the single color. Rounded blooms next to feathery foliage next to spiky architectural plants keeps the eye moving even without color contrast.
Expert Tip
Add at least one silver or chartreuse foliage plant to any monochromatic display. These neutrals don’t break the color theme, but they add contrast that makes the main color pop even harder.
Why It Works
Color psychology plays a real role here. Monochromatic palettes read as sophisticated, curated, and intentional — the opposite of a random grab-bag of plants.
Best For
- Modern and contemporary homes
- Luxury outdoor spaces
- Anyone who feels overwhelmed by mixing colors
Common Mistake to Avoid
Going too rigid. Slight variations in shade — pale lavender next to deep purple — actually strengthen a monochromatic scheme rather than weakening it.
Quick Wins
- Pull your color from your front door or outdoor furniture
- Layer light to dark tones from back to front
- Use contrasting foliage (silver, chartreuse) as a secret weapon
- Photograph the arrangement to see how it reads at a distance
Would you go bold with deep jewel tones or keep it soft and neutral? Tell me in the comments.
7. The Repurposed Container Garden
What You’re Seeing
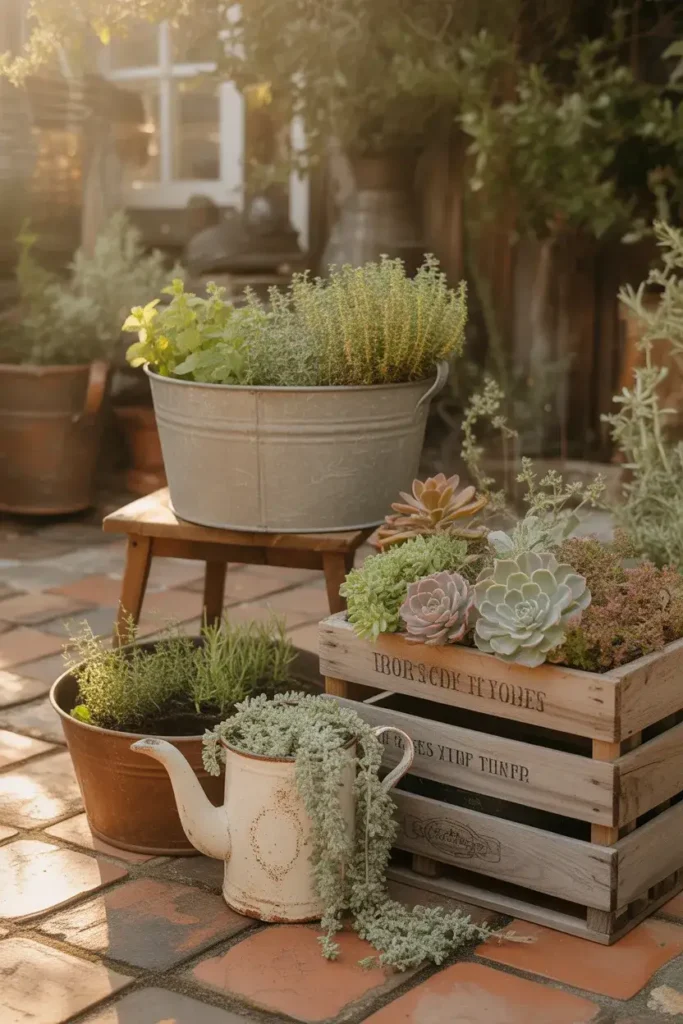
Picture an eclectic cottage backyard where an old galvanized washtub holds sprawling mint and lemon thyme, a weathered wooden wine crate overflows with succulents, a cracked antique teapot has been repurposed as a planter for a single trailing sedum, and a stack of mismatched vintage buckets creates a whimsical tower of herbs. Every single container was found, thrifted, or rescued.
Design Breakdown
Repurposed container gardening is part DIY, part sustainability, and entirely charming. The premise is simple: anything that holds soil and has drainage can become a planter.
Unexpected containers that make incredible planters:
- Galvanized buckets, washtubs, and stock tanks
- Wooden wine or whiskey crates (line with landscape fabric)
- Old boots and rain boots
- Colanders (built-in drainage!)
- Vintage enamel bread boxes or coffee pots
- Cracked or chipped ceramic pots (still usable for succulents)
- Wheelbarrows
- Old toolboxes
The aesthetic result is layered, personal, and impossible to replicate — which is part of what makes it so appealing on platforms like Pinterest.
Expert Tip
Drill drainage holes in anything metal before planting. A standard drill bit with a metal-rated tip works well. Without drainage, even the most drought-tolerant plant will eventually rot.
Why It Works
Repurposed planters tell a story. They feel collected and authentic rather than purchased and arranged. This is the gardening equivalent of antique furniture — the character is the point.
Best For
- Budget-conscious gardeners
- Cottage, bohemian, and farmhouse aesthetics
- Anyone who loves thrifting and DIY projects
Common Mistake to Avoid
Using untreated wood directly as a planter without lining it. Wood in direct contact with wet soil rots quickly. Always line wooden containers with landscape fabric or a plastic liner with drainage holes poked through.
Quick Wins
- Seal the inside of wooden containers with linseed oil before planting
- Group repurposed containers of varying heights for a curated display
- Use consistent plant colors to unify wildly different containers
- Hit thrift stores and estate sales in early spring for the best finds
You May Also Like:
- Vegetable Garden Ideas
- Indoor Hydroponic Gardening Ideas
- Front Porch Flower Pot Ideas
- DIY Garden Trellis Ideas
- Vintage Garden Decor Ideas
8. The Year-Round Evergreen Container
What You’re Seeing
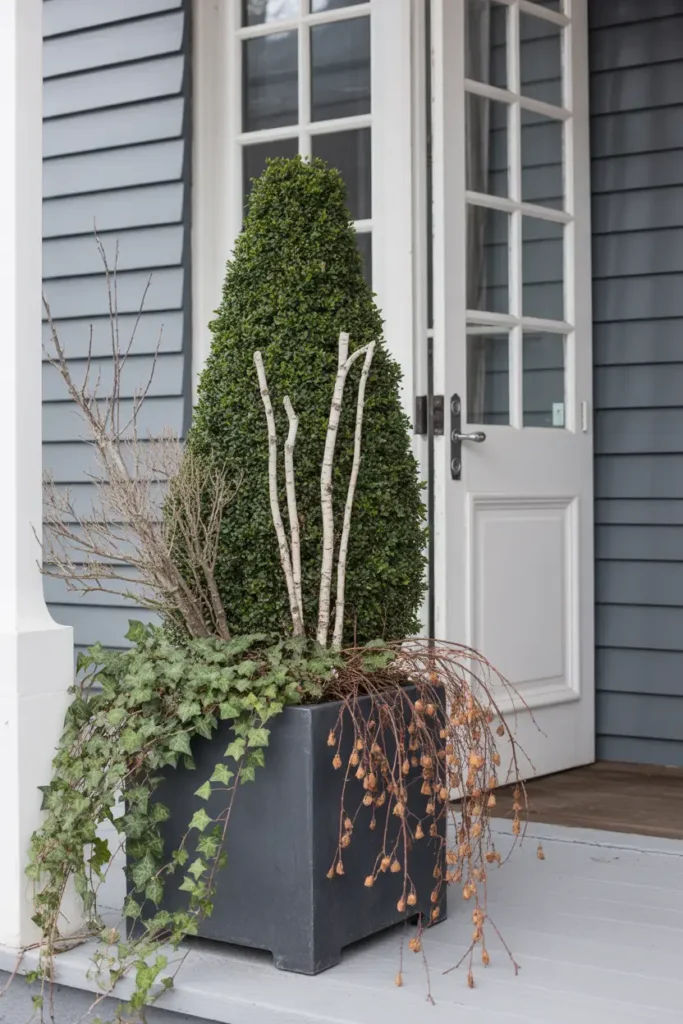
Visualize a front porch in January that still looks intentional and beautiful. A large black planter holds a small boxwood topiary at center, flanked by trailing English ivy that stays green through frost, with white-barked birch twigs and dried seed pods tucked in for texture. No dead annuals, no empty pots — just a composed, winter-worthy arrangement that looks as good in February as it does in October.
Design Breakdown
Year-round container gardens require a different approach than seasonal displays. The goal isn’t the biggest splash of color — it’s sustained, dignified presence through every season.
Backbone plants for year-round containers:
- Boxwood — slow-growing, dense, classically shaped
- Dwarf Alberta spruce — naturally conical, stays neat without pruning
- English ivy — trails beautifully and tolerates cold
- Ornamental grasses — provide movement and winter texture
- Holly — evergreen with berries through winter
- Dwarf conifers — incredible textures, colors, and forms
Layer in seasonal color around your evergreen backbone:
- Spring: Add bulbs (tulips, crocus) tucked between the evergreens
- Summer: Tuck in colorful annuals
- Fall: Add ornamental cabbages and mums
- Winter: Replace summer annuals with pine boughs, birch twigs, and seasonal berries
Expert Tip
In cold climates, wrap ceramic or glazed pots with burlap or move them under a covered porch before temperatures drop below 20°F. Freezing and thawing repeatedly cracks even high-fired ceramics.
Why It Works
A year-round container is an investment rather than a seasonal expense. The evergreen structure means you’re only replacing the accent plants rather than the entire display — which saves money and time over the long run.
Best For
- Homeowners in four-season climates
- Front entrances that need to look good year-round
- Anyone tired of replanting from scratch every season
Common Mistake to Avoid
Choosing evergreens that will outgrow the container within two years. Always check the mature size. A “compact” boxwood that reaches 4 feet will dwarf a 12-inch pot within a season or two.
Quick Wins
- Choose containers in neutral colors that work in every season
- Go with odd-numbered plant groupings within the container
- Use slow-release fertilizer in spring to feed the whole season
- Deadhead any seasonal additions regularly to keep the display looking sharp
Most people don’t know this: Evergreen containers in cold climates actually benefit from a light layer of mulch on top of the soil before winter. A 2-inch layer of shredded bark or pine needle mulch insulates the root zone against freeze-thaw cycles, which is actually more damaging than sustained cold. This single step can mean the difference between a plant that bounces back in spring and one that arrives in March looking like it gave up.
This simple change can completely transform the look of any season.
9. The Water-Wise Succulent Container Garden
What You’re Seeing
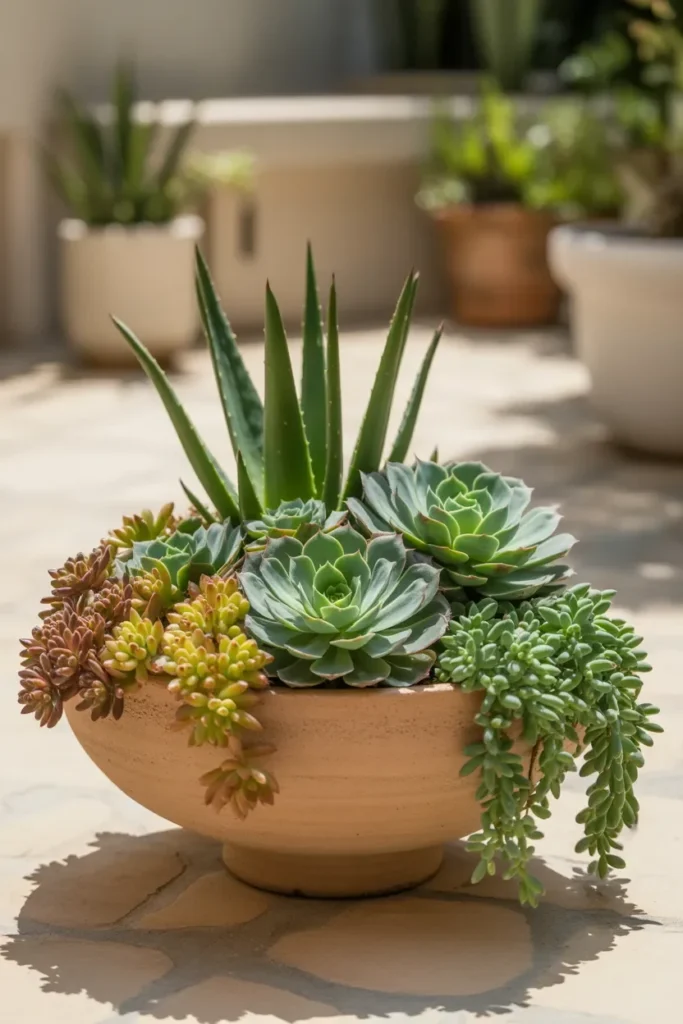
Think of a sun-baked courtyard patio with a wide, shallow terracotta bowl filled with a carefully composed succulent arrangement: blue-green echeveria rosettes in the center, plump golden sedum cascading over the front edge, spiky aloe vera providing height at the back, and a trailing string of pearls draping down the sides like jewelry. The arrangement looks almost too perfect to be real.
Design Breakdown
Succulent container gardens are the ultimate low-maintenance container gardening idea. They thrive on neglect (within reason), tolerate drought, and offer some of the most varied and stunning textures available in any plant family.
Best succulents for container arrangements:
- Echeveria — rosette-shaped, huge color range, the crown jewel of arrangements
- Sedum — groundcover types cascade beautifully over pot edges
- Aloe — upright architectural accent; bonus medicinal properties
- Haworthia — tolerates more shade than most succulents
- Aeonium — dramatic purple-black or lime-green rosettes on tall stems
- String of Pearls / Pearls and Jade Pothos — trailing show-stoppers
The key design rule: vary shapes dramatically. A container of all-rosette echeveria looks monotonous. Pair rosettes with upright spiky forms, cascading trailers, and something architectural.
Expert Tip
Top-dress the container with decorative gravel or small river stones after planting. This improves drainage at the soil surface, reduces moisture loss, and makes the arrangement look finished and intentional. It also prevents soil from splashing onto the plants when watering.
Why It Works
In an era of busy schedules and frequent travel, succulents offer the beauty of a lush container garden with a fraction of the maintenance. They forgive a forgotten watering better than almost any other plant.
Best For
- Busy homeowners or frequent travelers
- Sunny balconies, rooftops, and patios
- Anyone new to container gardening who wants a confidence-building win
- Budget gardeners (succulents propagate easily from cuttings — free plants!)
Common Mistake to Avoid
Using regular potting mix. Succulents need fast-draining soil that won’t hold moisture against their roots. Use a cactus/succulent mix or amend regular potting mix with 50% coarse perlite.
Quick Wins
- Propagate new plants from fallen leaves — completely free
- Rotate the container quarterly so all sides receive equal sun
- Water deeply but infrequently — soak, then let dry completely
- Group several succulent containers together for a striking desert-garden effect
What’s your biggest container gardening challenge — remembering to water, choosing the right plants, or something else? I’d love to know.
10. The Container Water Garden
What You’re Seeing
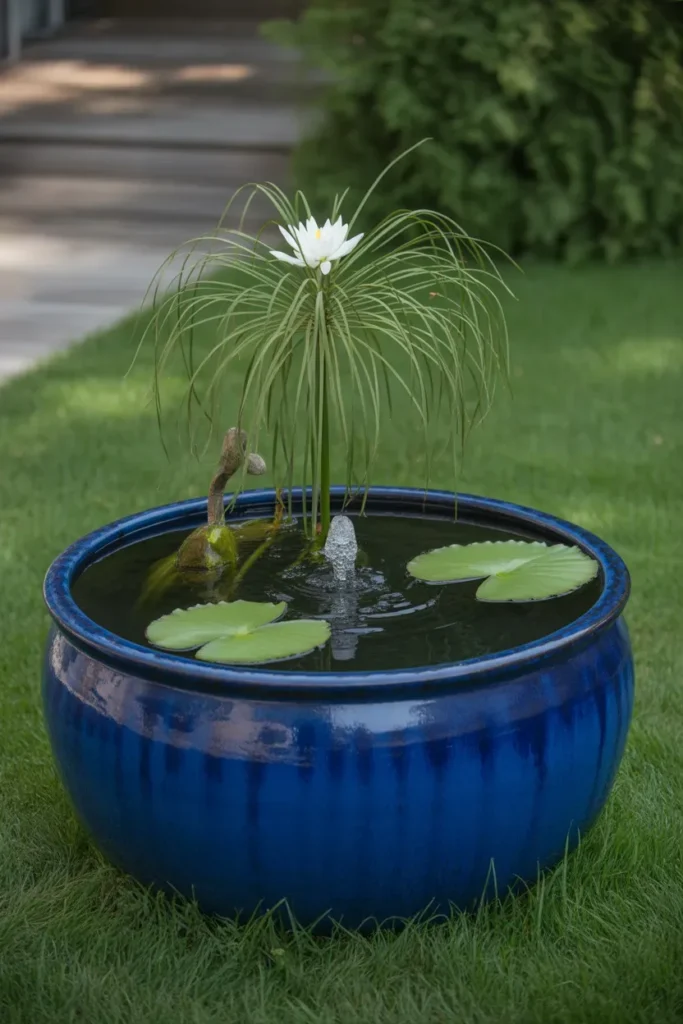
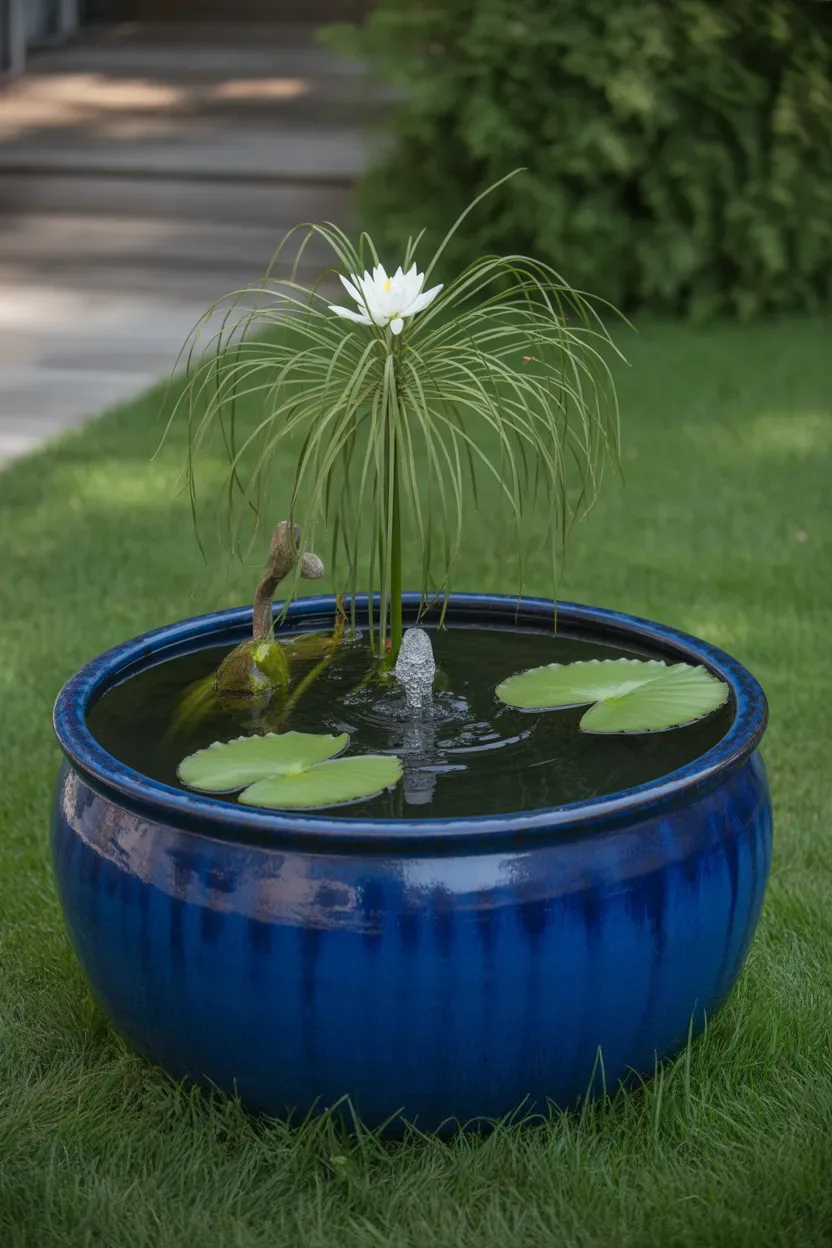
Imagine a peaceful backyard corner where a large glazed cobalt-blue pot holds still, dark water reflecting the sky above. A dwarf papyrus stands gracefully at center, a water lily floats on the surface, and a few trailing water plants soften the rim. A tiny solar-powered fountain creates a gentle trickle. The sound alone changes the feel of the entire yard.
Design Breakdown
Container water gardens are perhaps the most surprising and overlooked container gardening idea on this list — but they deliver an almost instant sense of calm and luxury that no amount of flowers can replicate.
Any watertight container can become a water garden:
- Large glazed ceramic pots (sealed inside)
- Half wine or whiskey barrels (lined with food-grade rubber liner)
- Large galvanized stock tanks
- Purpose-made decorative basins
Essential plants for a container water garden:
- Upright accent: dwarf papyrus, taro, cattail (dwarf variety)
- Floating plants: water lilies (miniature varieties like ‘Walter Pagels’), water hyacinth
- Oxygenators: anacharis (submerged to keep water clear)
- Trailing edge plants: creeping Jenny, water celery
No fish required. But if you want to control mosquitoes naturally, three or four small goldfish or mosquitofish in a large container will eat larvae without any chemical treatment.
Expert Tip
Place water plants on upturned bricks or pots inside the container so their roots are at the right depth. Most aquatic plants have specific depth requirements — a dwarf papyrus might want its roots 2-4 inches below the surface, while a water lily might want 6-12 inches.
Why It Works
Water features have been shown to reduce stress and create a sense of wellbeing — even small ones. The sound of moving water masks street noise and creates an acoustic privacy screen that’s as valuable as a visual one.
Best For
- Large patios and decks with room for a statement piece
- Anyone wanting a low-maintenance water feature without installing a pond
- Entertaining spaces that need a conversation-starting focal point
Common Mistake to Avoid
Placing the container in full shade. Aquatic plants, especially water lilies, need at least 6 hours of direct sun to bloom. A shaded water container quickly becomes a murky, algae-filled disappointment.
Quick Wins
- Add a solar-powered fountain for the sound and aeration (no wiring required)
- Change 25% of the water weekly to prevent algae buildup
- Choose miniature or dwarf varieties specifically labeled for container water gardens
- In cold climates, bring tropical aquatic plants inside before first frost
Related Garden & Outdoor Ideas
Love everything you’ve seen so far? Keep exploring with these hand-picked reads from the blog.
- Small Balcony Garden Ideas
- Vegetable Garden Ideas
- Garden Ideas
- Tiny Patio Ideas
- Outdoor Patio Ideas
- Front Porch Flower Pot Ideas
- Small Garden Design Ideas
- 10 Creative Ladder Herb Gardening Ideas on a Budget
Final Thoughts on Container Gardening Ideas
Here’s the thing about container gardening ideas: the barrier to entry is almost zero.
You don’t need a yard, a big budget, or a green thumb. You need a pot, some decent soil, the right plant for your conditions, and the willingness to try.
Of the ten ideas we walked through, the ones that tend to have the biggest impact the fastest are the tiered planter display for pure curb appeal, the herb window box for everyday practicality, and the succulent container garden for anyone who’s killed every plant they’ve ever owned and is ready for a win.
Pick just one this week. Not two, not all ten — just one. Go to your local nursery or hop on Amazon, grab a container and a few plants, and get your hands dirty. The satisfaction of stepping back and seeing a beautiful container garden you created yourself is genuinely one of the best feelings.
So — which of these container gardening ideas are you going to try first? Are you drawn to the drama of a statement urn, the practicality of a vegetable box, or the serenity of a water garden? Drop your pick in the comments below. I read every single one.
And if you’re looking for even more inspiration for your outdoor space, check out our guide to Outdoor Patio Ideas — it’s full of ideas that pair perfectly with a beautiful container garden.
One more thing: if you loved the water garden idea, you might also enjoy exploring outdoor pool design ideas — the two go hand in hand for creating a genuinely tranquil backyard retreat.