


This article was created in line with Trends Oraa’s research and content standards.
Your fence is the first thing people see. And right now, it’s probably doing nothing.
That blank stretch of wood or metal is wasted real estate — and it’s silently making your entire yard feel unfinished.
The good news? Turning a dull fence into a jaw-dropping focal point doesn’t require a big budget or a design degree. These garden fence decoration ideas will show you exactly how to do it — whether you have a tiny urban backyard, a sprawling suburban lot, or anything in between.
If you’ve been staring at that bare fence all season wondering where to start, this guide was made for you. We’re covering 10 stunning ideas, from easy DIY upgrades to lush vertical gardens that look straight out of a magazine. Scroll through and get ready to see your outdoor space in a whole new way.
You might also love our guide on Small Garden Design Ideas — packed with clever layouts and plant combinations that work in any size yard.
10 Garden Fence Decoration Ideas to Inspire Your Next Outdoor Makeover
Let’s get into it. Each idea below is fully broken down so you can visualize it, understand why it works, and actually pull it off.
Idea 1: Vertical Planter Wall Fence
What You’re Seeing
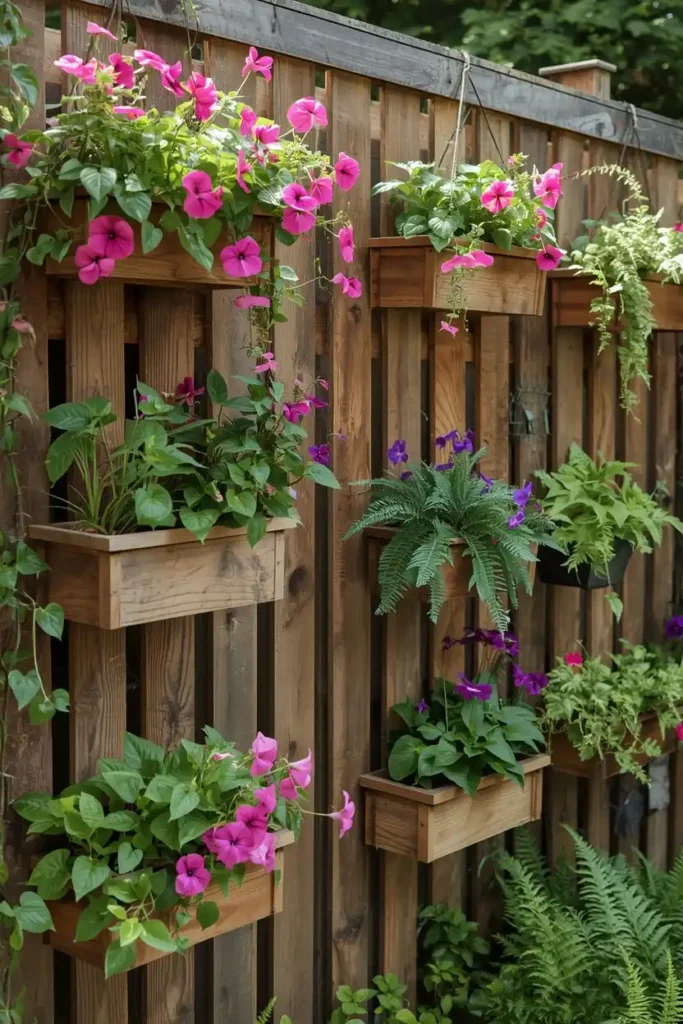
Picture a classic wood privacy fence completely transformed by rows of mounted planter boxes. Each box is filled with a mix of trailing vines, bright annuals like petunias in soft pinks and purples, and lush ferns. The greenery cascades downward while the structured boxes create a clean, intentional grid. It’s equal parts cottage garden and modern outdoor room.
Design Breakdown
Vertical planter walls turn a flat, forgettable fence into a living, breathing design element. You can use wooden window boxes, metal wall planters, or even repurposed pallets with fabric pockets. The key is layering — taller plants at the top, trailing varieties in the middle, and compact fillers below. This layering creates visual depth and makes the fence look intentional rather than decorated as an afterthought.
For wood fences, mount brackets directly into the fence boards. For metal or vinyl, use fence-clamp style brackets that don’t require drilling. Choose a consistent color for the planters — matte black, white, or natural wood — to keep the look cohesive.
Expert Tip
Don’t overcrowd the boxes. Three plant varieties per box is usually the sweet spot: one thriller (tall and dramatic), one filler (compact and full), one spiller (cascading). This combo always looks professionally styled.
Why It Works
Plants soften the hard edges of any fence, and a vertical planter wall adds height to the garden without taking up floor space. Psychologically, greenery makes outdoor spaces feel more private and calming — like a natural room outdoors.
Best For
- Small spaces
- Renters (removable mounting options available)
- Budget makeovers (window boxes are inexpensive)
Common Mistake to Avoid
Using heavy ceramic pots on fence-mounted brackets. They can pull the fence boards loose over time. Stick with lightweight plastic or fiberglass planters that look like something more expensive.
Quick Wins
- Start with just 3–5 planters and see how the scale feels before committing to more
- Choose drought-tolerant plants like succulents or lavender if you tend to forget watering
- Pair planters with trailing string lights for an evening ambiance upgrade
- Paint the fence a dark color (charcoal, navy) to make the planters pop
Idea 2: Hanging Lantern and String Light Display
What You’re Seeing
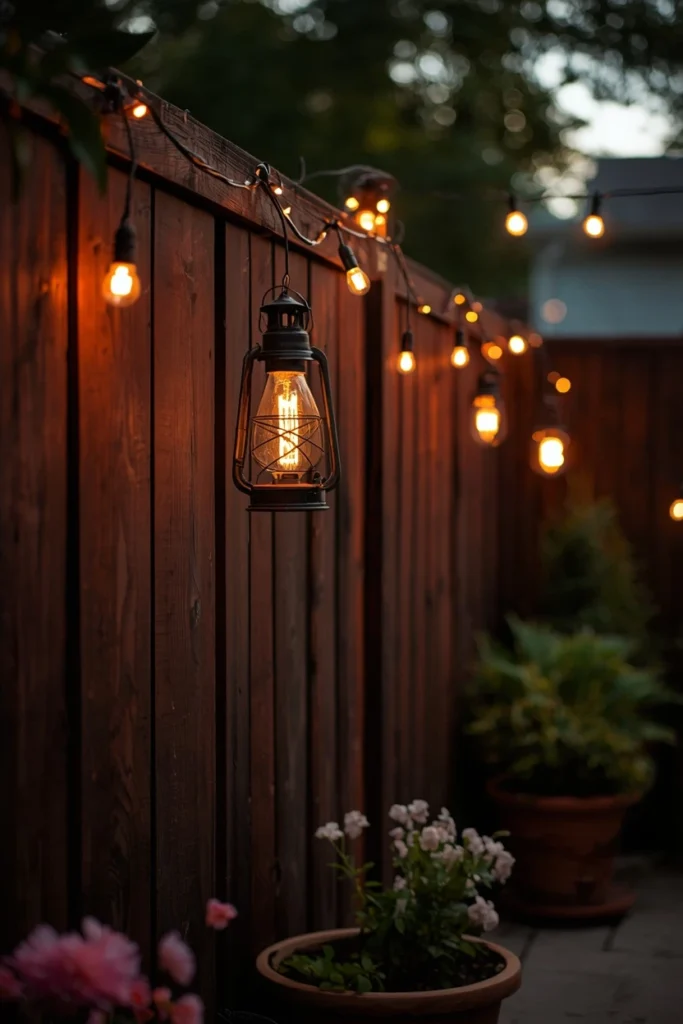
Imagine stepping into your backyard at dusk and seeing a warm, golden glow coming from a line of hanging lanterns strung along a wooden fence. Between the lanterns, Edison-style string lights zigzag in lazy loops, casting soft light across the whole space. There are no harsh shadows — just that warm, honeyed light that makes every evening feel like a dinner party.
Design Breakdown
This idea works on almost any fence type and requires almost no tools. The concept is layering two types of lighting: ambient (string lights) and accent (lanterns). String lights provide overall warmth and coverage, while lanterns create defined points of visual interest. You can use solar-powered lanterns, battery-operated ones, or plug-in versions with an outdoor extension cord.
For the string lights, use outdoor-rated café lights with warm white or amber bulbs — not cool white, which feels clinical outdoors. Hang them in swooping loops using screw hooks pushed into fence posts. For lanterns, use S-hooks or simple wire to hang them from the top rail.
Expert Tip
Vary the heights of your lanterns intentionally. Hanging some low and some high creates movement and makes the display feel curated rather than uniform. Odd numbers of lanterns (3, 5, 7) almost always look better than even numbers.
Why It Works
Lighting is one of the most underrated elements of outdoor design. A well-lit fence extends your outdoor living time well into the evening, makes the space feel larger, and adds enormous warmth. The return on investment for string lights and lanterns is arguably the highest of any outdoor décor purchase.
Best For
- Renters (no permanent modifications needed with the right hooks)
- Budget makeovers (solar string lights are incredibly affordable)
- Families (creates a magical, safe evening atmosphere)
- Entertaining spaces
Common Mistake to Avoid
Using cool-white LED string lights. They create a harsh, sterile look outdoors. Always choose warm white (2700K–3000K) for garden lighting.
Quick Wins
- Solar café lights eliminate the need for extension cords
- Layer lanterns of different sizes for a more interesting display
- Add weather-resistant candles inside lanterns for extra ambiance
- Cluster lanterns at a seating area focal point for maximum impact
Most people don’t know this: The spacing of your string lights matters more than the quantity. A single strand hung in wide, generous loops looks far more elegant than three strands hung tight and straight. Give your lights room to breathe, and the whole fence transforms.
Idea 3: Climbing Rose or Vine Trellis Fence
What You’re Seeing
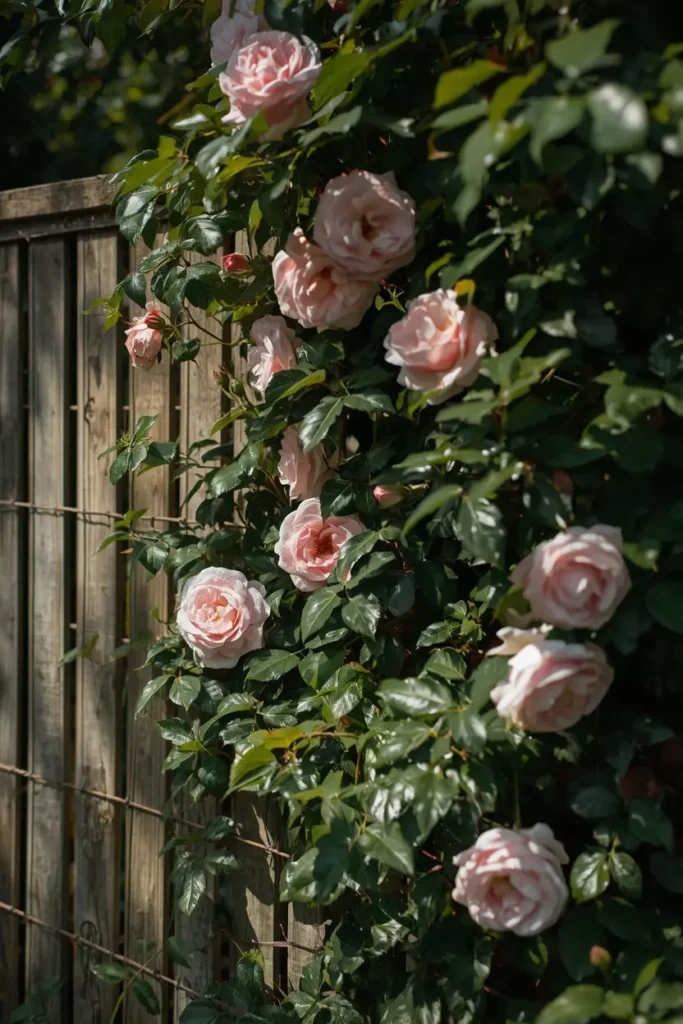
Visualize the difference a climbing rose makes on a bare fence. Where once there was just flat wood, now there’s an explosion of soft pink blooms, dark green glossy leaves, and gently arching canes weaving through a simple wood or wire trellis. The scent alone changes the entire mood of the garden. It looks like it took decades to grow — and with the right variety, it can look this lush in just two or three seasons.
Design Breakdown
A trellis doesn’t need to be elaborate. A simple grid of horizontal wires stapled between fence posts is enough to train a climbing rose, jasmine, clematis, or wisteria. The key is choosing the right plant for your climate and light conditions. Climbing roses need at least 6 hours of sun. Clematis thrives in partial shade. Wisteria is breathtaking but vigorous — plant it only where you want permanent, aggressive coverage.
Attach wire horizontally at 12-inch intervals up the fence, using staples or vine eyes screwed into posts. As the plant grows, gently tie new growth to the wire with soft garden twine. This guides the plant outward rather than straight up, encouraging fuller coverage.
Expert Tip
Plant climbers at least 12 inches away from the fence base. This prevents root competition with fence posts and gives you access to the base of the fence for maintenance. Lean the plant toward the fence when planting and use a bamboo cane to bridge the gap initially.
Why It Works
Living fences are the ultimate blend of privacy, beauty, and biodiversity. Flowering climbers attract pollinators, provide nesting cover for birds, and soften hard boundaries in a way no artificial decoration can replicate. There’s also a long-term value here — an established climbing rose or jasmine becomes a permanent, low-maintenance feature that adds real value to the property.
Best For
- Large spaces
- Luxury homes
- Families with garden beds along the fence line
- Long-term homeowners
Common Mistake to Avoid
Planting climbers directly against a wooden fence without a trellis. The stems trap moisture against the wood and accelerate rot. Always create a gap between the plant and the fence surface.
Quick Wins
- Start with fast-growing annual climbers (morning glory, black-eyed Susan vine) while perennial climbers establish
- Use metal fence panels as a built-in trellis for instant coverage
- Choose thornless climbing roses if you have children or pets
- Mix climbers for multi-season interest (spring clematis + summer rose + fall jasmine)
You May Also Like:
- DIY Fence Ideas
- Small Balcony Garden Ideas
- Vintage Garden Decor Ideas
- Garden Bird Feeders Ideas
- DIY Garden Trellis Ideas
Most people waste more space than they realize. That top rail of your fence? It can hold a window box planter. The lower section? Perfect for mounted art, a birdhouse, or a pocket planter. From bottom to top, your fence is a vertical canvas that most homeowners leave completely blank.
Idea 4: Reclaimed Wood Art and Sculptural Accents
What You’re Seeing
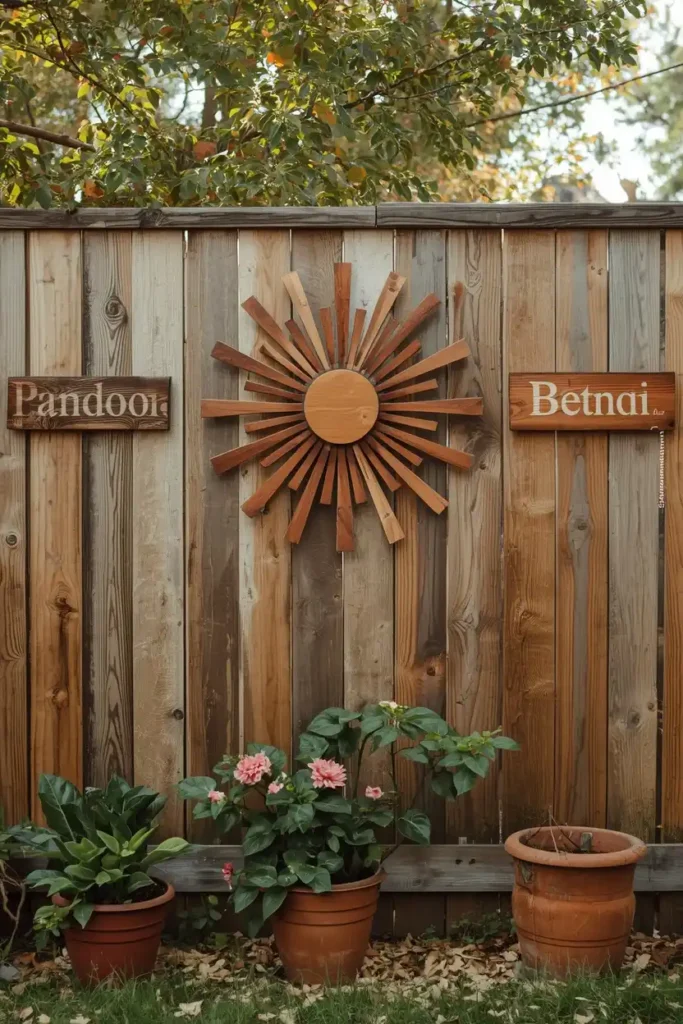
Think of a weathered cedar fence with large wooden sunburst art pieces mounted at intervals. Between them, smaller wooden signs with hand-lettered botanical names of the plants below. The whole display has a handcrafted, artisanal quality that feels deeply personal and specific to this particular garden. No two accents are identical, but together they form a cohesive gallery wall — just outdoors.
Design Breakdown
Garden wall art transforms a fence from a boundary into a backdrop. The most impactful approach is treating the fence like an indoor gallery wall — varying the scale of pieces, maintaining consistent color tones or materials, and spacing pieces with intention rather than randomly.
Reclaimed wood art is especially compelling because it harmonizes with the natural garden environment. You can find pieces at antique markets, flea sales, or make your own with basic woodworking. Metal garden art — geometric sunbursts, botanical cutouts, abstract forms — also works beautifully and weathers to a gorgeous patina over time.
For mounting, use weatherproof screws or heavy-duty outdoor adhesive strips. Always check the fence’s structural integrity before mounting anything heavy.
Expert Tip
When creating a gallery wall on a fence, start with the largest piece in the center and work outward. Cut paper templates of each piece and tape them to the fence first to nail the layout before committing to drilling.
Why It Works
Art personalizes a space in a way plants and lights can’t quite replicate. It tells visitors something about the homeowner’s taste and creates visual anchors that draw the eye around the garden. A well-curated fence gallery wall becomes the definition of outdoor living done with intention.
Best For
- Medium to large spaces
- Homeowners with a strong design sensibility
- Budget makeovers (DIY reclaimed wood art is extremely affordable)
Common Mistake to Avoid
Using indoor artwork outdoors. Always verify that any piece mounted outdoors is rated for exterior use or properly sealed. Unprotected MDF or indoor metals will deteriorate quickly.
Quick Wins
- A single large statement piece makes more impact than many small pieces scattered randomly
- Seal all wooden art pieces with exterior varnish or teak oil annually
- Mix 2D art with 3D sculptural elements for visual texture
- Coordinate art colors with your fence color for a curated look
Which of these ideas so far is jumping out at you? The planters, the lights, the climbers, or the art? Let me know in the comments — I love hearing which direction readers are leaning.
Idea 5: Mirror and Metalwork Fence Accents
What You’re Seeing
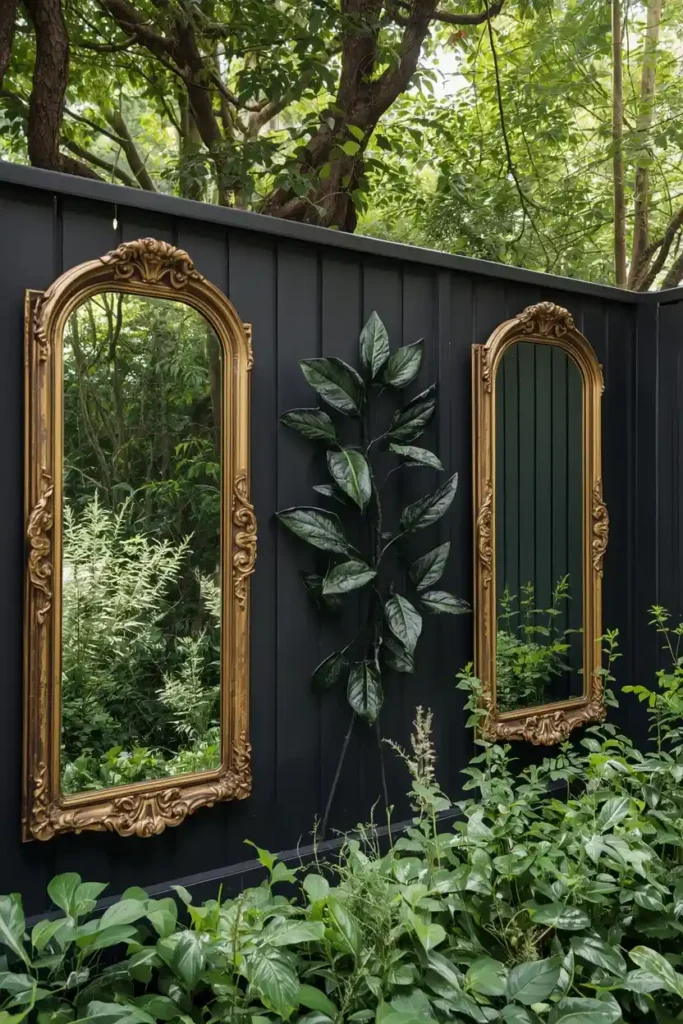
Picture a small city garden where a dark-painted fence holds three large outdoor mirrors in aged gold frames. The mirrors reflect a lush border planting back into the space, effectively doubling the visual depth of the garden. Interspersed between them are wrought-iron botanical wall hangings — delicate outlines of leaves and flowers that cast dramatic shadows as the sun moves. The fence feels like a feature wall in an upscale boutique hotel.
Design Breakdown
Outdoor mirrors are one of design’s best-kept secrets for small spaces. By reflecting the garden back on itself, they create the illusion of a much larger space. They also bounce light into shaded corners. Use acrylic mirrors or glass mirrors rated for outdoor use (standard glass mirrors will delaminate in moisture). Frame them in weather-resistant materials — teak, powder-coated metal, or sealed stone.
Pair mirrors with metalwork accents — forged iron botanical art, geometric sculptures, or copper plant markers — to add contrast in texture and material. The combination of reflective and matte finishes creates a layered, sophisticated look.
Expert Tip
Position outdoor mirrors carefully. Never place them where they’ll reflect harsh direct sun toward a seating area, and avoid angles that reflect the house back at you (it breaks the garden illusion). The best placement reflects plants and sky.
Why It Works
Mirrors in garden design exploit a fundamental psychological trick: the brain interprets reflected space as real space. A well-placed mirror can make a 10-foot-wide garden bed feel twice as deep. Combined with metalwork that creates dynamic shadow play, this idea turns a plain fence into a genuinely theatrical design element.
Best For
- Small spaces (transformative for tiny gardens)
- Urban gardens with limited square footage
- Luxury homes
Common Mistake to Avoid
Using standard indoor mirrors outdoors. They delaminate within months in outdoor humidity. Always source mirrors specifically rated for exterior use.
Quick Wins
- Group an odd number of mirrors (3 or 5) for the most natural-looking display
- Use mirrors to brighten shaded fence sections
- Combine with climbing plants that will eventually frame the mirrors naturally
- Clean outdoor mirrors with a damp cloth and mild soap — avoid abrasive cleaners
One thing I’ve learned from years of designing outdoor spaces: mirrors are the single highest-impact, lowest-effort transformation available for small gardens. A pair of well-placed outdoor mirrors can make a 12-foot fence look like it opens onto a larger garden beyond. If you’re working with a compact space, this is the idea to start with. The key is placement — reflect your best plants, not your patio furniture or the shed.
Idea 6: Herb and Edible Garden Fence Wall
What You’re Seeing
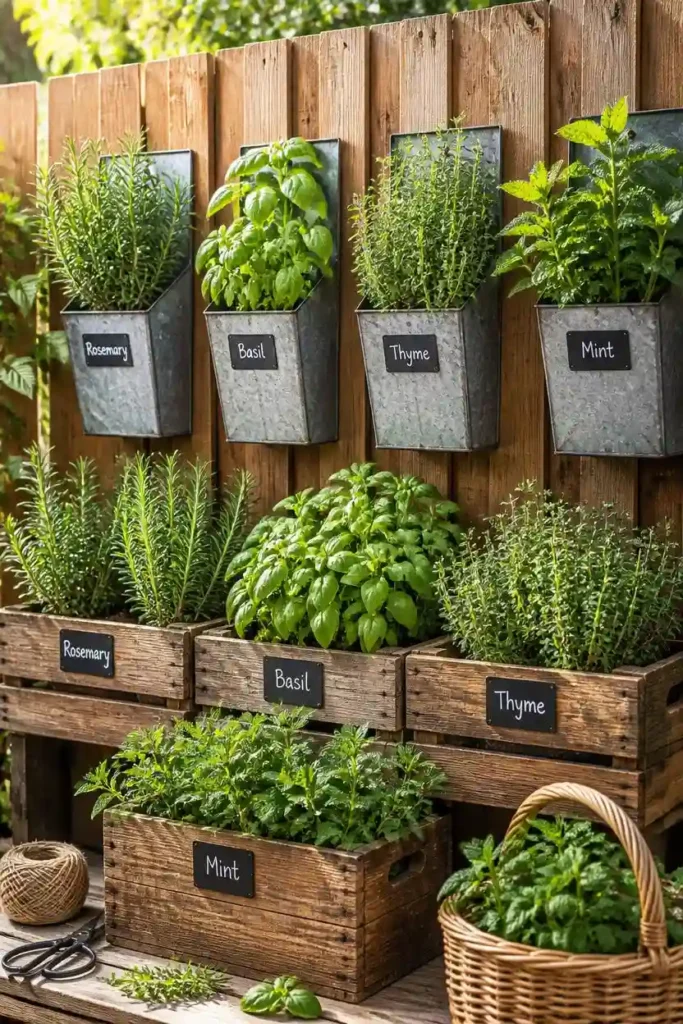
Visualize a sunny backyard fence lined with tiered hanging wooden crates, each planted with a different culinary herb. Rosemary spills over one edge. Basil creates a dense, fragrant mass in another. Mint, thyme, and chives fill in between. A small chalkboard sign on each crate identifies the herb in elegant script. The whole display is organized, aromatic, and intensely practical.
Design Breakdown
An edible fence wall combines beauty with function in a way few garden features can match. You’re essentially creating a vertical herb garden that looks stunning, smells incredible, and provides daily culinary ingredients just steps from the kitchen door.
The structure can be as simple as wooden wine crates, galvanized metal buckets, or terra cotta wall planters mounted at varying heights. Ensure adequate drainage — each container needs holes in the bottom, and you may want to add a small gravel layer beneath the potting mix to prevent waterlogging.
Sun exposure matters enormously here. Most culinary herbs need 6–8 hours of direct sun. If your fence is in partial shade, focus on shade-tolerant herbs like mint, parsley, chervil, and Vietnamese coriander.
Expert Tip
Mount your herb containers at a comfortable harvesting height — around waist to chest level. It sounds obvious, but many people mount containers too high or too low and end up rarely using them. Accessibility directly impacts how often you’ll actually cook with fresh herbs.
Why It Works
Beyond aesthetics, edible fence gardens solve a real problem: most home cooks want access to fresh herbs but don’t have the garden space or time for a dedicated herb bed. A fence-mounted herb garden puts fresh rosemary, thyme, and basil within arm’s reach without sacrificing a square foot of garden space.
Best For
- Small spaces
- Families (kids love harvesting herbs)
- Budget makeovers (herbs are inexpensive and fast-growing)
- Urban gardeners
Common Mistake to Avoid
Mixing mint with other herbs in shared containers. Mint is extremely invasive and will take over. Always give mint its own pot.
Quick Wins
- Start with just three herbs you actually cook with regularly
- Self-watering fence planters dramatically reduce maintenance
- Harvest herbs frequently — it encourages bushy growth
- Label each container with a weatherproof chalkboard or metal plant stake
The next idea is one designers secretly love — and it’s one most homeowners never consider for their fence. It’s simple, it’s dramatic, and it costs almost nothing.
Idea 7: Painted Mural or Stencil Fence Art
What You’re Seeing
Picture a solid wooden fence painted in a deep sage green, with a hand-painted botanical mural spanning the full width. Overscale fern fronds and monstera leaves in lighter greens and creams create a jungle-like backdrop behind a simple seating area. The mural gives the impression of a lush forest beyond the fence — transforming a flat boundary into a theatrical scene. Even on a still day, the garden feels alive.
Design Breakdown
A painted mural or stencil pattern transforms your fence from a boundary into a destination. You don’t need to be an artist. Botanical stencils are widely available and make it easy to create an overscale, professional-looking design with just exterior paint and a foam roller.
For a freehand mural, sketch the design in chalk first (it wipes off) and then paint in sections. Simple designs — botanicals, geometric patterns, abstract shapes — are the most approachable for non-artists. The most effective murals use just two or three colors for a cohesive look.
Use exterior-grade latex paint rated for outdoor surfaces. For fences, a satin or eggshell finish holds up better to weather than flat paint and is easier to clean.
Expert Tip
Scale is everything with fence murals. Go bigger than you think looks right. Overscale botanical prints (leaf or flower motifs 12–24 inches wide) look dramatically more intentional than small, timid stencil patterns. When in doubt, make each element larger.
Why It Works
A mural transforms the psychological experience of a garden. Instead of a fence that says “this is where the space ends,” a painted scene says “this is where the experience begins.” It creates a visual destination that makes the garden feel curated and immersive rather than accidental.
Best For
- Renters who have landlord permission to paint
- Budget makeovers (exterior paint is inexpensive)
- Urban gardens with blank walls or fence panels
- Homeowners who want a dramatic transformation on a small budget
Common Mistake to Avoid
Using interior paint for a fence mural. It will peel and fade within a single season. Always use exterior-grade paint rated for direct sun exposure.
Quick Wins
- Prime the fence first for better paint adhesion and truer colors
- Start with a simple two-color geometric pattern if botanical murals feel daunting
- Add a clear exterior varnish over the finished mural for longevity
- Revisit and touch up annually before the outdoor season begins
You May Also Like:
The Complete Fence Decoration Planning Guide
Before you dive into any of these garden fence decoration ideas, it helps to have a clear plan. This section will walk you through everything you need to consider — so you don’t waste money, make irreversible decisions, or end up with a fence that looks worse than it did before.
Step 1: Know Your Fence Material
Different fence materials have different constraints.
- Wood fences: Most versatile. Can be painted, drilled into, have brackets mounted, and can support significant weight. Requires the most maintenance (annual sealing or painting).
- Vinyl fences: Can’t be drilled without cracking. Use clamp-style attachments or over-rail hooks. Paint doesn’t adhere well without a dedicated vinyl primer.
- Metal/chain link: Great for mounting via wire or zip ties. Works beautifully as a built-in trellis for climbers. Hard to paint without special metal primer.
- Aluminum/wrought iron: Decorative fences that benefit most from climbing plants and hanging lanterns rather than mounted planters.
Step 2: Assess Sun Exposure
This single factor determines what plants will thrive on your fence.
- Full sun (6+ hours direct sun): Climbing roses, most herbs, sun-loving annuals, lavender, wisteria
- Partial shade (3–6 hours sun): Clematis, ferns, impatiens, shade-tolerant herbs (mint, parsley)
- Full shade (less than 3 hours): Boston ivy, hostas, ferns, shade-loving ferns, and mostly non-plant décor
Step 3: Set a Realistic Budget
Here’s a general cost breakdown for each approach:
| Decoration Idea | Budget Range | Notes |
|---|---|---|
| String lights (solar) | $20–$60 | Easiest entry point |
| Hanging lanterns (3–5) | $30–$80 | Solar or battery |
| Vertical planters (5 boxes) | $50–$150 | DIY lowers cost significantly |
| Herb garden setup | $40–$100 | Includes containers and starter plants |
| Climbing rose + trellis | $50–$120 | Long-term investment |
| Mural/stencil painting | $30–$80 | Mostly labor, minimal materials |
| Outdoor mirrors (2–3) | $80–$200 | Higher-end option |
| Reclaimed wood art | $0–$100 | DIY potential is high |
Step 4: Think About Maintenance Honestly
This is where many homeowners make a mistake. They install a stunning vertical garden that requires daily watering and then watch it die by August.
Ask yourself:
- How much time can I realistically dedicate to maintenance each week?
- Do I travel or have periods away from home?
- Is there an outdoor water source nearby for easy watering?
If maintenance time is limited:
- Choose drought-tolerant plants (succulents, lavender, sedum)
- Invest in self-watering planters
- Prioritize non-plant decorations (lights, mirrors, art) in high-maintenance zones
Step 5: Consider Your Fence’s Structural Condition
Before mounting anything on your fence, check its condition honestly. A fence with rotting posts or compromised boards won’t hold planters safely and will look worse with decorations highlighting its flaws. Repair or replace problem sections before decorating.
Common Planning Mistakes to Avoid
- Buying too many small items. A dozen small decorations scattered randomly look cluttered. Three to five larger, intentional pieces look designed.
- Ignoring scale. What looks great in an Instagram photo at a large estate will look tiny against your 6-foot privacy fence. Always consider how pieces will actually look in your specific space.
- Forgetting seasonal changes. Your fence decoration should look good year-round, not just in peak summer. Think about how it will look in winter — lights and art stay beautiful, bare annual planters do not.
- Neglecting the neighbor’s view. If your fence is the boundary between properties, what does your decoration look like from the other side? Considerate design always wins points with neighbors.
Idea 8: Birdhouse and Wildlife Habitat Fence Display
What You’re Seeing
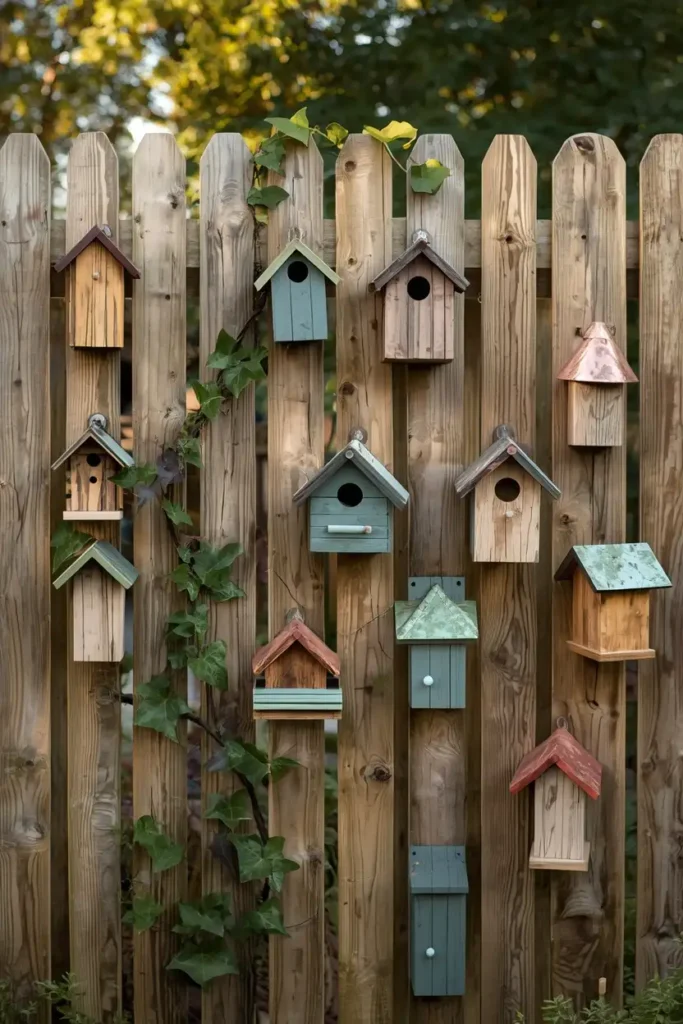
Think about a tall wooden fence with a collection of handcrafted birdhouses mounted at varying heights — some painted in muted pastels, others left in natural unpainted wood, a few with copper roofs that have developed a gorgeous green patina. Between the birdhouses, small bat boxes and insect hotels fill in the gaps. Trailing ivy weaves between the mounted pieces, softening the transitions. It’s a fence that feels alive in every sense of the word.
Design Breakdown
A wildlife habitat fence wall serves double duty as beautiful garden décor and a meaningful contribution to local biodiversity. Birdhouses attract cavity-nesting birds like bluebirds, wrens, and chickadees. Bat boxes provide shelter for insectivores that naturally control garden pests. Insect hotels give beneficial insects a habitat — including the pollinators that keep your garden productive.
For maximum impact, mount your wildlife features at appropriate heights:
- Bluebird boxes: 5–6 feet high, facing open space
- Wren houses: 6–10 feet high, near shrubs
- Bat boxes: 10–15 feet high in full sun (the higher, the better)
- Insect hotels: 3–4 feet high, sheltered from rain
Group birdhouses in a visually intentional arrangement — not perfectly uniform but organized around a visual center point.
Expert Tip
Not all birdhouses are functionally appropriate for actual nesting. If you want birds to actually use your houses (rather than just decorating with them), match the entrance hole diameter to specific species. Bluebirds need 1.5-inch holes. Wrens need 1.25 inches. Chickadees need 1.25 inches. Houses with holes larger than 2 inches attract house sparrows, which can displace native species.
Why It Works
Ecologically meaningful design has become a major trend in garden thinking — and for good reason. A wildlife fence doesn’t just look beautiful; it actively improves the garden ecosystem. Birds and bats control insect pests. Pollinators boost the productivity of flowering plants. The garden becomes a functioning ecosystem rather than just a decorative space.
Best For
- Families with children (educational and engaging)
- Large spaces
- Homeowners committed to sustainable gardening
- Gardens with existing bird-friendly plantings
Common Mistake to Avoid
Mounting birdhouses without considering the cleaning access. Birds won’t reuse dirty houses. Choose or build houses with a hinged or removable panel for annual cleaning. Clean each house in early spring before nesting season begins.
Quick Wins
- Start with a single wren house — wrens are easy to attract and delightful to watch
- Position birdhouses away from areas with frequent human traffic
- Add a fence-mounted bird bath nearby to attract more species
- Plant berry-producing shrubs along the fence to provide a natural food source
Here’s where it gets interesting: combining a birdhouse display with a climbing plant that provides natural cover (like native Virginia creeper or climbing hydrangea) creates a complete habitat in a single fence panel. Birds are attracted to both the nesting boxes AND the shelter the plants provide, making your fence the most popular real estate in the garden.
Idea 9: Coastal and Nautical Fence Decor
What You’re Seeing
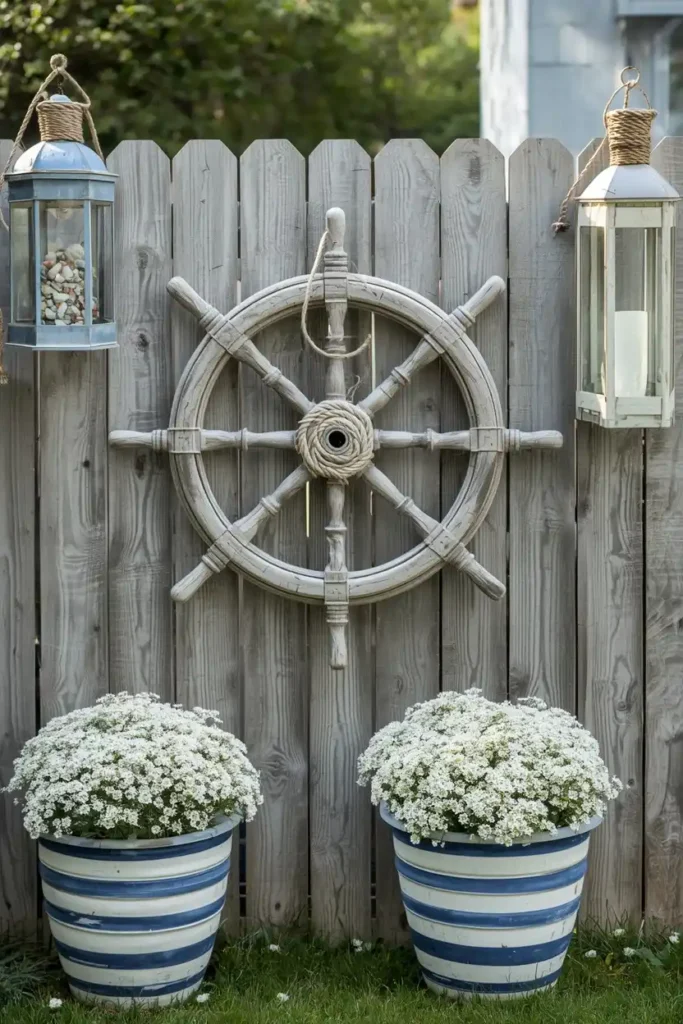
Close your eyes for a moment. You’re in a backyard that feels like it belongs to a beach house — even if it’s 200 miles from the nearest coastline. A weathered gray fence is decorated with starfish, drift-wood-style signs, rope-wrapped lanterns, and an overscale ship’s wheel mounted as a centerpiece. Sea glass pieces hang from simple fishing wire in clusters, catching the light like wind chimes. Blue-and-white striped planters hold cascading white alyssum and silvery dusty miller. The whole scene smells like the sea, even if that’s just the rosemary in the herb box nearby.
Design Breakdown
Coastal and nautical themes translate beautifully to fence decoration because they’re built around a cohesive material palette: weathered wood, rope, metal with a salt-aged patina, and white or blue paint. The rules are simple — stay within the palette, vary the textures, and embrace a slightly worn, sun-bleached aesthetic.
Key materials include: rope (for wrapping, hanging, and bordering), driftwood (sourced or simulated with gray-stained wood), shells and sea glass (as hanging displays or embedded in planters), and weathered metal (ship wheels, anchors, coastal signs).
Keep the color palette tight: white, navy, weathered gray, natural rope tan, and soft sage green for any plantings. These five colors in varying combinations will look cohesive and intentional.
Expert Tip
The secret to coastal décor that looks genuine rather than kitschy is restraint. One large statement piece (a ship’s wheel or overscale driftwood mirror) does more than a dozen small shells scattered randomly. Edit ruthlessly and let each piece breathe.
Why It Works
Coastal themes tap into deeply positive associations — vacation, relaxation, openness, warmth. A fence decorated in a coherent nautical style extends those psychological benefits into your everyday backyard experience. Even on a Monday morning, looking out at this fence feels like a small escape.
Best For
- Medium to large spaces
- Homes near water (or those that wish they were)
- Budget makeovers (many coastal pieces can be DIYed or found at thrift stores)
- Renters (most pieces can be hung without permanent modifications)
Common Mistake to Avoid
Overcrowding with too many individual small pieces. Coastal décor easily tips into cluttered if you’re not editing. Follow the one-large-one-medium-one-small rule per fence panel.
Quick Wins
- Rope wrapped around lantern hooks instantly adds nautical texture
- Whitewashed wood art weathers beautifully and requires no maintenance
- Blue-and-white striped fabric accents in cushions or planters reinforce the theme
- Natural sea grass or rope doormats near a fence gate complete the story
This simple change can completely transform the room — or in this case, the yard. Sometimes it’s not about adding more to a fence, but about committing to one strong, cohesive theme and executing it with intention. Coastal decor, like the next idea, proves that consistency beats quantity every single time.
Idea 10: Seasonal Wreath and Garland Fence Gallery
What You’re Seeing
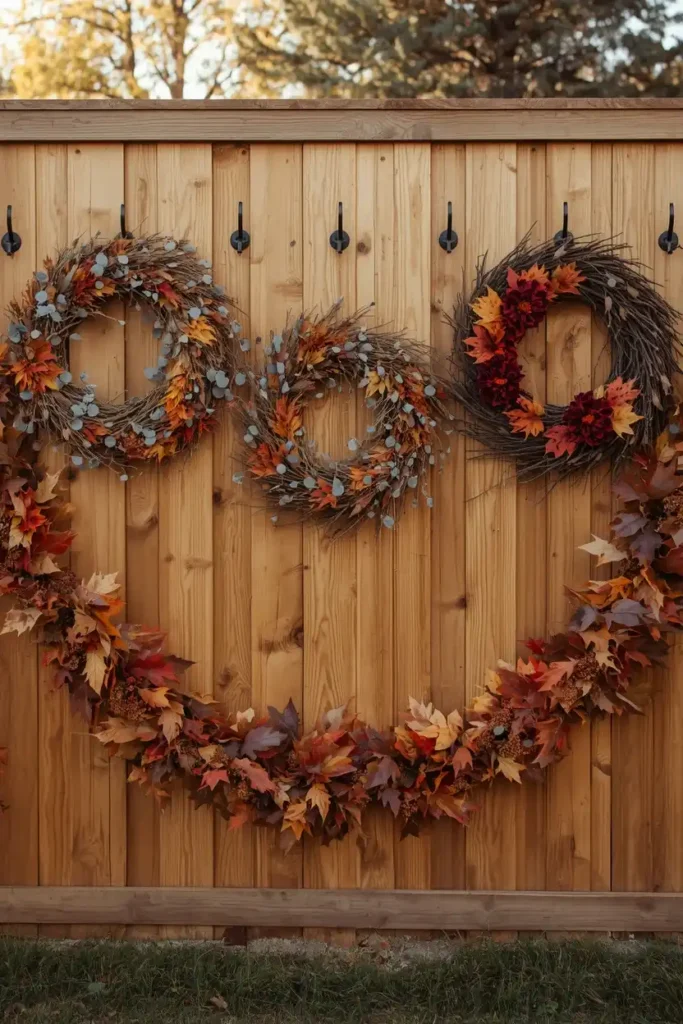
Visualize a simple wooden fence in late autumn, dressed with a row of three oversized wreaths made from dried eucalyptus, rust-colored maple leaves, and deep burgundy dahlias. The wreaths are spaced evenly along the fence and hang from simple matte black hooks. Trailing faux-autumn garland connects each wreath with a loose swag. By December, the same hooks hold evergreen wreaths with pine cones and red ribbon. By March, pastel spring wreaths with blooms take over. The fence becomes a living calendar of the seasons.
Design Breakdown
A seasonal wreath gallery is the most flexible and arguably the most impactful fence decoration strategy because it changes with the year. You’re never stuck with a single look, and each season feels fresh, intentional, and celebratory.
The infrastructure is simple: a set of high-quality, weatherproof wreath hooks in a consistent finish (matte black is the most versatile). From there, swap in wreaths seasonally — a mix of fresh, dried, and faux wreath materials depending on your budget and maintenance preferences.
For the most cohesive look, use three or five wreaths of the same diameter (24–30 inches work well on standard fence panels). Connect them with matching garland for a fuller, more intentional display. Keep the hook style and placement consistent so swapping is quick and the display always looks organized.
Expert Tip
Invest in a small collection of high-quality wreath forms and bases, then change the materials seasonally. A good grapevine wreath base ($8–12 each) can be redressed four times a year with seasonal picks, berries, and blooms — and it looks dramatically more expensive than buying new wreaths each season.
Why It Works
Seasonal decoration is one of the most powerful ways to make a home feel alive and cared for. It signals that someone pays attention — to the season, to the detail, to the experience of coming home. A seasonal wreath gallery on the fence is visible to neighbors and passersby, contributing to curb appeal and that elusive sense of “this home is loved.”
Best For
- Families (seasonal changes become part of family traditions)
- Renters (no permanent modifications needed)
- Small and large spaces alike
- Homeowners who love changing their décor seasonally
Common Mistake to Avoid
Leaving a seasonal wreath up long past its season. A Halloween wreath in December says “I got busy,” not “I have great taste.” Set a calendar reminder to swap wreaths at each seasonal transition.
Quick Wins
- Grapevine wreath bases are the most versatile foundation — they work in every season
- Faux greenery wreaths last years and look as good as fresh with quality picks added
- Match wreath colors to your fence paint for a designer-level coordinated look
- Add ribbon or a bow that ties into your outdoor cushion colors for cohesion
Related Garden and Outdoor Ideas
If these garden fence decoration ideas have you in the mood to transform your whole outdoor space, don’t stop here. We’ve got a whole library of inspiration waiting for you.
- Small Garden Design Ideas
- Vintage Garden Decor Ideas
- Outdoor Patio Ideas
- Tiny Garden Ideas
- Balcony Garden Ideas
- Small Balcony Garden Ideas
- DIY Fence Ideas
- Garden Ideas
Your Fence Is Ready for Its Moment
You’ve just seen 10 genuinely transformative ways to bring your garden fence to life — from lush vertical planters and climbing roses to coastal-themed displays and seasonal wreath galleries. Each idea is different in budget, scale, and style, but they all share one thing: they make your fence a feature instead of a footnote.
If you’re feeling overwhelmed by the options, here’s my advice: pick just one idea and commit to it this week. Not next season — this week. Even starting small (a single set of solar string lights, one mounted planter, or a coat of exterior paint) creates immediate momentum and instantly makes the space feel more intentional.
The most impactful starting points? Honestly, it depends on your space — but if I had to choose one idea for maximum impact with minimal investment, it’s the string lights and lanterns. They require zero tools, very little money, and they transform the feel of your garden every single evening.
What’s your biggest challenge with your current outdoor fence situation? Is it a budget limitation, a maintenance question, or just not knowing where to start? Drop it in the comments below — I read every single one and love helping readers figure out their specific situation.
And if you’re still craving more outdoor inspiration after all this, head over to our Outdoor Patio Ideas guide — because once your fence looks this good, the rest of your outdoor space will want to catch up.
One more thing before you go: if you loved these garden fence decoration ideas, wait until you see what’s possible with a plain garden shed. The same principles — lighting, plants, art, seasonal décor — apply, and the results are even more dramatic. That guide might just be the one that changes everything for your outdoor space.